
Backyard Before & After: A Smart Patio Transformation
The Vision: Reclaiming a Neglected South-Facing Patio
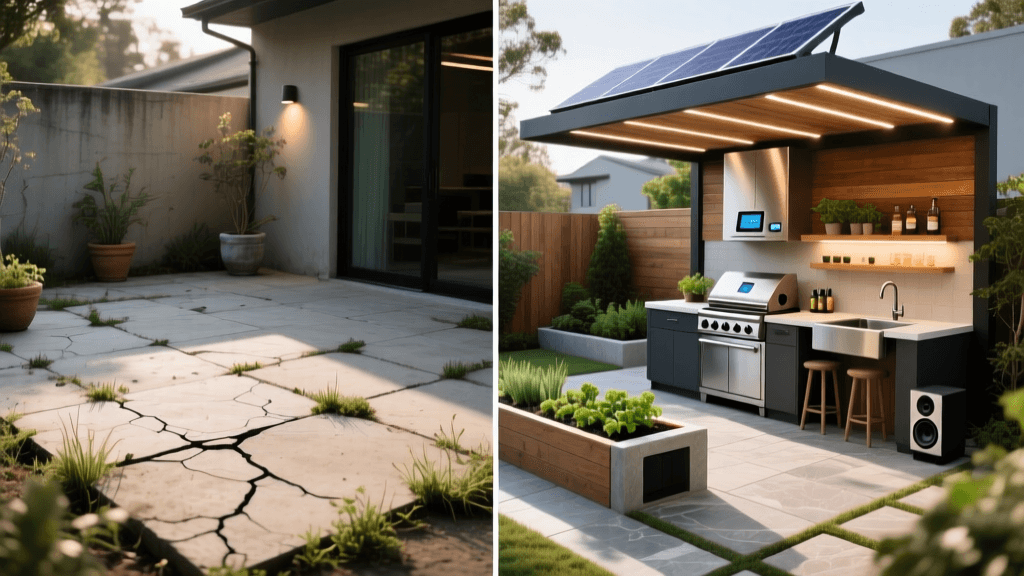
Every homeowner has that one outdoor space that feels like a missed opportunity. For us, it was a 15-by-20-foot cracked concrete slab sitting on the south side of our house. The 'before' state was dismal: the concrete was heaved by tree roots, puddled after every rainstorm, and offered zero shade. Because it was south-facing, the slab absorbed and radiated heat directly into our home's living room during the summer, forcing our air conditioning to work overtime. Our goal was a complete before and after transformation that bridged indoor and outdoor living, integrated smart home technology, and embraced energy-efficient landscaping and garden-to-table cooking. Over the course of three weekends and a strictly managed $4,500 budget, we transformed this barren heat-trap into a stunning, multi-functional outdoor kitchen and smart garden oasis. Here is the step-by-step breakdown of how we achieved this dramatic backyard makeover.
Phase 1: Demolition and Energy-Efficient Hardscaping
The first step in any major before and after transformation is demolition. We rented an electric jackhammer for the weekend to break up the 4-inch-thick concrete slab. Instead of sending the rubble to a landfill, we repurposed the broken concrete chunks as a base layer for our new retaining wall, saving roughly $300 in disposal and material fees.
Installing Permeable Pavers
Concrete runoff is a major issue for suburban watersheds. To address this, we opted for Belgard Aqua Roc permeable pavers. Unlike traditional hardscaping, these pavers feature widened joints filled with crushed stone, allowing rainwater to percolate back into the groundwater table rather than overwhelming municipal storm drains. We excavated an additional 8 inches of soil to create a proper sub-base: 4 inches of crushed gravel for drainage, 2 inches of bedding sand, and the pavers on top. This not only solved our puddling problem but also created a level, elegant foundation for our new outdoor living space.
Strategic Shading for Energy Efficiency
To combat the solar heat gain affecting our home's interior, we needed natural shade. According to the U.S. Department of Energy, strategic landscaping and tree planting can reduce a home's air conditioning costs by up to 25 percent. We planted a mature, 12-foot Red Maple (Acer rubrum) approximately 15 feet away from the south-facing windows. Deciduous trees are the ultimate energy-efficient landscaping tool: their dense canopy provides deep shade during the scorching summer months, while their bare branches in winter allow passive solar heating to warm the home.
Phase 2: The Garden-to-Table Raised Beds
No outdoor living space is complete without a connection to nature and fresh food. We constructed two 4-by-8-foot raised garden beds using untreated, rough-sawn cedar. Cedar is naturally resistant to rot and insects, eliminating the need for chemical sealants that could leach into our food supply.
The Perfect Soil Mix
The secret to a thriving garden-to-table setup is the soil. We avoided cheap topsoil and instead mixed our own high-performance growing medium based on the square-foot gardening method. The ratio was simple: one-third coarse vermiculite for moisture retention, one-third peat moss (mixed with lime to balance pH) for structure, and one-third organic compost for nutrients. According to guidelines supported by the U.S. Department of Agriculture, building healthy, organic soil structure is the foundation of sustainable agriculture and reduces the need for synthetic fertilizers. This single soil preparation step ensured our tomatoes, basil, and bell peppers would yield a massive harvest in the very first season.
Phase 3: Smart Irrigation Integration
In the 'before' state, we relied on a wasteful, manual oscillating sprinkler that watered the weeds and the fence just as much as the grass. For the 'after' state, we integrated a smart home irrigation system tailored specifically for our new landscape zones.
- The Controller: We installed a Rachio 3 Smart Sprinkler Controller. This device connects to our home Wi-Fi and uses local weather data to automatically skip watering on rainy or humid days.
- The Delivery: We ran 1/2-inch poly tubing to the raised beds and installed pressure-compensating drip emitters directly at the base of each plant. Drip irrigation reduces water evaporation and targets the root zone directly.
The environmental and financial impact of this upgrade was immediate. The EPA WaterSense program notes that smart irrigation controllers and drip systems can save the average home thousands of gallons of water annually compared to traditional spray heads. Our water bills dropped noticeably within the first month of the transformation.
Phase 4: The DIY Outdoor Kitchen & Smart Lighting
To truly bridge the gap between indoor comfort and outdoor cooking, we built a 6-foot outdoor kitchen island. We used structural cinder blocks for the frame, which we then veneered with a lightweight, interlocking stone facade. The countertop was poured concrete, sealed with a food-safe, UV-resistant penetrating sealer. We installed a weatherproof 24-inch outdoor refrigerator and a built-in gas grill, creating a seamless workflow for garden-to-table meals. Imagine harvesting fresh rosemary and cherry tomatoes from your raised beds, walking ten feet, and immediately prepping them on your own outdoor island.
Smart Ambient Lighting
Lighting is what makes an outdoor space usable after the sun goes down. We integrated smart lighting using weatherproof LED string lights and smart path lights. By connecting the outdoor lighting circuit to a smart plug integrated with our home's virtual assistant, the lights automatically turn on 30 minutes before sunset and dim to 40 percent brightness at 11:00 PM. This not only creates a stunning ambiance for evening entertaining but also adheres to dark-sky principles by reducing unnecessary light pollution.
The 'After' Reveal: Project Data & ROI
The transformation from a cracked, unusable slab to a vibrant, smart outdoor living space was staggering. Below is a breakdown of the project metrics, highlighting the dramatic improvements in sustainability, utility, and home value.
Before & After Comparison Chart
| Metric | Before Transformation | After Transformation |
|---|---|---|
| Usable Living Space | 100 sq ft (cracked/uneven) | 300 sq ft (permeable & functional) |
| Monthly Summer Water Use | 4,500 gallons (sprinkler) | 1,200 gallons (smart drip) |
| Home Cooling Impact | High (radiant heat slab) | Reduced (strategic tree shading) |
| Garden Yield | None (dead grass & weeds) | 150+ lbs of organic produce |
| Evening Usability | Poor (no lighting/bugs) | Excellent (smart LED ambiance) |
Budget Breakdown
| Project Phase | Estimated Cost |
|---|---|
| Demo & Permeable Pavers | $1,450 |
| Cedar Raised Beds & Soil | $650 |
| Smart Irrigation System | $350 |
| Outdoor Kitchen (DIY) | $1,500 |
| Smart Lighting & Decor | $350 |
| Tree & Landscaping | $200 |
| Total Project Cost | $4,500 |
Final Thoughts on the Transformation
This before and after project proves that you do not need a massive budget or a professional landscaping crew to completely revolutionize your outdoor space. By focusing on energy-efficient landscaping, integrating smart home technology for water and lighting management, and committing to a garden-to-table lifestyle, we turned a liability into our home's greatest asset. The patio is no longer just a place to sit; it is an active, sustainable extension of our home that pays dividends in fresh food, lower utility bills, and countless evenings spent enjoying the outdoors.

