
Landscaping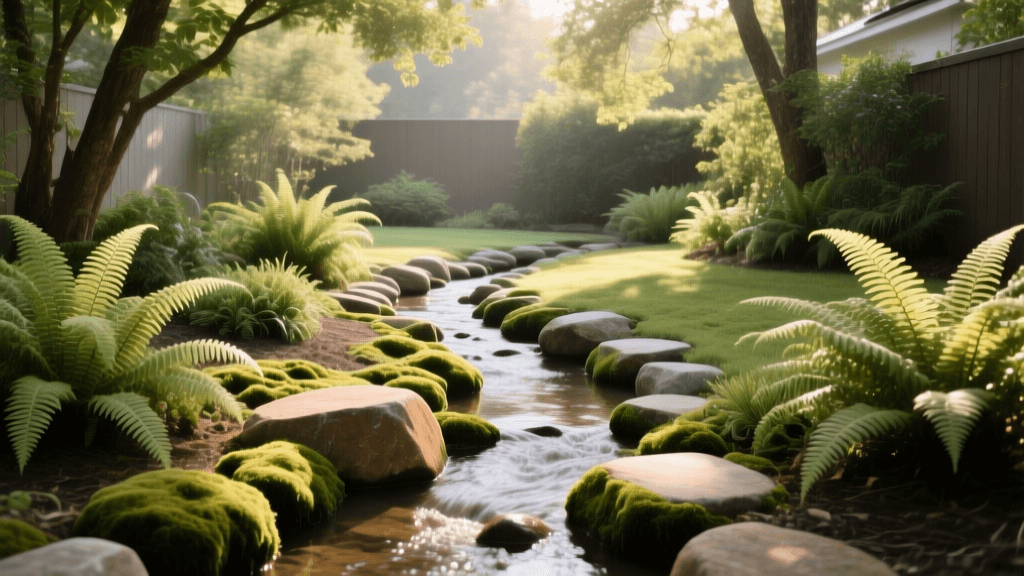
Backyard Transformation: Soggy Shade to Dry Creek Bed
The "Before": Diagnosing a Soggy, Shaded Nightmare
Every neighborhood has that one yard where grass simply refuses to grow, and rain turns the space into an unusable swamp. Our project site was a 450-square-foot backyard hemmed in by a north-facing fence and overshadowed by two majestic, 60-year-old White Oak trees. While the canopy provided beautiful summer shade, it created a hostile microclimate for traditional turfgrass. The existing soil was heavy, compacted clay that repelled water rather than absorbing it.
After even a modest half-inch rainfall, water would pool in the center of the yard for up to 72 hours. The result was a patchy, muddy mess dominated by dying Poa trivialis (rough bluegrass), opportunistic moss, and a thriving mosquito population. The homeowner wanted a lush, functional outdoor space but was tired of fighting a losing battle against the shade and poor drainage. Traditional turf was out of the question; we needed a design that embraced the site's natural constraints rather than fighting them.
The Vision: Embracing the Microclimate
Instead of installing expensive, hidden French drains that would simply dump the water problem onto a neighbor's property, we opted for a surface-level solution: a meandering dry creek bed flanked by a lush, moisture-loving shade garden. This approach aligns perfectly with modern sustainable landscaping practices. By designing a system that mimics natural hydrology, we can effectively manage surface runoff. According to the Environmental Protection Agency's green infrastructure guidelines, incorporating visible, naturalistic water management features helps slow, spread, and sink rainwater into the soil, reducing erosion and filtering pollutants.
The master plan involved carving a shallow, S-curved channel through the lowest point of the yard, directing water from the roof's downspout toward the rear property line's drainage easement. The excavated clay would be mounded slightly on the banks to create elevated planting beds, and the entire area would be transformed into a woodland-inspired fern and hosta oasis.
Step-by-Step Transformation Guide
Phase 1: Excavation and Grading
The first step was laying out the creek bed using a flexible garden hose to mark natural, sweeping curves. Sharp angles look artificial, so we ensured the bends were gradual and asymmetrical. Using a flat spade and a mattock, we excavated a trench averaging 24 inches wide and 12 inches deep.
Crucially, we maintained a consistent 1% slope (a 1/8-inch drop per linear foot) from the downspout to the rear easement to ensure water would flow during heavy storms. In total, we removed approximately 3.5 cubic yards of heavy clay soil. Rather than paying for haul-away, we used a portion of this clay to build up the berms on the outside of the creek's curves, creating natural-looking topography that would later serve as our elevated planting beds.
Phase 2: Hardscaping the Dry Creek Bed
Laying the foundation correctly is the difference between a dry creek bed that lasts a lifetime and one that turns into a muddy ditch after a single season. We lined the entire trench with a heavy-duty, 6-ounce non-woven geotextile fabric. This commercial-grade fabric is essential; it allows water to pass through while preventing the underlying clay from migrating up into the rock layers and clogging the system. We overlapped all seams by at least 12 inches and secured the edges with landscape staple pins every 3 feet.
Next, we added a 2-inch base layer of 3/4-inch crushed granite to promote rapid subsurface drainage. Finally, we filled the channel with 4 to 6 inches of 3-5 inch rounded river cobble. To anchor the design and mimic the natural erosion patterns of a real stream, we strategically placed 12-18 inch limestone accent boulders on the outside edges of the curves, where water velocity would naturally be highest. A pro tip for natural stone placement: always bury at least one-third of the boulder's height in the soil so it looks like it is emerging from the earth, rather than just sitting on top of it.
Phase 3: Soil Amendment and Planting
The mounded clay banks needed serious remediation before they could support a vibrant garden. We top-dressed the planting areas with 3 inches of a 50/50 mix of organic leaf compost and pine bark fines. We incorporated this into the top 4 inches of the clay using a hand fork, being extremely careful to avoid severing the shallow feeder roots of the mature White Oaks.
When selecting the plant palette, we needed species that could tolerate both deep shade and periods of saturated soil. We cross-referenced moisture and shade tolerances using the NC State Extension Plant Database to ensure our choices were botanically suited for this specific microclimate. Proper plant selection is the backbone of any successful landscape transformation, and as noted by the University of Minnesota Extension, utilizing native and adaptable plants in water-management zones drastically reduces long-term maintenance and irrigation needs.
Plant Palette for Wet Shade
- Ostrich Fern (Matteuccia struthiopteris): Planted in large drifts along the shadiest banks. Spaced 24 inches on center, these vigorous natives provide architectural height and thrive in wet, acidic soils.
- Hosta 'Patriot': Utilized for its striking variegated foliage, which brightens up dark corners. Spaced 18 inches on center, the dense leaves act as a living mulch, suppressing weeds and retaining soil moisture.
- Astilbe 'Deutschland': Planted in clusters of three near the creek's edge. The bright white, feathery plumes bloom in early summer, providing a stark, beautiful contrast against the dark river stones.
- Sweet Flag (Acorus calamus): Positioned directly inside the creek bed in the lowest, wettest spots. This semi-aquatic plant handles temporary inundation effortlessly and adds a lush, grass-like texture to the hardscape.
Material Breakdown and Cost Analysis
Transforming this space was highly cost-effective compared to installing a traditional patio or a subterranean drainage system. Below is the itemized budget for the 450-square-foot project.
| Material | Quantity | Unit Cost | Total Cost |
|---|---|---|---|
| 6oz Non-Woven Geotextile Fabric | 150 sq ft | $0.85 / sq ft | $127.50 |
| 3/4" Crushed Granite Base | 1 Ton | $45.00 / ton | $45.00 |
| 3-5" Rounded River Cobble | 3 Tons | $85.00 / ton | $255.00 |
| 12-18" Limestone Accent Boulders | 5 Stones | $60.00 / stone | $300.00 |
| Organic Compost & Pine Bark | 2 Cubic Yards | $40.00 / yd³ | $80.00 |
| Shade-Tolerant Plugs (Flats) | 6 Flats (108 plants) | $95.00 / flat | $570.00 |
| Total Project Materials | $1,377.50 |
Note: This project was completed as a DIY weekend build over two weekends. Professional installation for a similar scope of work typically ranges from $3,500 to $5,500 depending on regional labor rates and site access.
The "After": One Year Later
Fast forward twelve months, and the transformation is nothing short of spectacular. The patchy, muddy swamp is entirely gone. In its place is a serene, woodland-inspired retreat. The dry creek bed has handled multiple severe summer thunderstorms flawlessly; roof runoff now cascades beautifully over the river cobble and safely exits the property, with zero standing water remaining 24 hours after a storm.
The ferns have doubled in size, creating a lush, prehistoric canopy over the creek banks, while the Hosta 'Patriot' provides brilliant splashes of white and green. We added three large, natural flagstone stepping stones across the narrowest part of the creek bed, creating a functional and whimsical pathway that invites exploration.
"The secret to a natural-looking dry creek bed is to embrace imperfection. Nature doesn't sort rocks by uniform diameter, and streams don't flow in straight lines. By varying stone sizes, burying boulders, and allowing moisture-loving plants to spill over the edges, you blur the line between hardscape and horticulture."
Maintenance has been reduced to a mere fraction of what the homeowner previously spent trying to keep failing grass alive. A light application of slow-release organic fertilizer in the spring, an annual top-dressing of compost, and occasional weeding are all that is required. By working with the site's natural hydrology and shade patterns instead of against them, this once-forgotten backyard has become the crown jewel of the neighborhood.

