
Gardening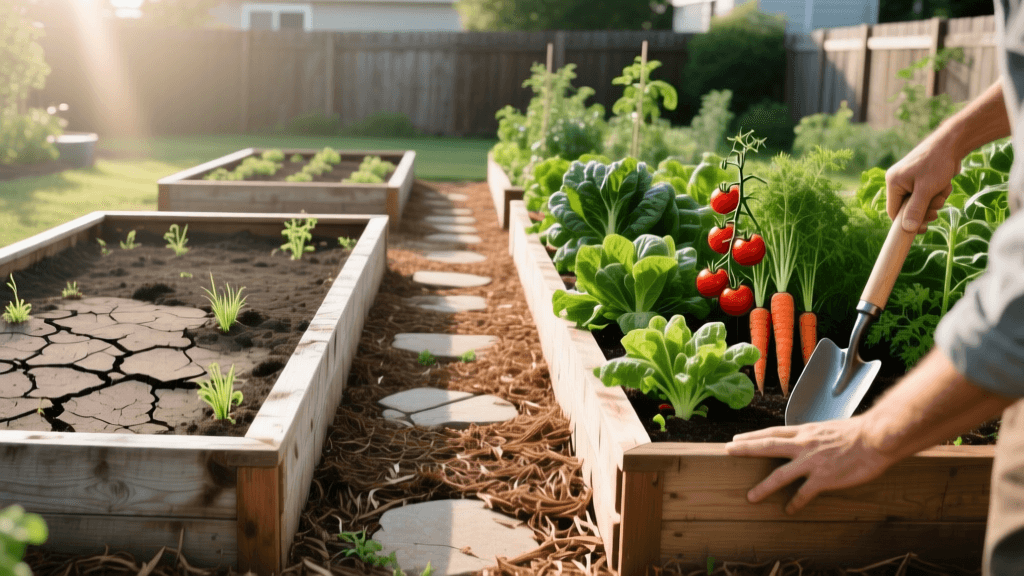
Backyard Garden Transformation: Dead Grass to Raised Beds
The Ugly Before: A Barren Patch of Compacted Clay
Every thriving garden starts with a vision, but rarely does it start with perfect conditions. Our project site was a 20-foot by 20-foot patch of neglected backyard that had been stripped of its topsoil during the home's initial construction. What remained was a desolate expanse of compacted red clay, dotted with stubborn crabgrass and bindweed. Water pooled on the surface after a light rain, and a standard soil test revealed a pH of 5.4 with virtually zero organic matter. Growing vegetables directly in this ground would have been an exercise in futility.
The goal was ambitious: transform this dead zone into a highly productive, visually stunning raised bed vegetable garden within a single season. This before-and-after case study breaks down the exact steps, materials, costs, and horticultural strategies we used to turn a barren wasteland into a lush, high-yielding edible landscape.
Phase 1: Site Preparation and the Smothering Method
Before swinging a hammer, we had to deal with the existing weeds and the impenetrable clay pan. Tilling the clay would only bring dormant weed seeds to the surface and risk creating hardpan. Instead, we opted for sheet mulching, a no-dig method championed by soil health experts.
According to the USDA Natural Resources Conservation Service, minimizing soil disturbance and keeping the soil covered are foundational principles of soil health. We mowed the existing weeds as low as possible and covered the entire 400-square-foot area with overlapping layers of plain, uncoated corrugated cardboard. We soaked the cardboard thoroughly with a garden hose to initiate the decomposition process and block all sunlight, effectively smothering the weeds beneath.
Phase 2: Constructing the Cedar Raised Beds
With the ground smothered, we moved on to hardscaping. We designed a layout featuring four identical raised beds, leaving 3-foot-wide walking paths between them for easy access and wheelbarrow maneuverability.
Materials and Dimensions
- Lumber: Untreated, rough-sawn Western Red Cedar (naturally rot-resistant and safe for organic food production).
- Dimensions: 4 feet wide by 8 feet long, with a depth of 11 inches (using two stacked 2x6 boards per side).
- Hardware: Exterior-grade structural wood screws and galvanized steel corner brackets to prevent bowing over time.
We assembled the beds directly on top of the wet cardboard. The cardboard acts as a biodegradable weed barrier that will eventually break down, allowing deep-rooted crops and earthworms to migrate between the raised bed soil and the native clay below. The University of Minnesota Extension highly recommends a width of no more than 4 feet for raised beds, ensuring you can reach the center from either side without stepping on and compacting your carefully prepared soil.
Phase 3: The Transformation Soil Recipe
The most critical element of any before-and-after garden transformation is the soil. Filling four 4x8x11-inch beds requires roughly 95 cubic feet of soil. Buying bagged potting mix would have been prohibitively expensive, so we ordered a custom bulk blend and amended it heavily.
The Ultimate Raised Bed Mix
We utilized a modified version of the famous 'Mel's Mix' from Square Foot Gardening, adapted for modern sustainability:
- 33% High-Quality Compost: We sourced a diverse blend of municipal leaf compost and composted cow manure. The Environmental Protection Agency (EPA) notes that compost enriches soils, reduces the need for chemical fertilizers, and promotes higher agricultural yields.
- 33% Coco Coir: Used as a sustainable alternative to peat moss, coco coir provides excellent moisture retention and aeration without the environmental concerns associated with peat bog harvesting.
- 34% Coarse Vermiculite and Perlite: A 50/50 split of these volcanic minerals ensures the soil remains light, fluffy, and well-draining, preventing the compaction that plagued the native yard.
We mixed the ingredients in a heavy-duty mortar tub before wheelbarrowing them into the cedar frames. The visual contrast was staggering: the dark, rich, crumbly loam sitting beautifully against the pale, fresh cedar and the surrounding dead clay.
Phase 4: Strategic Planting and Companion Layout
With the beds filled and watered deeply to settle the soil, it was time to plant. We utilized a high-density planting strategy to maximize the visual impact and the harvest.
Bed 1: The Nightshade Jungle
Indeterminate Cherokee Purple and Sun Gold tomatoes were planted along the north edge, trained up a 5-foot-tall cattle panel trellis. We interplanted sweet basil and French marigolds at the base. The marigolds not only added a vibrant pop of orange and yellow to the visual transformation but also helped deter root-knot nematodes.
Bed 2: The Leafy Greens and Roots
This bed was dedicated to fast-growing crops. We succession-planted butterhead lettuce, rainbow Swiss chard, and radishes. The bright neon stems of the chard provided an incredible visual contrast against the dark soil.
Bed 3: The Pollinator and Pepper Paradise
Bell peppers and jalapenos were surrounded by alyssum and nasturtiums. The nasturtiums were allowed to spill over the cedar edges, softening the hardscaping and creating a lush, overflowing 'cottage garden' aesthetic.
Bed 4: The Vertical Climbers
Stringless snap peas and bush beans were planted with a central bamboo teepee trellis, creating a striking architectural focal point in the center of the garden.
Project Breakdown: Costs and Timeline
Transforming a yard requires an investment of both time and capital. Below is the exact breakdown of our before-and-after project.
| Project Phase | Materials / Action | Estimated Cost | Time Invested |
|---|---|---|---|
| Site Prep | Cardboard, mowing, leveling | $45 | 4 Hours |
| Bed Construction | Cedar lumber, brackets, screws | $680 | 12 Hours |
| Soil Filling | Bulk compost, coir, vermiculite | $450 | 8 Hours |
| Trellising | Cattle panels, T-posts, bamboo | $120 | 3 Hours |
| Planting | Seeds, organic transplants | $110 | 5 Hours |
| Irrigation | Drip tape, timer, fittings | $95 | 4 Hours |
| Total | Complete Garden Transformation | $1,500 | 36 Hours |
The Lush After: 90 Days Later
Fast forward three months, and the transformation was nothing short of miraculous. The barren, cracked clay patch was entirely hidden beneath a sprawling canopy of vibrant green foliage. The cattle panel trellis was completely obscured by heavy, fruit-laden tomato vines, and the nasturtiums had cascaded down the cedar boards, creating a seamless blend of hardscape and softscape.
But the visual transformation was only half the story. The soil structure beneath the surface had also begun to change. Earthworms had migrated up through the decomposing cardboard, integrating the native clay with the rich organic matter of the raised beds. The drip irrigation system kept the moisture levels perfectly consistent, eliminating the blossom end rot that often plagues tomatoes in fluctuating clay soils.
The Harvest Yield
By late summer, the garden was producing an overwhelming bounty. We harvested over 150 pounds of tomatoes, dozens of crisp peppers, and endless bowls of salad greens. The before-and-after photos tell a story of sweat equity, but the daily harvests proved that the investment was entirely worth it.
'The greatest fine gardening transformations do not just change the look of a yard; they fundamentally alter the ecology of the soil and the daily rhythm of the gardener's life.'
Final Thoughts on Garden Transformations
If you are staring out at a patch of dead grass, compacted dirt, or construction debris, do not despair. As this before-and-after project proves, you do not need perfect native soil to grow a spectacular vegetable garden. By utilizing no-dig sheet mulching, building durable raised beds, and investing in a high-quality, well-aerated soil mix, you can bypass poor ground conditions entirely.
The key to a successful transformation is patience during the preparation phase. Do not rush the soil building process. Spend the time to source diverse composts, ensure your beds are level, and set up an automated drip irrigation system before you even think about planting a single seed. When you lay the groundwork correctly, the 'after' photo will practically take care of itself, leaving you with a thriving, beautiful, and delicious backyard oasis.

