
Landscaping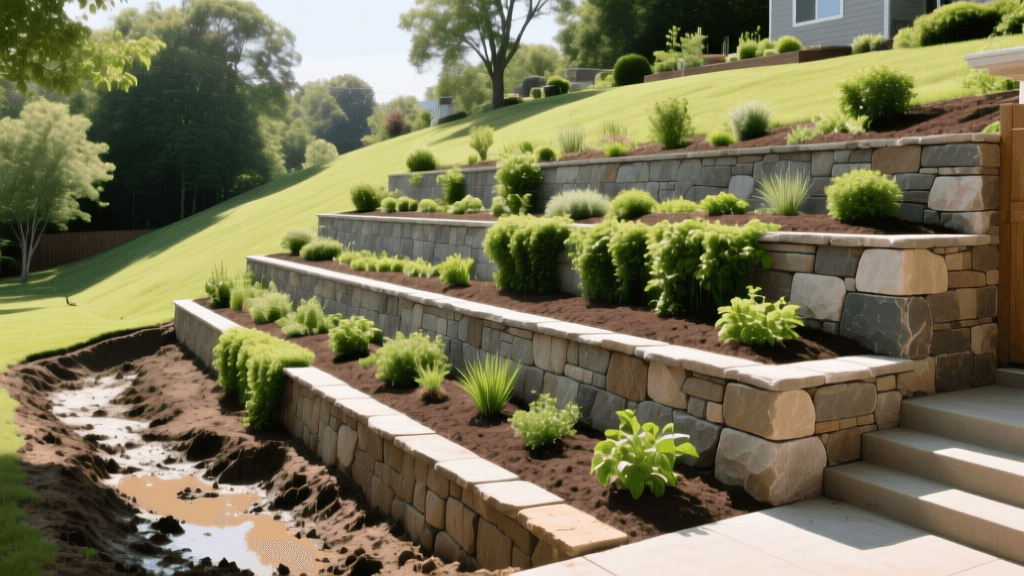
Backyard Slope Makeover: From Eroded Mud to Tiered Oasis
The 'Before': A Muddy, Unusable Nightmare
Every homeowner with a sloped backyard knows the unique frustration that comes with it. Our subject property featured a 30-foot wide backyard with a severe 8-foot vertical drop over a 25-foot horizontal distance. The existing landscape was essentially a muddy slip-and-slide. Heavy clay soil exacerbated the issue, preventing water from percolating into the ground. Every time it rained, stormwater gained velocity, carving deep gullies into the slope and depositing thick, anaerobic mud directly onto the lower concrete patio. Not only was the yard entirely unusable for recreation or entertaining, but the standing water near the foundation also created a prime breeding ground for mosquitoes and posed a long-term threat to the home's structural integrity.
The existing 'landscaping' consisted of a few struggling, shallow-rooted weeds and a single, dying pine tree that was slowly leaning downhill. The homeowners were desperate for a solution that would stop the erosion, manage the stormwater, and create functional outdoor living spaces. The answer was a complete backyard slope transformation using terraced segmental retaining walls and strategic deep-rooted plantings.
The Plan: Terracing and Drainage Solutions
Rather than attempting to flatten the entire yard or build a single, massive 8-foot wall (which would require expensive engineering permits and massive concrete footings), we opted to terrace the slope into two distinct, manageable levels. According to the Environmental Protection Agency (EPA), terracing is a highly effective green infrastructure technique that reduces stormwater runoff velocity, promotes soil infiltration, and prevents topsoil loss.
The design called for a lower retaining wall standing 2.5 feet tall, creating a flat, shaded garden bed. The upper wall would also stand 2.5 feet tall, holding back a level, sun-drenched patio space perfect for a fire pit. By breaking the 8-foot drop into smaller, reinforced tiers, we could utilize standard segmental retaining wall blocks without the need for geogrid reinforcement or deep concrete footings, keeping the project DIY-friendly and cost-effective.
Step-by-Step Transformation Breakdown
Phase 1: Excavation and French Drain Installation
The first step was moving the earth. We rented a mini-excavator for a weekend to cut into the clay slope. We removed approximately 15 cubic yards of heavy clay, using the 'cut and fill' method to roughly shape the two terraces. Because clay soil holds water, installing a robust drainage system behind the lower wall was non-negotiable.
We dug a trench along the base of the lower wall and installed a 4-inch corrugated, perforated drainage pipe. The pipe was wrapped in non-woven geotextile landscape fabric to prevent soil clogging, and surrounded by 3/4-inch washed gravel. We ensured the pipe had a 1-percent slope (1 inch of drop per 10 feet of run) to gravity-feed the captured water into an existing municipal storm drain at the edge of the property. This French drain system acts as the hidden hero of the transformation, relieving hydrostatic pressure that could otherwise push the retaining wall outward.
Phase 2: Building the Segmental Retaining Walls
For the walls, we selected Allan Block Classic segmental units in a slate grey color. The key to any retaining wall is the base. We excavated a 6-inch deep trench for the base course and filled it with 3/4-inch angular crushed limestone. Using a vibratory plate compactor, we compacted the base in 2-inch lifts until it was as hard as concrete. A level base course is critical; if the first row is off by a fraction of an inch, the error multiplies as you stack higher.
We laid the first course of blocks, checking for level both front-to-back and side-to-side. As we stacked the subsequent courses, we staggered the joints (like bricklaying) and filled the hollow cores of the blocks with the same crushed limestone to add mass and improve drainage. Behind the wall, we backfilled with 12 inches of washed gravel before adding the native soil, ensuring water could easily flow down to the French drain.
Phase 3: Soil Amendment and Planting
The native clay soil we excavated was terrible for planting. We amended the backfill on the terraces with a 50/50 mix of screened topsoil and organic leaf compost to improve drainage and nutrient content. When selecting plants for the shaded lower terrace, we consulted the NC State Extension Plant Toolbox to identify deep-rooted, shade-tolerant perennials that excel at holding soil in place. We planted massive clumps of Hosta 'Patriot', Osmunda cinnamomea (Cinnamon Fern), and creeping Liriope along the wall edges to soften the hardscaping.
For the sun-drenched upper terrace, we utilized the Missouri Botanical Garden Plant Finder to select drought-tolerant, sun-loving ornamental grasses and shrubs. We planted Calamagrostis x acutiflora 'Karl Foerster' for vertical interest and year-round movement, alongside low-growing Juniperus horizontalis 'Blue Rug' to act as a living mulch that prevents surface erosion on the newly graded slopes.
Project Cost and Materials Breakdown
One of the biggest questions homeowners have regarding hardscaping is the cost. By tackling the labor ourselves and renting equipment strategically, we kept the budget remarkably reasonable for a project of this scale. Below is the itemized breakdown of the materials and rentals required for this 30-foot wide, two-tier transformation.
| Material / Service | Quantity | Estimated Cost |
|---|---|---|
| Mini-Excavator Rental | 2 Days | $650 |
| Vibratory Plate Compactor Rental | 1 Day | $120 |
| Allan Block Classic (Wall Blocks) | 140 Units | $560 |
| Crushed Limestone (Base & Drainage) | 6 Tons | $300 |
| Washed Gravel (Backfill) | 4 Tons | $200 |
| French Drain Pipe & Geotextile Fabric | 50 Feet | $95 |
| Topsoil & Organic Compost Blend | 12 Cubic Yards | $540 |
| Perennials, Grasses, & Shrubs | 45 Plants | $680 |
| Hardwood Mulch | 3 Cubic Yards | $135 |
| Total Estimated Cost | N/A | $3,280 |
Note: Professional installation for a project of this size, including engineering, labor, and heavy machinery, typically ranges from $8,000 to $14,000 depending on regional labor rates and site accessibility.
The 'After': A Multi-Level Outdoor Sanctuary
The transformation was nothing short of miraculous. The 'after' photos reveal a backyard that feels like a private botanical garden rather than a muddy construction zone. The lower terrace is now a cool, shaded retreat featuring lush ferns and hostas that thrive in the dappled light. The upper terrace, secured by the second retaining wall, provides a perfectly flat, dry surface for a stone fire pit and Adirondack chairs.
More importantly, the drainage issues are completely resolved. During a heavy, two-inch rainstorm a month after completion, the homeowners watched as the terraces slowed the water flow, allowing it to percolate into the amended soil. Any excess water was quietly captured by the French drain and routed away from the foundation. The patio remained completely dry, and the mudslides were a thing of the past.
Expert Tips for Slope Stabilization
- Call Before You Dig: Always contact your local utility marking service (like 811 in the US) at least a few days before excavating. Hitting a buried gas or fiber-optic line on a slope can be catastrophic and incredibly expensive.
- Never Skip the Base Prep: The most common reason DIY retaining walls fail, bulge, or lean is inadequate base compaction. Spend the extra time and money to rent a plate compactor and use angular crushed stone, not round river rock, for your base.
- Embrace Living Mulch: Bare soil on a slope will eventually erode, even with terracing. Utilize creeping groundcovers and ornamental grasses whose deep, fibrous root systems act as a biological net, holding the topsoil firmly in place during heavy rains.
- Plan for Irrigation: Terraced slopes can create microclimates. The upper tier will dry out much faster than the lower, shaded tier. Install a drip irrigation system with separate zones for the upper and lower beds to ensure efficient water usage without causing runoff.
A well-designed terraced landscape does more than just look beautiful; it actively heals the land by managing water, preventing erosion, and creating thriving habitats for pollinators and beneficial insects.

