
Landscaping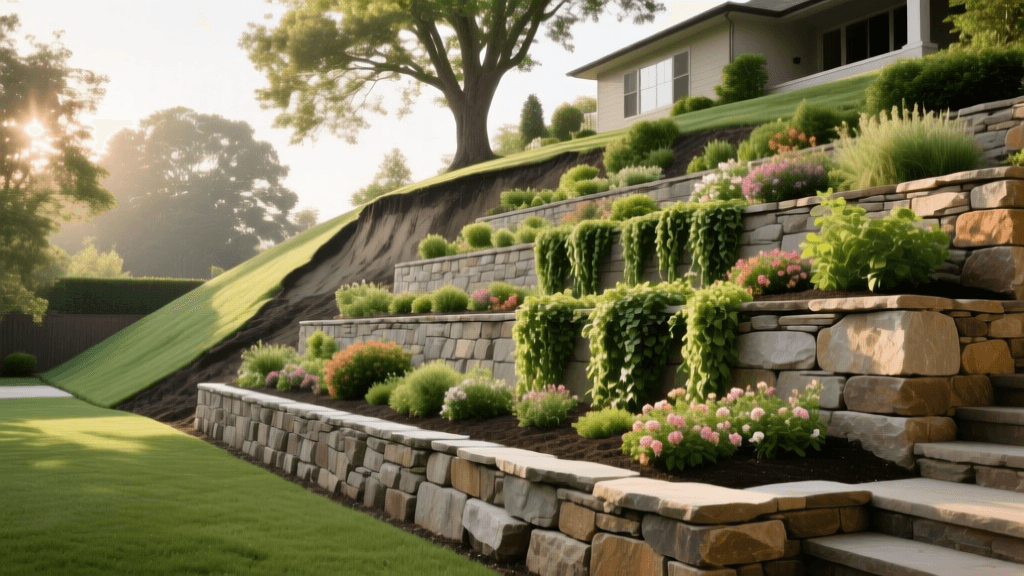
Backyard Slope Makeover: Before and After Retaining Wall Oasis
The Before: Battling a Steep, Erosion-Prone Slope
Steep backyard slopes are a common landscaping nightmare. Before this transformation, the 40-foot-wide backyard featured a brutal 12-foot vertical drop over just 25 horizontal feet. This created a 45-degree incline of heavy, compacted clay soil that was practically unusable. Every time it rained, water cascaded down the slope, carving deep gullies, washing away topsoil, and depositing a muddy mess near the home's foundation. Not only was the space an eyesore, but the unchecked stormwater runoff posed a genuine threat to the structural integrity of the house.
The homeowners wanted a flat, usable outdoor living space but were overwhelmed by the sheer scale of the earthmoving required. The goal was clear: halt the erosion, manage the stormwater, and create a beautiful, tiered oasis that blended hardscaping with sustainable planting.
The Master Plan: Designing the Tiered Transformation
The After vision involved slicing the single, massive slope into three distinct, manageable terraces. Each terrace would be held back by a 2-foot-high retaining wall, creating flat planting beds and a central patio area. To handle the inevitable water flow without blowing out the retaining walls, the design incorporated a meandering dry creek bed lined with river cobbles, channeling water safely away from the foundation and into a lower rain garden.
Managing stormwater at its source through green infrastructure and terraced landscaping not only protects your home's foundation but also reduces the burden on municipal sewer systems.
— Environmental Protection Agency (EPA) Green Infrastructure Guidelines
Step-by-Step Execution: How We Did It
Transforming a slope of this magnitude requires precise engineering, heavy lifting, and an understanding of hydrology. Here is the exact process, materials, and measurements used to achieve the stunning After result.
Phase 1: Excavation and Base Preparation
The most critical step in any retaining wall project is the base. A wall is only as strong as the ground it sits on. We excavated a trench 24 inches wide and 8 inches deep for the footprint of each wall. The bottom 6 inches were filled with 3/4-inch crushed angular gravel. Crucial tip: Never use round pea gravel for a retaining wall base. Angular gravel locks together when compacted with a plate compactor, creating a solid, frost-resistant foundation that will not shift over time.
Phase 2: Building the Retaining Walls
We selected Versa-Lok Standard retaining wall blocks for their interlocking pin system and natural stone aesthetic. For a 2-foot-tall wall, the first course of blocks was buried halfway (about 6 inches) below grade to prevent the soil from pushing the wall outward at the base. As we stacked the blocks, we backfilled immediately behind the wall with 12 inches of clean, washed drainage rock. This ensures that hydrostatic pressure—the buildup of water behind the wall that causes bulging and collapse—is immediately relieved.
Because the middle terrace wall was pushing 3 feet in height in certain low spots, we incorporated Tensar BX1200 biaxial geogrid. This synthetic mesh is layered between the block courses and extends 4 feet back into the compacted soil, effectively tying the wall into the earth and turning the soil mass into a single, cohesive structure.
Phase 3: The Dry Creek Bed Drainage Solution
To handle surface runoff, we carved a winding, 3-foot-wide channel down the center of the terraces. We lined the trench with Mirafi 500X woven geotextile fabric. Avoid cheap, non-woven landscape fabrics from big-box stores; they tear easily under the weight of river rock and clog with silt. The woven fabric allows water to pass through while keeping the underlying soil completely intact. We then filled the channel with a mix of 3-5 inch Tennessee river cobbles and larger 8-12 inch boulders placed strategically on the bends to slow water velocity and create a natural, rugged look.
Phase 4: Planting for Erosion Control
Hardscaping alone does not complete a landscape. The flat terraces were amended with 3 inches of organic compost and planted with deep-rooted native species. According to the National Wildlife Federation, native plants are essential for sustainable landscaping because their extensive root systems act as a living net, holding soil in place far better than shallow-rooted turfgrass. We planted Echinacea purpurea (Purple Coneflower), Asclepias tuberosa (Butterfly Weed), and deep-rooting ornamental grasses like Panicum virgatum (Switchgrass) along the retaining wall edges to soften the hardscape and absorb excess moisture.
Project Breakdown: Costs, Materials, and Timeline
Understanding the financial and time investment is vital before starting a major slope transformation. Below is a detailed breakdown of the materials, estimated costs, and labor time for this specific 40-foot wide, 3-tier project.
| Project Phase / Material | Quantity Required | Estimated Cost | DIY Labor Time |
|---|---|---|---|
| Excavation & Earthmoving | 15 cubic yards of soil removed | $600 (Dumpster/Disposal) | 40 hours |
| 3/4-inch Crushed Angular Gravel | 12 tons | $660 ($55/ton) | 15 hours |
| Versa-Lok Standard Blocks | 320 blocks (approx. 3 pallets) | $1,760 ($5.50/block) | 60 hours |
| Washed Drainage Rock | 8 tons | $480 ($60/ton) | 12 hours |
| Tensar Geogrid & Pins | 2 rolls / 100 pins | $450 | 8 hours |
| Mirafi 500X Woven Fabric | 1 roll (300 sq ft) | $180 | 4 hours |
| River Cobbles & Boulders | 6 tons | $720 ($120/ton) | 10 hours |
| Native Plants & Compost | 45 plugs / 4 yards compost | $550 | 12 hours |
| Total Estimated DIY Cost | --- | $5,400 - $6,000 | ~160 Hours |
Note: Hiring a professional landscaping contractor for a project of this scale, including heavy machinery operation and engineering, typically ranges from $18,000 to $28,000 depending on regional labor rates and site accessibility.
The After: A Functional, Stunning Landscape Oasis
The transformation was nothing short of miraculous. The muddy, dangerous slope was replaced by three flat, highly usable tiers. The top terrace now hosts a cozy fire pit area with Adirondack chairs. The middle tier serves as a vibrant, low-maintenance native pollinator garden. The bottom tier transitions seamlessly into the existing lawn, protected from runoff by the dry creek bed.
During the first major spring downpour, the true test occurred. Instead of a muddy landslide, the rainwater gently cascaded into the dry creek bed, flowing smoothly over the river cobbles and dissipating safely into the lower rain garden. The retaining walls remained perfectly plumb, and the foundation stayed completely dry.
Expert Tips for Your Own Slope Transformation
- Check Local Building Codes: Many municipalities require a stamped engineering permit for retaining walls exceeding 3 or 4 feet in height. Always call your local zoning office before breaking ground.
- Call Before You Dig: It is a federal requirement to contact your local utility marking service before any major excavation. Visit Call811.com to schedule a free marking of underground gas, water, and electrical lines to prevent catastrophic accidents.
- Invest in Quality Drainage: The number one reason retaining walls fail is poor drainage. Never skip the perforated pipe, washed backfill rock, and geotextile fabric.
- Rent the Right Equipment: Do not attempt to move 15 cubic yards of soil and 20 tons of gravel by hand. Renting a mini-skid steer (like a Toro Dingo or Bobcat MT55) for a weekend will save your back and cut excavation time by 80 percent.
- Use a Laser Level: String lines are easily bumped and sag over long distances. A rotary laser level ensures your base trench and subsequent block courses remain perfectly level across a 40-foot span.
- Conduct a Percolation Test: Before designing a rain garden at the base of your slope, test your soil drainage. Dig a 12-inch hole, fill it with water, and let it drain. If it takes more than 24 hours to drain completely, you may need to amend the soil heavily with sand and compost or install an underground French drain to move water to the street.
Transforming a steep, unusable slope into a tiered retaining wall oasis is a challenging but deeply rewarding landscaping project. By prioritizing proper base preparation, hidden drainage infrastructure, and sustainable native planting, you can turn a backyard liability into a stunning, functional asset that increases your property value and protects your home for decades to come.

