
Landscaping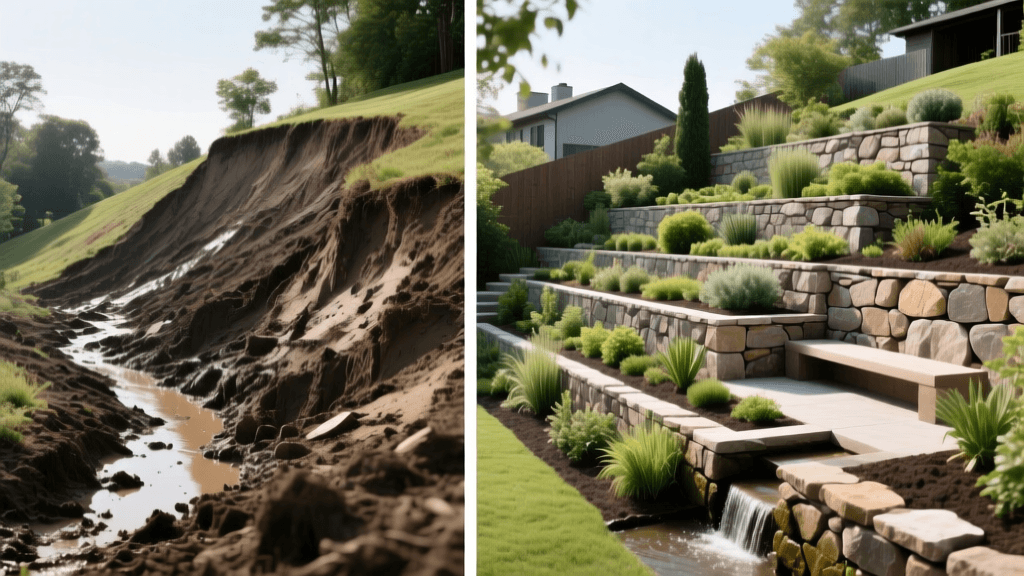
Backyard Slope Transformation: Muddy Hill to Tiered Oasis
The "Before": A Steep, Unusable Muddy Slope
Every landscaping professional and avid DIYer has encountered the dreaded "backyard cliff." For this specific transformation project, the homeowners were dealing with a severe 30-degree slope that dropped 15 vertical feet over a 40-foot horizontal distance. The existing soil was dense, poorly draining clay that turned into a muddy, treacherous slip-and-slide every spring thaw. Not only was the space entirely unusable for recreation, gardening, or entertaining, but the severe surface runoff was also threatening the structural integrity of their home's foundation and washing away precious topsoil.
According to the EPA's guidelines on green infrastructure and stormwater management, unmanaged slope runoff can overwhelm municipal drainage systems, cause localized flooding, and degrade local waterways through sediment pollution. The goal for this property was clear: we needed to arrest the erosion, manage the hydrostatic pressure, and transform this hazardous, eroding hill into a functional, multi-tiered outdoor oasis featuring retaining wall terraces and a lower patio space.
Planning the Transformation: Design and Materials
To tackle a 15-foot drop safely, a single monolithic retaining wall is not only visually overwhelming but structurally risky and often subject to strict municipal engineering permits. Instead, we designed a three-tiered "stair-step" terrace system. Each tier would be 5 feet high and feature a 5-foot deep planting and walking plateau. This design breaks up the visual mass of the wall, creates distinct microclimates for planting, and drastically reduces the lateral earth pressure exerted on any single wall structure.
We selected the Allan Block Legacy system for its classic stone texture, built-in setback pins, and hollow cores that allow for easy gravel backfill and drainage. Below is the comprehensive material breakdown and estimated cost for the 40-foot wide, three-tiered project.
| Material / Service | Quantity / Specs | Estimated Cost |
|---|---|---|
| Allan Block Legacy Units | 180 blocks (approx. 45 per tier) | $1,450 |
| Allan Block Capstones | 60 linear feet | $480 |
| 3/4" Clear Crushed Gravel | 12 tons (Base & Backfill) | $600 |
| Non-Woven Geotextile Fabric | 3 rolls (4ft x 50ft) | $180 |
| Tenax Geogrid Reinforcement | 2 rolls (for upper tiers) | $350 |
| Perforated Drain Pipe | 150 feet (4-inch corrugated) | $120 |
| SRW Landscape Adhesive | 6 tubes (for capstones) | $90 |
| Topsoil & Compost Mix | 15 cubic yards | $750 |
| Heavy Equipment Rental | Mini-excavator (3 days) | $900 |
| Total Estimated Cost | Excluding final plantings | $4,920 |
Step-by-Step Execution: Building the Tiered Oasis
Step 1: Excavation and Base Preparation
The most critical step in any retaining wall installation is the base. A wall is only as strong as the ground it rests upon. Using a rented mini-excavator, we excavated a trench for the bottom tier that was 24 inches wide and 12 inches deep. This depth allowed us to get below the active frost line in our region, preventing frost heave from shifting the wall over time. We filled the bottom 6 inches of the trench with 3/4-inch clear crushed gravel and compacted it thoroughly using a mechanical plate compactor. The angular edges of the clear crushed stone lock together tightly under pressure, creating a virtually indestructible, free-draining foundation.
Step 2: Laying the First Course
We laid the first course of Allan Blocks directly onto the compacted gravel base. For structural integrity, the first course must be partially buried; we ensured that at least 1/8th of the block's height (or roughly 1.5 inches) was buried below the final grade of the lower patio. Using a 4-foot carpenter's level and a rubber mallet, we meticulously leveled each block side-to-side and front-to-back. The built-in setback pins of the Allan Block system automatically created the necessary backward lean (batter) into the hillside, which is crucial for counteracting the forward push of the retained soil.
Step 3: Installing Drainage and Backfilling
Hydrostatic pressure—water trapped in the soil pushing against the back of the wall—is the number one cause of retaining wall failure. To combat this, we installed a comprehensive drainage system. Behind the first course, we laid a 4-inch perforated corrugated drain pipe, ensuring it sloped slightly toward a designated daylight exit point at the edge of the property. We then backfilled the space directly behind the blocks with 12 inches of 3/4-inch clear gravel.
Pro Tip: Never use pea gravel or "crusher run" (gravel with stone dust) for retaining wall backfill. Pea gravel is round and rolls like marbles under pressure, while crusher run contains fine dust that can clog the drainage pipe and trap water against the wall. Always use clear, angular, washed crushed stone.
To prevent the native clay soil from migrating into the gravel backfill and clogging the drainage system over time, we draped a non-woven geotextile filter fabric over the gravel before backfilling the remaining space with native soil.
Step 4: Geogrid Reinforcement and Upper Tiers
Because the upper two tiers were each 5 feet high and supported significant loads from the terraces above, we incorporated Tenax geogrid reinforcement. Every second course of blocks, we unrolled layers of geogrid into the hollow cores of the blocks, extending it 5 feet back into the compacted soil of the terrace. The geogrid acts like a net, tying the wall face to the soil mass behind it, effectively turning the wall and the soil into a single, monolithic gravity structure. We repeated the base preparation, block stacking, and gravel backfilling process for the second and third tiers, stepping them back 5 feet from the edge of the tier below to create the planting plateaus.
The "After": A Functional, Beautiful Outdoor Space
Once the hardscaping was complete, we adhered the Allan Block capstones to the top course using a high-strength, polyurethane SRW landscape adhesive. The transformation was nothing short of spectacular. The muddy, treacherous slope was gone, replaced by three distinct, level terraces held together by elegant, stone-textured walls. The bottom tier was left open and paved with flagstone to serve as an intimate lower patio, while the middle and upper tiers were prepped with a rich blend of premium topsoil and organic compost for planting.
Planting the Terraces for Erosion Control and Beauty
Hardscaping a slope is only half the battle; the right vegetation is required to stabilize the exposed soil on the terraces and soften the harsh lines of the retaining walls. When selecting plants for steep slopes and terraced gardens, it is vital to choose species with deep, fibrous root systems that act as a natural net to hold the soil in place. Utilizing the USDA Plants Database, we researched native and naturalized species that thrive in our specific hardiness zone while providing excellent erosion control.
- Cascading Edge Plantings: We planted Juniperus horizontalis (Creeping Juniper) along the edges of the capstones. As it matures, it will cascade beautifully over the wall face, softening the hardscape while its deep roots lock the terrace soil in place.
- Mid-Terrace Massing: Hemerocallis (Daylilies) and Pennisetum alopecuroides (Fountain Grass) were planted in sweeping drifts across the middle tier. Their dense, fibrous root mats are legendary for soil stabilization, and they require minimal maintenance once established.
- Upper Slope Anchors: To anchor the very top of the property where the terraces meet the neighbor's fence line, we planted several native serviceberry shrubs. As noted by the Arbor Day Foundation, integrating deep-rooted native shrubs and trees into stormwater management landscapes drastically improves soil water infiltration and provides critical habitat for local pollinators and birds.
Key Takeaways for Your Own Slope Transformation
Transforming a steep, unusable slope into a tiered garden oasis is a labor-intensive project, but the return on investment—both in property value and personal enjoyment—is immense. The key to a lasting "after" picture lies entirely in the unseen elements: a deeply excavated and compacted gravel base, meticulous attention to drainage via clear crushed stone and perforated pipes, and the strategic use of geogrid reinforcement for taller walls. By respecting the physics of water and earth, and pairing robust hardscaping materials with deep-rooted, erosion-controlling plants, you can permanently conquer the backyard cliff and reclaim your outdoor living space.

