
Gardening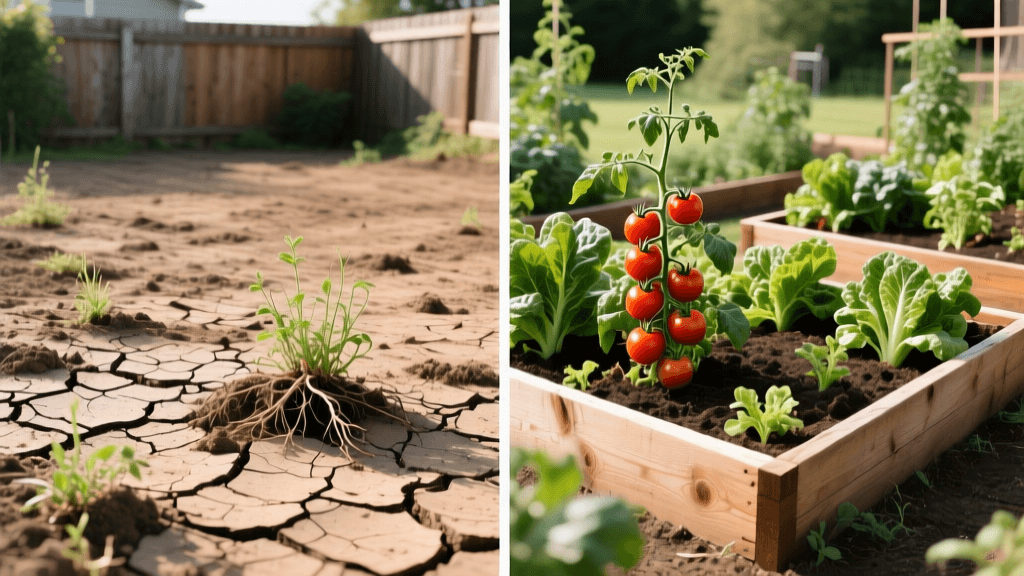
From Barren Clay to Bountiful Harvest: Raised Bed Garden Makeover
The "Before" State: Battling Hardpan Clay
Every gardener has a nemesis. For some, it is shade; for others, it is poor drainage. In our case, the enemy was heavy, compacted hardpan clay. The "before" picture of our backyard was a testament to frustration: a flat, lifeless expanse of dirt that turned into a sticky, unworkable swamp after a light rain and baked into concrete-like fissures during the summer heat. Previous attempts to till the soil and amend it in place resulted in broken tines and stunted, struggling tomato plants that barely reached a foot tall before succumbing to blossom end rot and root suffocation.
The soil lacked organic matter, possessed a highly alkaline pH of 7.8, and drained so poorly that puddles remained for days after a storm. According to Penn State Extension, attempting to grow deep-rooted vegetables in unamended heavy clay often leads to poor root development and severe waterlogging. We needed a complete paradigm shift. We did not just need to amend the soil; we needed to replace the growing environment entirely.
The Vision: Why Raised Beds Were the Only Solution
To achieve a true before and after transformation, we decided to abandon the native soil altogether and build a series of elevated raised beds. Raised bed gardening offers a multitude of benefits for challenging landscapes. First, it provides complete control over the soil texture, drainage, and nutrient profile. Second, the elevated height warms up faster in the spring, extending the growing season. Finally, it offers an ergonomic advantage, reducing the back strain associated with traditional in-ground gardening.
Our goal was to transform a 400-square-foot patch of barren clay into a highly productive, visually appealing kitchen garden capable of supplying a family of four with fresh summer produce. The design called for four identical beds, oriented north-to-south to maximize sun exposure, with wide pathways for easy wheelbarrow access.
Phase 1: Site Preparation and Sheet Mulching
The first step in our transformation was clearing the site without resorting to harsh chemical herbicides. We mowed the sparse, weedy grass as low as possible and then employed a technique known as sheet mulching. By laying down overlapping layers of heavy, uncoated corrugated cardboard directly over the clay, we created a biodegradable weed barrier.
This method serves two vital purposes: it smothers existing grass and weeds by blocking sunlight, and it eventually breaks down, inviting earthworms and beneficial microbes up from the clay layer into the new soil above. According to the University of Wisconsin-Madison Extension, cardboard is an excellent, eco-friendly base for raised beds that improves long-term soil biology while preventing invasive weeds like bindweed from infiltrating the new growing space.
Phase 2: Constructing the Cedar Raised Beds
For the bed materials, we selected untreated, rough-sawn Western Red Cedar. Cedar is naturally rot-resistant and can last 10 to 15 years without leaching harmful chemicals into the soil, unlike pressure-treated lumber which contains copper compounds. We built four beds, each measuring 4 feet wide by 8 feet long, and 11 inches deep. The 4-foot width is crucial, as it allows a gardener to reach the center of the bed from either side without ever stepping on and compacting the precious soil.
We reinforced the corners with 4x4 cedar posts and added a mid-span brace on the long sides to prevent the boards from bowing outward under the immense weight and hydrostatic pressure of the wet soil. The exterior was treated with a single coat of raw linseed oil to preserve the wood's natural color and protect it from UV degradation.
Phase 3: Engineering the Perfect Soil Mix
The most critical element of any raised bed transformation is the soil. Filling beds with native dirt or cheap topsoil is a recipe for disaster; the soil will compact over time, defeating the purpose of the raised bed. We utilized a modified version of the classic "Mel's Mix" popularized by Square Foot Gardening, adjusted for our local climate and budget.
Our custom recipe consisted of:
- 40% High-Quality Compost: A blend of mushroom compost, composted cow manure, and homemade leaf mold to provide slow-release nutrients and diverse microbiology.
- 30% Coarse Coir (Coconut Coir): Used instead of peat moss for sustainability, coir provides excellent moisture retention while remaining loose and friable.
- 30% Coarse Vermiculite and Perlite: A 50/50 split of these minerals ensures permanent aeration and drainage, preventing the soil from ever compacting.
| Soil Component | Volume per 4x8 Bed | Primary Function | Estimated Cost |
|---|---|---|---|
| Blended Compost | 13 cubic feet | Nutrients & Microbiology | $65.00 |
| Coconut Coir | 10 cubic feet | Moisture Retention | $45.00 |
| Vermiculite/Perlite | 10 cubic feet | Drainage & Aeration | $55.00 |
| Organic Fertilizer | 4 cups | Baseline NPK Boost | $12.00 |
We mixed the soil in batches using a heavy-duty tarp, rolling it back and forth until the components were uniformly integrated. We also incorporated a granular organic fertilizer and a handful of mycorrhizal fungi inoculant per bed to help plant roots establish quickly and access phosphorus.
Phase 4: Strategic Planting and Companion Gardening
With the beds filled and watered deeply to allow the soil to settle, it was time to plant. We utilized intensive companion planting strategies to maximize yield and deter pests naturally. In the center of each bed, we planted indeterminate heirloom tomatoes, pruning them to a single leader and trellising them with heavy-duty cattle panels.
At the base of the tomatoes, we planted sweet basil and French marigolds. The basil is believed to improve the flavor of the tomatoes and repel certain flying insects, while the marigolds secrete compounds from their roots that deter root-knot nematodes. Along the sun-drenched southern edges of the beds, we planted bush beans and zucchini, utilizing the vertical space efficiently. The transformation from bare dirt to a lush, green, structured garden happened almost overnight once the transplants went into the ground.
The "After" Reveal: 90 Days Later
Fast forward three months, and the "after" photos are almost unrecognizable compared to the barren clay wasteland we started with. The 11-inch cedar beds are overflowing with vibrant green foliage. The drainage issue is completely resolved; even after a two-inch summer downpour, the raised beds absorb the water instantly, with zero pooling on the surface or the cardboard base below.
The yield has been staggering. Because the soil is loose and rich in organic matter, the tomato roots plunged deep into the 11 inches of custom mix, supporting massive plants that are currently producing over 20 pounds of fruit per week. The cardboard base has begun to break down, and we have already spotted earthworms migrating up into the lower layers of the coir and compost mix, signaling the beginning of a thriving, self-sustaining soil food web.
Transformation Budget and Time Breakdown
A common concern with before and after garden makeovers is the cost. While building raised beds requires a higher upfront investment than tilling native soil, the long-term benefits in yield, reduced weeding, and water efficiency make it highly cost-effective. Below is the complete breakdown of our 4-bed transformation.
| Item / Task | Quantity | Total Cost | Time Invested |
|---|---|---|---|
| Cedar Lumber & Hardware | 4 Beds | $480.00 | 8 Hours |
| Cardboard & Site Prep | 400 sq ft | $30.00 (Free boxes) | 3 Hours |
| Custom Soil Ingredients | 132 cu ft total | $660.00 | 6 Hours |
| Trellising & Irrigation | Drip lines & panels | $150.00 | 4 Hours |
| Seeds & Transplants | Assorted | $85.00 | 2 Hours |
| Total Project | 32 sq ft growing space | $1,405.00 | 23 Hours |
For roughly $1,400 and a weekend and a half of labor, we completely erased the limitations of our native clay soil. The Old Farmer's Almanac frequently highlights that raised beds can yield up to four times more produce per square foot than traditional row gardening, meaning this investment will pay for itself in grocery savings within two growing seasons.
Final Thoughts on Garden Transformations
Transforming a hostile growing environment into a bountiful harvest is one of the most rewarding experiences a gardener can undertake. By accepting the limitations of our native clay and choosing to build upwards rather than fighting the dirt below, we created a resilient, high-yielding garden. If you are staring out at a backyard of compacted, lifeless soil, remember that the surface is just a starting point. With the right materials, a solid soil recipe, and a bit of sweat equity, your own before and after garden transformation is entirely within reach.

