
Lawn Care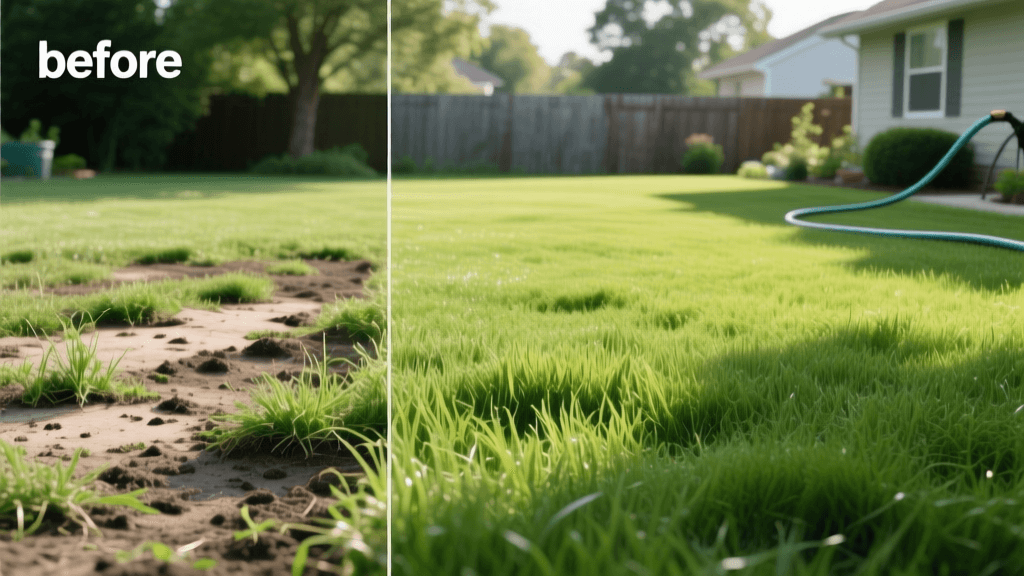
Transform Your Lawn: Before and After Aeration and Overseeding
The 'Before' Picture: Diagnosing a Failing Lawn
Every lawn care enthusiast has encountered the dreaded suburban lawn plateau: a yard that, despite regular watering and mowing, remains thin, patchy, and overrun with weeds. To understand the power of a proper lawn renovation, we tracked a 5,000-square-foot cool-season lawn (primarily Tall Fescue and Kentucky Bluegrass) in the Midwest through a complete 90-day transformation. The 'before' state of this lawn was a textbook example of soil compaction and biological neglect.
The homeowner reported that water pooled on the surface for hours after heavy rainfall, and the turf wilted rapidly during mild summer heat. Upon inspection, the thatch layer exceeded three-quarters of an inch, acting as a hydrophobic barrier. Furthermore, the 'screwdriver test'—pushing a standard six-inch screwdriver into the soil—failed at just one inch deep, indicating severe sub-surface compaction. This compacted environment suffocated the existing grass roots while creating an ideal nursery for broadleaf weeds like plantain, dandelions, and invasive crabgrass.
According to the Clemson University Home & Garden Information Center, soil compaction restricts the movement of air, water, and nutrients to the root zone, ultimately leading to turf decline and weed invasion. To reverse this damage, a complete core aeration and overseeding protocol was required.
The 90-Day Transformation Plan
Achieving a dramatic before-and-after transformation is not an overnight process. It requires strategic timing, precise product application, and rigorous follow-up care. We scheduled this renovation for early September, the optimal window for cool-season grasses to establish roots before winter dormancy.
Phase 1: Preparation and Weed Eradication (Days 1-14)
Two weeks before the scheduled aeration, the lawn was treated with a selective post-emergent herbicide containing mesotrione. Unlike traditional broadleaf killers that can linger in the soil and inhibit seed germination, mesotrione is safe to use at the time of seeding and effectively bleaches and destroys young weeds. The lawn was also mowed down to a height of 1.5 inches—much lower than the standard 3 inches. Bagging the clippings was mandatory during this phase to expose the soil surface and remove the excess thatch barrier, ensuring that new seeds would eventually make direct contact with the dirt.
Phase 2: Core Aeration (Day 15)
On Day 15, after a light morning rain to soften the ground, we rented a commercial-grade, walk-behind core aerator. The machine was driven over the lawn in two perpendicular passes to ensure maximum coverage. The aerator pulled thousands of soil plugs, each roughly half an inch wide and three inches deep, leaving them on the surface to break down naturally and return beneficial microbes to the thatch layer.
| Method | Mechanism | Effectiveness for Compaction | Best Use Case |
|---|---|---|---|
| Core Aeration | Removes physical plugs of soil and thatch. | Excellent (Relieves compaction permanently) | Severely compacted lawns, clay soils, renovation prep. |
| Spike Aeration | Pokes solid holes into the ground. | Poor (Can actually worsen compaction by pressing soil outward) | Very minor maintenance on sandy, loose soils. |
| Liquid Aeration | Applies surfactants to break soil surface tension. | Moderate (Improves water penetration, but doesn't remove cores) | Maintenance between core aeration cycles. |
Phase 3: Overseeding and Soil Amendment (Days 15-16)
Immediately following aeration, the lawn was overseeded using a premium, drought-resistant Tall Fescue blend. The application rate was set to 6 pounds per 1,000 square feet, slightly heavier than a standard maintenance overseed, to ensure a thick canopy that would naturally choke out future weeds. Following the University of Minnesota Extension guidelines for lawn renovation, we applied a high-phosphorus starter fertilizer (analysis 24-25-4) to fuel rapid root development. Finally, a piece of chain-link fence was dragged across the lawn to work the seed and fertilizer into the aeration holes, guaranteeing vital seed-to-soil contact.
The Watering Regimen: The Make-or-Break Factor
Seed will not germinate if it dries out, even for a few hours. The irrigation schedule for the first 21 days was strict:
- Weeks 1-2: Water 3 times daily (morning, noon, and late afternoon) for 10 minutes per zone. The goal is to keep the top inch of soil consistently moist, not muddy.
- Week 3: Reduce to once daily for 20 minutes as seeds sprout and roots begin to anchor.
- Week 4+: Transition to deep, infrequent watering (1 inch per week) to encourage deep root growth.
The 'After' Picture: Tracking the Transformation
The true measure of any lawn care treatment is the visual and biological result over time. Here is how the lawn evolved from a patchy, weed-infested eyesore into a lush, carpet-like turf.
30 Days Post-Seed: The Fragile Stage
At the one-month mark, the visual transformation was striking but delicate. The bare patches were filled with bright, pale-green fescue seedlings. The soil plugs from the aeration had completely dissolved, effectively top-dressing the lawn with native soil. However, the new grass was shallow-rooted and vulnerable. We performed the first mow at a height of 2.5 inches, ensuring the mower blades were razor-sharp to prevent tearing the young seedlings out of the ground.
60 Days Post-Seed: Establishing Dominance
By day 60, the lawn had undergone a massive color shift. The pale green seedlings matured into a deep, rich emerald. The root systems had penetrated deep into the aeration channels, accessing sub-surface moisture and making the turf noticeably more resilient to foot traffic. More importantly, the dense canopy of the new Tall Fescue had shaded out the soil, preventing any dormant crabgrass or broadleaf weed seeds from germinating. The 'before' picture of sparse, weedy dirt was now entirely unrecognizable.
90 Days Post-Seed: The Final Reveal
At 90 days, the transformation was complete. The lawn was mowed at a standard 3.5 inches, promoting deep roots and natural drought resistance. The thatch layer had been largely decomposed by the microbial activity introduced via the aeration cores. When performing the screwdriver test again, the tool slid effortlessly all six inches into the earth, proving that the soil structure had been fundamentally repaired. The homeowner was left with a thick, uniform, and highly functional outdoor space.
Transformation Cost Breakdown
Lawn renovation is an investment, but it is significantly more cost-effective than hiring professional landscaping crews to install new sod. Below is the itemized cost for this 5,000-square-foot DIY transformation.
| Item / Service | Quantity | Estimated Cost |
|---|---|---|
| Selective Herbicide (Mesotrione) | 1 Bottle | $35.00 |
| Core Aerator Rental (Half-Day) | 1 Rental | $75.00 |
| Premium Tall Fescue Seed | 30 lbs | $130.00 |
| Starter Fertilizer (24-25-4) | 1 Bag (covers 5k sq ft) | $45.00 |
| Total Project Cost | $285.00 |
Pro Tip: Never use a standard 'weed and feed' product before overseeding. The pre-emergent herbicides found in most weed-and-feed formulations will prevent your expensive grass seed from germinating, completely ruining your before-and-after transformation.
Final Thoughts on Lawn Transformations
Transforming a neglected lawn is one of the most rewarding projects a homeowner can undertake. By addressing the root causes of turf failure—namely soil compaction and poor biological activity—rather than just treating the symptoms, you set the stage for long-term success. Core aeration and overseeding do more than just fill in bare spots; they rebuild the soil ecosystem, crowd out invasive weeds, and create a resilient, deep-rooted lawn capable of withstanding the stresses of extreme weather. If your lawn resembles the 'before' picture described above, put down the standard fertilizer spreader, rent an aerator, and commit to the 90-day transformation process. The results will speak for themselves.

