
Lawn Care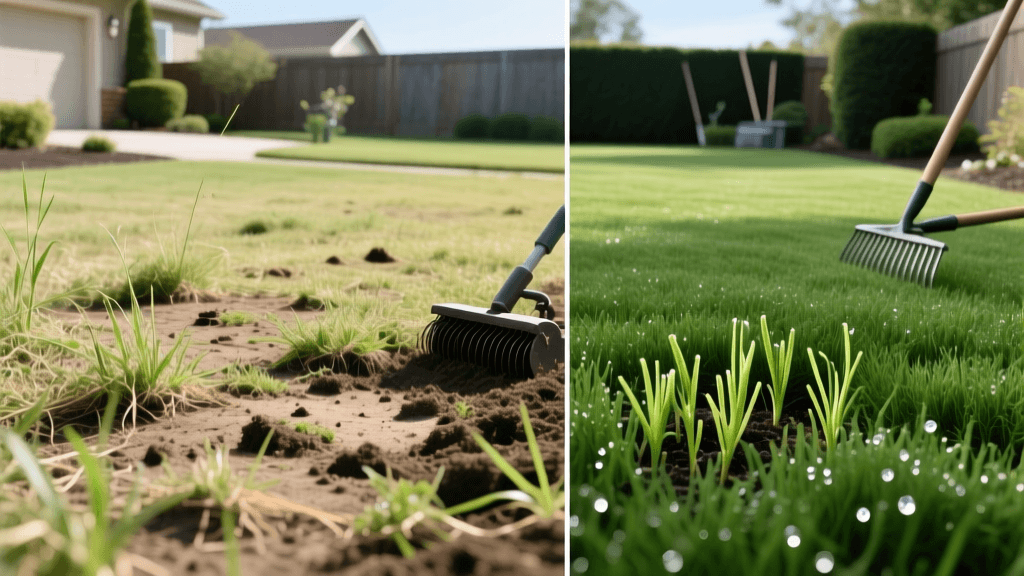
Transform Your Lawn: Before and After Aeration and Overseeding
The 'Before' State: Diagnosing a Failing Lawn
Every lawn transformation begins with an honest assessment of the 'before' state. If you are reading this, your lawn likely suffers from a combination of thin turf, aggressive weeds, and bare patches. But the visible symptoms are often rooted in unseen soil issues. A failing lawn is typically the victim of soil compaction, excessive thatch buildup, and nutrient depletion. Over time, foot traffic, heavy equipment, and relentless weather compress the soil particles, choking out grassroots and preventing water, oxygen, and nutrients from penetrating the root zone.
To confirm compaction, perform the screwdriver test. Push a standard six-inch screwdriver into your soil. If you cannot push it in at least four inches with moderate pressure, your soil is severely compacted. According to the University of Minnesota Extension, compacted soil restricts root growth and creates a shallow root system that is highly susceptible to drought stress and weed invasion. This is the exact 'before' scenario that sets the stage for a dramatic renovation.
The Science of Transformation: Core Aeration and Overseeding
The ultimate 'after' lawn—a thick, dark green, weed-resistant carpet—requires a two-pronged approach: core aeration and overseeding. While spike aerators merely poke holes and can actually worsen compaction by pressing soil outward, core aeration physically removes small plugs of soil and thatch. This alleviates compaction and creates perfect micro-environments for new seed-to-soil contact.
Overseeding introduces modern, disease-resistant, and drought-tolerant grass cultivars into the existing turf. When paired with a high-phosphorus starter fertilizer, the transformation from a sparse, weedy yard to a lush landscape is entirely achievable in a single fall season.
Step-by-Step Renovation Guide
Step 1: Preparation and Mowing
Before renting equipment, prep the canvas. Mow your existing lawn exceptionally short—around 1.5 to 2 inches—and bag the clippings. This exposes the soil surface, ensuring the aerator tines can penetrate deeply and the new grass seed will actually reach the dirt rather than getting trapped in the thatch layer. Flag all sprinkler heads and shallow utility lines with bright paint or flags to prevent costly damage during aeration.
Step 2: Core Aeration
Rent a walk-behind core aerator from a local equipment rental yard. Ensure the machine pulls actual soil cores that are 2 to 3 inches deep and 0.5 to 0.75 inches in diameter. Run the aerator over the lawn in two perpendicular directions (a crisscross pattern) to maximize the number of holes. Leave the extracted soil plugs on the lawn; they will break down naturally over the next few weeks, returning beneficial microbes to the surface. The Penn State Extension recommends performing this step in the early fall for cool-season grasses, as the soil is still warm enough to encourage rapid root growth, and weed competition is minimal.
Step 3: Overseeding and Fertilizing
Immediately after aeration, apply your grass seed. For cool-season lawns, a blend of Tall Fescue and Kentucky Bluegrass offers excellent durability and aesthetic appeal. Apply seed at a rate of 5 to 6 pounds per 1,000 square feet for overseeding. Use a broadcast spreader for even distribution, making two passes in perpendicular directions. Follow this with a starter fertilizer (look for an N-P-K ratio where the middle number, phosphorus, is prominent, such as 18-24-12). Phosphorus is critical for rapid root development in new seedlings.
Choosing the Right Seed for Your Climate
The success of your 'after' transformation hinges heavily on selecting the correct grass species for your specific hardiness zone. If you are in the northern two-thirds of the United States, you are dealing with cool-season grasses. Tall Fescue is the undisputed champion for high-traffic areas and shaded spots, offering deep roots that survive summer droughts. Kentucky Bluegrass, while requiring more sun and water, provides that classic, dark green, self-repairing rhizome spread that fills in damaged areas automatically.
For homeowners in the southern transition zone or deep south, warm-season grasses like Bermuda, Zoysia, or Centipede are the standard. However, overseeding warm-season lawns is typically done with annual ryegrass in the fall to maintain a green 'after' appearance during winter dormancy, rather than planting new permanent warm-season seed, which requires late spring planting when soil temperatures exceed 65 degrees Fahrenheit. Always check the seed tag for the 'Pure Live Seed' (PLS) percentage and ensure the 'Other Crop Seed' and 'Weed Seed' percentages are as close to zero as possible. Investing in premium, certified seed prevents the accidental introduction of invasive weeds like Poa annua or Rough Bluegrass into your newly renovated yard.
The Transformation Timeline: Week-by-Week Visual Guide
The 'after' doesn't happen overnight. Here is what you can expect during the critical 8-week establishment period.
| Timeframe | Visual 'After' State | Action Required |
|---|---|---|
| Week 1-2 | Seed germinates; fuzzy green sprouts appear in aeration holes. Soil plugs begin to break apart. | Water 2-3 times daily for 10 mins to keep the top inch of soil constantly moist. |
| Week 3-4 | New grass reaches 1.5 inches. The lawn looks slightly uneven as new seedlings outpace old turf. | Reduce watering to once daily, but increase duration to encourage deeper roots. |
| Week 5-6 | First mowing day. The lawn appears significantly thicker; bare spots are 80% filled in. | Mow at 2.5 inches. Never remove more than 1/3 of the blade. Return to standard fertilization. |
| Week 7-8 | The 'After' reveal. A dense, uniform, dark green carpet. Weeds are heavily shaded out. | Transition to deep, infrequent watering (1 inch per week). Apply pre-emergent the following spring. |
Cost Analysis: DIY vs. Professional Renovation
Transforming your lawn requires an investment of either time or money. Below is a cost breakdown for a standard 5,000 square foot lawn.
| Expense Category | DIY Cost (5,000 sq ft) | Professional Service Cost |
|---|---|---|
| Core Aeration | $60 - $80 (Equipment Rental) | $150 - $225 |
| Premium Grass Seed | $75 - $100 (25 lbs) | $100 - $150 (Included in service) |
| Starter Fertilizer | $30 - $45 | $50 - $75 (Included in service) |
| Labor / Time | 6 - 8 hours of heavy physical labor | 1 - 2 hours of crew time |
| Total Estimated Cost | $165 - $225 | $300 - $450 |
The 'After' State: Maintaining Your New Lawn
The stunning 'after' photos of lawn renovations are the result of disciplined follow-through. Once the new grass is established, shift your irrigation strategy to deep and infrequent watering. Applying roughly one inch of water per week, delivered in one or two heavy sessions, forces the new roots to dive deep into the aeration channels. This creates a drought-resilient lawn that stays green long into the summer.
Furthermore, maintain a high mowing height of 3 to 4 inches. Taller grass shades the soil, retaining moisture and naturally suppressing weed seed germination. As noted by turfgrass specialists at the University of Missouri Extension, proper mowing height and consistent soil aeration are the cornerstones of long-term turfgrass health. By committing to this annual or bi-annual renovation cycle, your lawn's 'before' and 'after' contrast will become a neighborhood legend, replacing thin, weed-choked dirt with a pristine, golf-course-quality landscape.

