
Lawn Care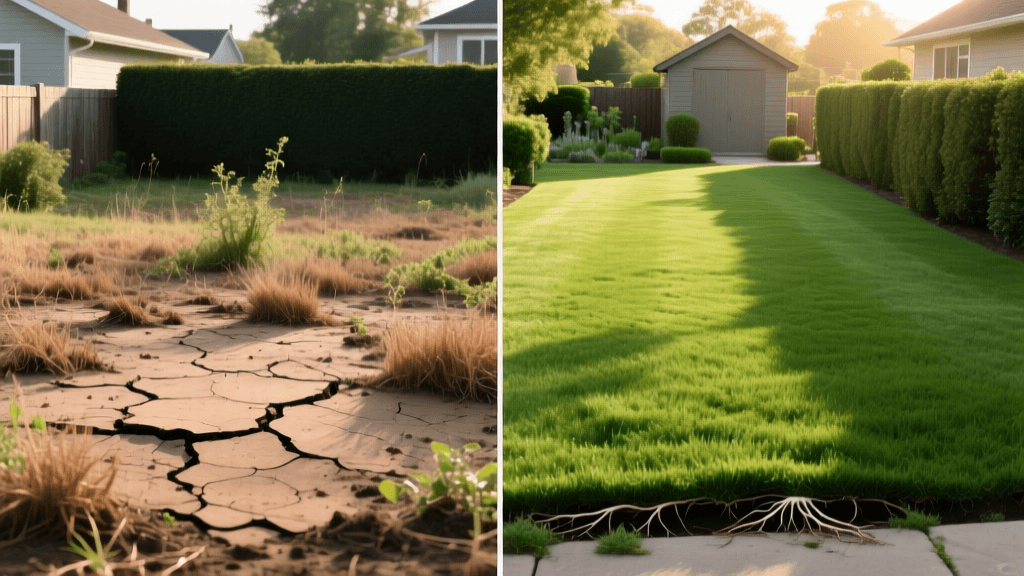
Before and After: Transforming a Weedy, Compacted Clay Lawn
The 'Before' State: Diagnosing a Failing Clay Lawn
Every lawn care professional and passionate homeowner has encountered the dreaded 'Before' lawn. You know the one: a patchwork quilt of invasive crabgrass, stubborn broadleaf weeds, and bare, cracked dirt that turns into a muddy swamp after a light rain. This specific transformation story focuses on a common suburban nightmare—a lawn suffering from severe soil compaction and heavy clay soil. In its 'Before' state, this yard exhibited all the classic signs of turf failure. The grass roots were barely an inch deep, unable to penetrate the dense clay hardpan beneath the surface. Because the soil was hydrophobic and compacted, water simply pooled on top before evaporating, leaving the shallow roots of the existing Kentucky Bluegrass to scorch and die during summer heatwaves.
Transforming a lawn like this requires more than just throwing down a few bags of seed and hoping for the best. It demands a systematic, scientific approach to soil renovation, weed eradication, and turfgrass selection. According to Penn State Extension's guide to lawn renovation, successful turf rehabilitation hinges on proper timing, aggressive soil preparation, and selecting the right grass species for your specific microclimate. In this comprehensive before-and-after guide, we will walk through the exact timeline, products, and techniques used to turn a compacted, weedy clay yard into a lush, deep-rooted Tall Fescue oasis.
Step 1: Timing the Transformation and Eradicating Weeds
The most critical mistake homeowners make when attempting a lawn transformation is doing it in the spring. Spring seeding sets you up for failure because the young, tender grass roots cannot survive the impending summer heat, and spring pre-emergent herbicides will prevent your new seed from germinating. The absolute best time to execute a cool-season lawn transformation is late summer to early fall (typically mid-August to late September, depending on your USDA hardiness zone).
Our 'Before' lawn was heavily infested with crabgrass and clover. To start with a clean slate, we applied a non-selective herbicide containing glyphosate to kill all existing vegetation. For those who prefer organic methods, soil solarization using clear plastic sheeting over the peak of summer is a highly effective alternative, though it takes 4 to 6 weeks. Once the existing weeds and failing grass were completely brown and dead, we mowed the lawn as low as the mower deck would allow—down to about 1.5 inches. This ultra-low cut removes the thatch barrier and ensures that new grass seed will make direct contact with the soil, which is non-negotiable for successful germination.
Step 2: Soil Testing and Core Aeration
Before adding any amendments or fertilizers, you must understand what your soil actually needs. Guessing is a waste of money and can harm the local watershed. We pulled 10 to 15 soil cores from various spots in the yard, mixed them in a clean plastic bucket, and sent the sample to a university extension soil lab. The results confirmed our visual diagnosis: the soil pH was slightly alkaline at 7.4, organic matter was virtually non-existent at less than 1%, and the cation exchange capacity (CEC) was poor, meaning the soil struggled to hold onto nutrients.
With the soil test in hand, it was time to address the physical compaction. The University of California Integrated Pest Management program notes that soil compaction is one of the primary limiting factors for turfgrass health, as it restricts oxygen flow to the root zone and prevents water infiltration. We rented a heavy-duty, walk-behind core aerator from a local equipment rental shop. Unlike spike aerators, which merely punch holes and can actually increase compaction along the sides of the hole, a core aerator physically extracts 2-to-3-inch plugs of soil and deposits them on the surface. We made three overlapping passes across the entire lawn, creating a grid of holes spaced about 2 to 3 inches apart. The extracted soil plugs were left on the lawn to break down naturally, helping to redistribute topsoil microbes back into the thatch layer.
Step 3: Amending the Clay Hardpan
Clay soil is notorious for its tight particle structure, which locks out water and air. To transform this lawn, we had to physically and chemically alter the top few inches of the soil profile. Following aeration, we applied soil amendments to improve drainage and nutrient retention. Below is a comparison chart of the most common clay soil amendments and how they function in a lawn renovation scenario.
| Amendment Type | Application Rate | Primary Benefits for Clay | Potential Drawbacks |
|---|---|---|---|
| Compost (Topdressing) | 1/4 inch to 1/2 inch layer | Adds vital organic matter, introduces beneficial microbes, improves moisture retention. | Can smother existing grass if applied too thick; may introduce weed seeds if not hot-composted. |
| Gypsum (Calcium Sulfate) | 40 lbs per 1,000 sq ft | Loosens tight clay particles through calcium ion exchange; adds calcium without altering pH. | Does not add organic matter; ineffective if soil is already high in calcium. |
| Elemental Sulfur | Varies strictly by soil test | Lowers soil pH in highly alkaline clay soils, unlocking trapped micronutrients like iron. | Very slow-acting (takes months); requires precise soil testing to avoid toxic over-application. |
| Coarse Builder's Sand | Not recommended alone | Theoretically increases drainage. | When mixed with clay without organic matter, it creates a concrete-like substance. Avoid. |
For this specific transformation, we chose to topdress the lawn with a 1/4 inch layer of premium, screened organic compost. Using a landscaping rake and a push broom, we worked the compost deep into the aeration holes. This single step is the secret weapon of professional turf managers; it inoculates the sterile clay with life and creates a hospitable seedbed for the new grass.
Step 4: Seed Selection and Starter Fertilization
Because the 'Before' lawn was a failing Kentucky Bluegrass monoculture that couldn't handle the heat and clay, we pivoted to a modern, deep-rooted Tall Fescue blend. Tall Fescue is incredibly resilient, drought-tolerant, and its roots can penetrate clay soils much deeper than bluegrass or ryegrass. We selected a premium, weed-free Tall Fescue mix containing three different cultivars to ensure genetic diversity, which protects the lawn from localized diseases and pest outbreaks.
We calibrated our rotary spreader and applied the seed at a heavy overseeding rate of 8 pounds per 1,000 square feet. Immediately after seeding, we applied a high-quality starter fertilizer. Starter fertilizers are specifically formulated with a high middle number (Phosphorus), such as an N-P-K ratio of 18-24-12. Phosphorus is the engine of root development, and it is critical for pushing the new seedlings' roots deep into the freshly composted aeration holes. Note: Many municipalities ban phosphorus fertilizers to protect waterways, but almost all local ordinances include an exemption for newly seeded or overseeded lawns, provided you have a soil test or a landscaping plan to prove it.
Step 5: The Critical 21-Day Germination Watering Schedule
You can do everything perfectly up to this point, but if you fail the watering test, your transformation will end in tragedy. Grass seed must remain continuously moist to germinate and establish. If the seed sprouts and then dries out for even a few hours, the delicate new root will die instantly. For the first 14 to 21 days, the 'After' lawn required a strict, almost obsessive watering regimen.
We programmed the smart irrigation controller to water the lawn three times a day—early morning, midday, and late afternoon—for just 5 to 8 minutes per zone. The goal was not to deeply soak the soil, but to keep the top half-inch of the compost and seed constantly damp. As the Tall Fescue seedlings emerged and reached a height of about 1.5 inches, we gradually reduced the frequency of watering to once a day, but increased the duration to 20 minutes. This transition trains the young roots to chase the moisture deeper into the clay soil, establishing the drought tolerance that the 'Before' lawn desperately lacked.
The 'After' State: 90 Days to a Lush Oasis
Fast forward 90 days from the initial renovation. The 'After' transformation is nothing short of spectacular. The bare, cracked clay patches are entirely gone, replaced by a dense, emerald-green carpet of Tall Fescue. Because we invested the time and heavy lifting into core aeration and compost topdressing, the new grass roots have pushed down 4 to 6 inches into the soil profile. The lawn now absorbs heavy rainfall like a sponge, completely eliminating the muddy puddling issues that plagued the 'Before' state.
The first mow of the newly transformed lawn was performed at the 30-day mark, with the mower deck set high at 3.5 inches. Cutting tall is essential for cool-season grasses, as it shades the soil, retains moisture, and prevents new weed seeds from receiving the sunlight they need to germinate. Moving forward, the maintenance routine for this 'After' lawn is remarkably simple: mow high, mulch the clippings, apply a slow-release nitrogen fertilizer in the late fall, and perform a preventative core aeration every other year to keep the clay from re-compacting.
Conclusion: Is the Transformation Worth It?
Renovating a heavily compacted, weedy clay lawn is not a weekend project that can be completed with a single trip to the garden center. It requires physical labor, strategic planning, and a strict adherence to seasonal timing. However, as the dramatic before-and-after results demonstrate, the return on investment is immense. By addressing the root cause of the failure—the soil structure—and introducing resilient turfgrass genetics, you can permanently change the trajectory of your landscape. A thriving lawn not only boosts property value and curb appeal but also creates a safe, beautiful outdoor space for your family to enjoy for decades to come.

