
Gardening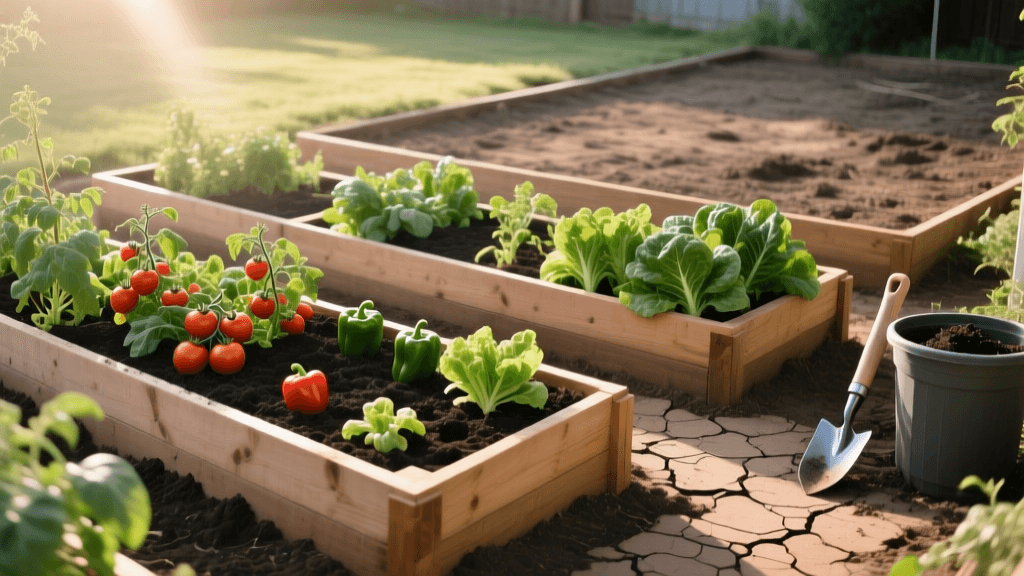
Backyard Garden Transformation: Clay Soil to Raised Beds
The Before State: A Compacted Clay Nightmare
Every gardener has faced a landscape that seems determined to resist their best efforts. Two years ago, my backyard was a prime example of stubborn, unyielding terrain. The before state of our garden was a compacted, heavy clay expanse that baked into concrete during the summer and turned into a swampy bog during the spring thaw. Our initial attempts to grow vegetables directly in the ground resulted in stunted root systems, rampant drainage issues, and a heartbreaking harvest. This article documents the complete before-and-after transformation of that barren clay patch into a highly productive, 128-square-foot raised bed vegetable oasis, detailing the exact materials, costs, and horticultural strategies used to achieve a lush, thriving garden.
The Pivot: Why We Chose Raised Beds Over Tilling
The native soil in our yard was classified as heavy silty clay. When wet, it remained waterlogged for days, suffocating plant roots and promoting fungal diseases like phytophthora. When dry, it formed deep, impenetrable cracks that sheared delicate root hairs. According to soil experts, amending native clay soil on a large scale is a multi-year endeavor that requires relentless applications of organic matter and deep mechanical aeration. Rather than fighting a losing battle against the native soil profile, we opted for a complete spatial transformation. As noted by Penn State Extension, raised beds offer an immediate solution to poor drainage and compacted soils, allowing gardeners to bypass native soil limitations entirely by creating a controlled, optimized growing environment above ground.
Step 1: Site Preparation and Sheet Mulching
The first step in our transformation was site preparation. We did not want to use chemical herbicides to clear the existing patchy, weed-choked grass. Instead, we utilized a sheet mulching technique. We mowed the area as short as possible and laid down overlapping layers of plain, uncoated corrugated cardboard. This method blocks sunlight, effectively smothering the grass and weeds while allowing earthworms and soil microbes to break down the organic matter over time. The United States Environmental Protection Agency (EPA) highly recommends utilizing carbon-rich materials like cardboard and leaves in composting and mulching practices to improve soil health without relying on synthetic chemicals. We wet the cardboard thoroughly and covered it with a two-inch layer of arborist wood chips to hold it in place while we constructed the beds.
Step 2: Constructing the Cedar Raised Beds
For the raised beds, we chose untreated, rough-sawn western red cedar due to its natural rot resistance and longevity. We constructed two beds, each measuring 4 feet wide by 8 feet long, with a depth of 18 inches. The 4-foot width is crucial, as it allows a gardener to reach the center of the bed from either side without ever stepping on the soil, thereby preventing future compaction. The 18-inch depth provides ample room for deep-rooting crops like indeterminate tomatoes and parsnips. To protect against subterranean pests like gophers and voles, we stapled heavy-duty 1/2-inch galvanized hardware cloth to the entire bottom footprint of each bed before setting them in place. According to The Old Farmer's Almanac, securing the base with hardware cloth is an essential, often-overlooked step that saves countless hours of frustration and lost crops later in the season. We leveled the beds using a string line and a carpenter's level, ensuring the tops were perfectly even to facilitate uniform water distribution.
Step 3: Engineering the Perfect Soil Mix
The most critical component of any raised bed transformation is the soil. Filling a 4x8 bed that is 18 inches deep requires approximately 48 cubic feet of soil per bed. We avoided cheap topsoil bags, which often contain hidden clay and weed seeds, and instead mixed our own premium, well-draining, moisture-retentive blend. We adapted the famous square-foot gardening soil recipe to be more sustainable and cost-effective, substituting peat moss with coco coir. Our recipe consisted of 40 percent high-quality organic compost, 40 percent coco coir for moisture retention, and 20 percent pumice for aeration and drainage. We also incorporated a slow-release organic granular fertilizer and a dusting of glacial rock dust for trace minerals.
Soil Mix Cost and Volume Breakdown
Below is the exact cost and volume breakdown for filling a single 4x8x1.5 foot raised bed:
| Material | Volume Required | Estimated Cost | Purpose |
|---|---|---|---|
| Organic Compost Blend | 19.2 cu ft | $75.00 | Microbial life and primary nutrients |
| Coco Coir (Expanded) | 19.2 cu ft | $55.00 | Moisture retention and soil structure |
| Horticultural Pumice | 9.6 cu ft | $40.00 | Drainage and aeration |
| Organic Granular Fertilizer | 6 cups | $12.00 | Baseline N-P-K and micronutrients |
| Total Per Bed | 48.0 cu ft | $182.00 | Complete optimized soil profile |
Step 4: Strategic Planting and Companion Gardening
With the beds filled, we implemented a high-density companion planting strategy to maximize our 64 square feet of growing space per bed. In Bed 1, we planted indeterminate Cherokee Purple tomatoes on a heavy-duty cattle panel trellis. At the base of the tomatoes, we interplanted bush basil and sweet alyssum. The basil acts as an aromatic pest deterrent, while the alyssum attracts predatory hoverflies and parasitic wasps that naturally control aphid populations. In Bed 2, we focused on a high-yield succession planting of bush beans, zucchini, and Swiss chard, bordered by nasturtiums to serve as a trap crop for pests. This dense, diverse planting approach mimics natural ecosystems, reducing weed pressure and maximizing photosynthetic output.
The After State: First Season Yields and Lessons
The after state, just 14 weeks post-planting, was nothing short of spectacular. The barren, cracked clay patch was entirely hidden beneath a lush, vibrant canopy of green foliage and ripening fruit. The physical transformation of the space was matched only by the culinary transformation of our kitchen. Over the course of the 20-week growing season, the two raised beds produced over 140 pounds of organic vegetables. The Cherokee Purple tomatoes alone yielded 65 pounds of fruit, completely free of the blossom end rot that had plagued our previous in-ground attempts due to inconsistent clay soil moisture.
The true measure of a garden's success is not just the weight of the harvest, but the resilience of the ecosystem you have built above the soil.
Conclusion
Transforming a hostile clay backyard into a productive vegetable garden requires an upfront investment of time, labor, and capital, but the dividends are immediate and immense. By abandoning the fight against native clay and embracing the controlled environment of raised beds, we bypassed years of soil remediation. The before-and-after contrast is a testament to the power of proper soil engineering and strategic garden design. For any gardener staring down a backyard of unworkable clay, the raised bed transformation is not just a landscaping project; it is the fastest, most reliable pathway to gardening success.

