
Gardening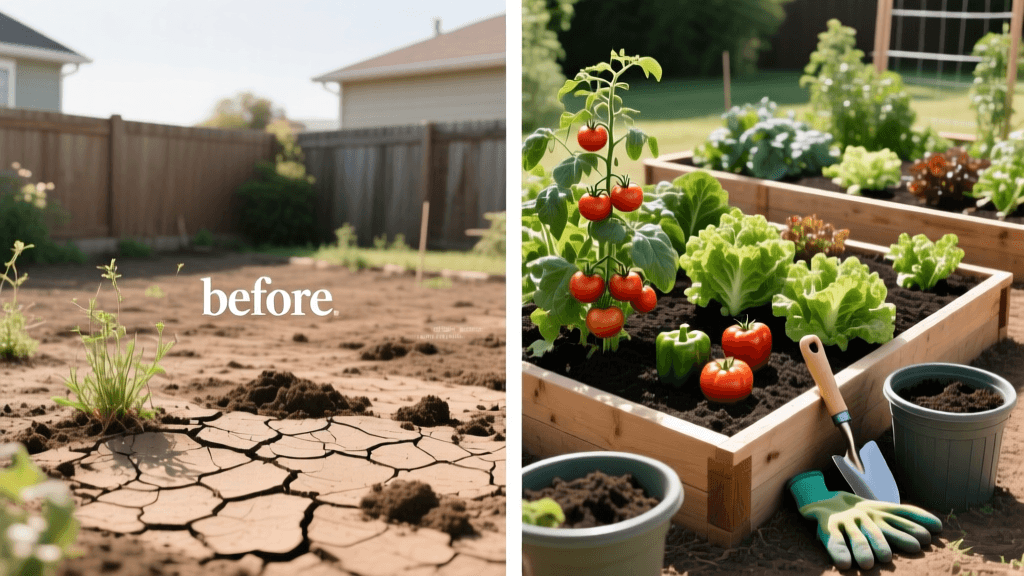
Backyard Garden Transformation: Clay Soil to Raised Beds
The "Before" State: A Compacted Clay Wasteland
When we first surveyed the 20-by-20-foot patch of neglected backyard in our Zone 6b property, the term "hardpan" was an understatement. The native soil was heavy, impermeable clay that baked into concrete-like fissures during the peak of summer and turned into a waterlogged, anaerobic swamp during the spring thaw. A rudimentary percolation test revealed that it took over four hours for a single inch of water to drain. Furthermore, the area was entirely choked by aggressive perennial weeds, primarily quackgrass and Canada thistle, which had established deep, nearly indestructible rhizome networks.
Traditional tilling was out of the question; rototilling would only chop the weed rhizomes into hundreds of new propagules, guaranteeing a worse infestation the following season. The soil test results from our local university extension confirmed our visual assessment: a pH of 7.9, severely compacted structure, and less than 1% organic matter. We needed a radical transformation that bypassed the native soil entirely while simultaneously rehabilitating the ecosystem beneath it.
Phase 1: Sheet Mulching to Eradicate Weeds and Build Biology
Instead of fighting the clay and the weeds with chemical herbicides or destructive tilling, we opted for a passive, highly effective method known as sheet mulching or "lasagna gardening." This technique aligns perfectly with the principles of soil conservation advocated by the USDA Natural Resources Conservation Service, which emphasizes keeping the soil covered and minimizing disturbance to protect soil biology.
We began by mowing the existing weeds as low as possible, leaving the clippings in place to decompose. Next, we laid down overlapping sheets of plain, uncoated corrugated cardboard, ensuring a minimum overlap of six inches at every seam to prevent any opportunistic weeds from finding the light. We thoroughly soaked the cardboard with a garden hose until it was completely saturated, which accelerates decomposition and makes it immediately unappealing to burrowing rodents.
On top of the cardboard, we applied a two-inch layer of diverse, OMRI-listed organic compost, followed by a three-inch layer of aged arborist wood chips. According to the Environmental Protection Agency (EPA), recycling organic materials like wood chips and compost not only diverts waste from landfills but also introduces vital microbial life to degraded soils. This layered approach would smother the weeds, retain moisture, and slowly break down, feeding the earthworms and fungi that would eventually fracture the compacted clay beneath.
Phase 2: Constructing the Cedar Raised Beds
While the sheet mulch began its slow work of rehabilitating the subsoil, we needed an immediate, usable growing space for the upcoming season. We decided to construct two large raised beds directly on top of the sheet-mulched area. We chose untreated, rough-sawn Western Red Cedar for its natural rot resistance and longevity, avoiding chemically treated lumber that could leach unwanted compounds into our food supply.
The dimensions for each bed were 4 feet wide by 8 feet long, with a depth of 11 inches. The 4-foot width is crucial, as it allows a gardener to reach the exact center of the bed from either side without ever stepping on the soil, thereby preventing future compaction. We reinforced the corners with heavy-duty aluminum corner brackets and secured the boards using 3-inch exterior-grade stainless steel star-drive screws to prevent rust streaking and structural failure over time.
Tools and Materials Required
- (4) 2x11x8 foot Cedar Boards
- (4) 2x11x4 foot Cedar Boards
- (8) Aluminum Corner Brackets
- (1 box) 3-inch Stainless Steel Deck Screws
- Impact Driver, Drill, Level, and Rubber Mallet
Phase 3: The Ultimate Raised Bed Soil Recipe
Filling raised beds is often where new gardeners make their most expensive mistakes. Buying bagged "potting soil" for large beds is financially ruinous, while filling them with native topsoil or cheap "garden soil" often results in severe compaction and poor drainage over time. The Royal Horticultural Society (RHS) notes that container and raised bed environments require a delicate balance of moisture retention and free drainage to prevent root rot and nutrient lockout.
We developed a custom, bulk-delivered soil mix designed specifically for intensive vegetable production. A 4x8 bed that is 11 inches deep holds roughly 24 cubic feet of soil. For two beds, we needed 48 cubic feet (about 1.8 cubic yards). We ordered 2 cubic yards to account for initial settling and watering.
| Component | Percentage | Volume (for 2 Cu. Yards) | Purpose |
|---|---|---|---|
| High-Quality Topsoil | 40% | 0.8 Cu. Yards | Provides mineral base and structural bulk |
| Organic Compost Blend | 40% | 0.8 Cu. Yards | Supplies slow-release nutrients and microbial life |
| Coarse Pumice / Perlite | 20% | 0.4 Cu. Yards | Ensures long-term aeration and prevents compaction |
Pro Tip: Never use pure peat moss or coconut coir as a primary base for raised beds; while they hold water well, they lack the mineral structure necessary to support heavy-feeding crops like tomatoes and squash over a long season.
Phase 4: Companion Planting and Layout Strategy
With the beds filled and settled, it was time to plant. We utilized intensive square-foot gardening principles combined with strategic companion planting to maximize our yield and naturally deter pests.
In Bed 1, we planted indeterminate Cherokee Purple tomatoes, trellised them using heavy-duty concrete reinforcing wire panels, and underplanted them with Genovese basil and French marigolds. The marigolds are well-documented for their ability to exude alpha-terthienyl from their roots, which suppresses harmful root-knot nematodes in the soil. We also added nasturtiums as a trap crop at the corners to draw aphids away from the primary harvest.
In Bed 2, we focused on a high-turnover salad and root crop rotation. We interplanted loose-leaf lettuces, radishes, and bush peas, utilizing the peas' nitrogen-fixing capabilities to feed the heavy-feeding leafy greens. By the time the peas finished producing in early summer, the space was immediately succession-planted with heat-tolerant Swiss chard and bush beans.
The "After" Transformation: 90 Days Later
The visual and ecological transformation of this space in just 90 days was nothing short of astonishing. The "before" photos show a barren, cracked, weed-choked patch of useless clay. The "after" photos reveal a lush, vibrant, and highly productive edible landscape.
The cedar beds provided a clean, structured aesthetic that instantly elevated the backyard's design. More importantly, the soil biology was thriving. When we gently lifted the edge of one bed to inspect the cardboard layer, we found it had almost entirely decomposed, replaced by a dark, friable layer of humus teeming with earthworms that were actively pulling organic matter down into the once-impermeable clay.
The yields were spectacular. The Cherokee Purple tomatoes, benefiting from the deep, uncompacted soil and consistent moisture retention of our custom mix, produced over 60 pounds of fruit per plant. The drainage issues were completely resolved; even after a two-inch summer downpour, the raised beds absorbed the water instantly, with zero pooling or runoff.
Project Cost and ROI Breakdown
Transforming a yard doesn't have to break the bank, especially when you factor in the long-term yield of homegrown organic produce. Below is the exact cost breakdown for this 90-day transformation.
| Item / Material | Quantity | Estimated Cost |
|---|---|---|
| Western Red Cedar Lumber | 8 boards | $280.00 |
| Hardware (Brackets & Screws) | 1 kit | $45.00 |
| Cardboard (Sourced for free) | 40 boxes | $0.00 |
| Arborist Wood Chips (Free delivery) | 1 cubic yard | $0.00 |
| Bulk Soil Mix (Topsoil/Compost/Pumice) | 2 cubic yards | $160.00 |
| Seeds and Transplants | Assorted | $65.00 |
| Total Project Cost | $550.00 |
Conclusion
Transforming a hostile, compacted clay yard into a productive vegetable garden does not require heavy machinery, chemical herbicides, or an endless budget. By leveraging the power of sheet mulching, building durable raised beds, and investing in a high-quality soil profile, you can completely rewrite the ecological destiny of your backyard. The before and after results speak for themselves: nature, when given the right organic building blocks and a little structural support, will do the heavy lifting for you.

