
Gardening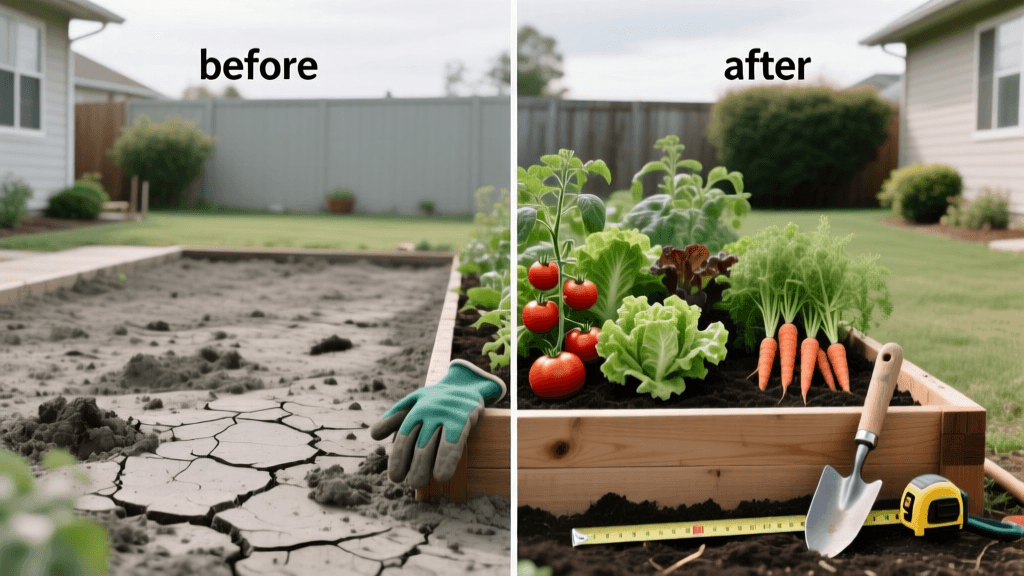
Backyard Makeover: Transforming Clay Into Raised Beds
The 'Before' State: A Compacted Clay Nightmare
Every gardener has faced a daunting outdoor space, but few are as challenging as a backyard dominated by heavy, compacted clay soil. Our project site began as a 20-by-30-foot barren patch behind a suburban home. The 'before' conditions were dismal: water pooled for days after a light rain, the surface baked into rock-hard clumps during the summer, and native weeds were the only things thriving. Digging a simple hole for a transplant required a pickaxe. According to the University of Minnesota Extension, clay soils have extremely small pore spaces, which severely restricts root penetration and drainage, making traditional in-ground vegetable gardening an exercise in frustration.
Our vision for the 'after' was a lush, accessible, and highly productive vegetable garden. Instead of fighting the clay with endless tilling and gypsum amendments, we decided to build above it. The goal was to construct four large raised beds, completely bypassing the native soil issues while creating a visually stunning backyard transformation.
Phase 1: Site Preparation and Smothering (Week 1)
The first step in our before-and-after transformation was clearing the space without destroying the underlying soil structure further. Tilling wet clay creates hard clods that are nearly impossible to break apart later. Instead, we opted for sheet mulching, also known as the lasagna method.
- Clearing: We mowed the existing weeds and grass as short as possible using a string trimmer.
- Smothering: We laid down overlapping layers of heavy-duty, unwaxed contractor cardboard directly over the mowed area.
- Wetting: The cardboard was thoroughly soaked with a garden hose to initiate the decomposition process and keep it anchored against the wind.
This barrier not only kills the existing vegetation by blocking sunlight but also invites earthworms to the surface, which will naturally help break up the clay boundary layer over the next few seasons.
Phase 2: Constructing the Raised Beds (Week 2)
For the physical structures, we chose untreated, rot-resistant Western Red Cedar. While composite materials last longer, cedar offers a beautiful, natural aesthetic that ages to a distinguished silver-gray, fitting our desired 'after' landscape design.
Measurements and Materials:
- Dimensions: 4 feet wide by 8 feet long. This width ensures you can reach the center of the bed from either side without stepping on the soil and causing compaction.
- Height: 11 inches (achieved by stacking two 2x6 inch boards). This depth is sufficient for most vegetable roots while containing the soil volume to keep costs manageable.
- Hardware: Stainless steel exterior screws and powder-coated steel corner brackets to prevent the wood from bowing outward over time.
We assembled the beds directly on top of the wet cardboard. To deter burrowing pests like voles and gophers, we stapled a layer of 1/2-inch galvanized hardware cloth to the bottom of each bed before setting them in place. The total material cost for the wooden frames and hardware came to roughly $135 per bed.
Phase 3: The Ultimate Soil Recipe (Week 3)
The most critical component of any raised bed transformation is the soil. Filling beds with native clay or cheap, unamended topsoil will replicate the very problems you are trying to escape. We followed a modified version of the classic 'Mel's Mix' popularized by square foot gardening, tailored with regional bulk materials to save money.
The Wisconsin Master Gardener program recommends a blend that provides excellent drainage, moisture retention, and organic matter. We mixed our soil directly in the beds using a tarp and a shovel to ensure even distribution.
Soil Amendment Cost & Volume Breakdown (Per 4x8x11 Bed)
| Ingredient | Volume Needed | Estimated Cost | Purpose |
|---|---|---|---|
| Bulk Screened Topsoil | 12 Cubic Feet | $25 (Bulk delivery prorated) | Base structure and mineral content |
| Organic Compost | 8 Cubic Feet | $30 (Bulk delivery prorated) | Nutrients and microbial life |
| Coconut Coir | 4 Cubic Feet | $22 (Two compressed bricks) | Moisture retention (sustainable peat alternative) |
| Coarse Vermiculite | 4 Cubic Feet | $35 (Bagged) | Aeration and water retention |
| Organic Granular Fertilizer | 2 Cups | $5 | Baseline N-P-K nutrients |
Total Soil Cost Per Bed: ~$117. Total Project Soil Cost (4 beds): ~$468.
Phase 4: Strategic Planting and Companion Layout (Week 4)
With the beds filled and settled, it was time to plant. We utilized intensive spacing and companion planting to maximize the 'after' visual appeal and biological health of the garden.
- Bed 1 (The Nightshade Haven): Indeterminate cherry tomatoes trained up heavy-duty cattle panel trellises, underplanted with basil to deter pests and improve flavor, surrounded by a border of French marigolds to suppress root-knot nematodes.
- Bed 2 (The Leafy Greens & Roots): Succession-planted Swiss chard, butterhead lettuce, and radishes, shaded slightly by a trellis of climbing snap peas on the northern edge.
- Bed 3 (The Squash & Pollinator Zone): Bush zucchini in the center, surrounded by nasturtiums (acting as a trap crop for aphids) and borage to attract essential pollinators.
- Bed 4 (The Pepper & Allium Display): Bell peppers and jalapeños interplanted with bunching onions and garlic to confuse olfactory pests with strong scents.
We installed a drip irrigation system with 1/4-inch emitter tubing snaking through each bed, connected to a smart Wi-Fi timer. This ensured consistent moisture without wetting the foliage, a crucial step in preventing fungal diseases like powdery mildew and early blight.
The 'After' Reveal: Month 3 Results
Fast forward 90 days, and the transformation is nothing short of spectacular. The barren, waterlogged clay patch is now a vibrant, structured, and highly productive edible landscape.
Visual Impact: The cedar beds have anchored the space, creating clean geometric lines. The cattle panel trellises are completely obscured by a towering wall of green tomato vines and bright yellow blossoms. The pathways between the beds, covered in 3 inches of arborist wood chips, provide a clean, mud-free walking surface that contrasts beautifully with the lush foliage.
Harvest Yields: By bypassing the clay soil and utilizing our custom soil blend, the plants experienced zero transplant shock and grew at an accelerated rate. In just the third month, we harvested over 40 pounds of cherry tomatoes, 15 pounds of zucchini, and continuous daily cuttings of lettuce and chard. The drip irrigation system reduced our water usage by an estimated 40% compared to the overhead sprinklers previously used on the lawn.
Final Thoughts on the Transformation
Transforming a hostile clay environment into a thriving raised bed garden requires an upfront investment of time, physical labor, and capital. However, the 'before and after' results speak for themselves. By building up rather than digging down, you gain complete control over your soil ecology, drainage, and planting density. Whether you are dealing with heavy clay, rocky terrain, or poor sandy soil, the raised bed transformation is a proven strategy to turn your backyard liabilities into your greatest gardening assets.

