
Gardening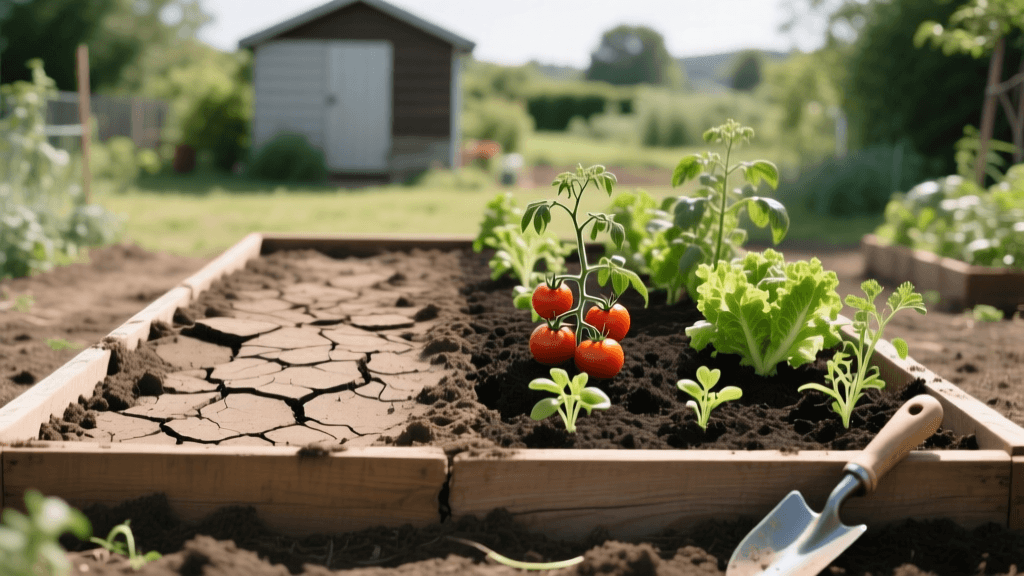
Before and After: Turning Compacted Clay Into a Raised Bed Garden
The Challenge: Gardening in Heavy Clay
Every gardener has that one problem area in their yard. For our suburban property, it was a 100-square-foot patch of sun-baked, heavily compacted clay soil situated in the center of the backyard. For years, this area was a barren wasteland. During the spring rains, it turned into a muddy bog that held standing water for days. In the heat of summer, it baked into a cracked, concrete-like surface that broke our gardening trowels and stifled any attempt at growing even the hardiest weeds. We wanted a thriving vegetable garden, but the native soil was entirely inhospitable to delicate root systems. This is the story of how we transformed this useless clay patch into a highly productive, beautiful raised bed vegetable garden, complete with a full breakdown of the costs, materials, and timeline.
The “Before” State: Assessing the Damage
Before breaking ground, we conducted a thorough site assessment and soil test. The results were exactly what we feared. The soil consisted of over 60% clay particles, with a pH of 7.8 (highly alkaline) and almost zero organic matter. According to the USDA Natural Resources Conservation Service, healthy soil requires a balance of physical structure, biological activity, and chemical nutrients. Our clay patch failed on all three fronts. The tightly bound clay particles left no room for oxygen or water infiltration, creating an anaerobic environment where beneficial soil microbes simply could not survive. Tilling the clay was out of the question; doing so would only destroy the minimal structure that existed and create hardpan layers just beneath the surface. We needed a complete elevation strategy: raised beds.
The Blueprint for Transformation
To bypass the native clay entirely while still utilizing the space, we decided to build two 4x8-foot raised beds, oriented north-to-south to maximize sun exposure. The transformation was broken down into three critical phases: site preparation, construction, and soil formulation.
Step 1: Site Preparation and Sheet Mulching
Rather than digging out the clay or using toxic chemical herbicides to kill the sparse, weedy grass, we opted for a no-dig sheet mulching approach. In early March, we mowed the area as short as possible and laid down overlapping layers of plain, uncoated corrugated cardboard. We ensured every edge overlapped by at least 6 inches to prevent weeds from finding a gap. After laying the cardboard, we soaked it thoroughly with a garden hose. This process, known as solarization and smothering, deprives the underlying vegetation of light, effectively killing it while allowing earthworms to eventually break down the cardboard and integrate it into the clay below. This step took about two hours and cost virtually nothing, as we sourced the cardboard from a local appliance store for free.
Step 2: Constructing the Raised Beds
We chose untreated Western Red Cedar for the bed walls due to its natural resistance to rot and insects. To ensure deep root growth for crops like tomatoes and carrots, we built the beds to be 18 inches deep (using three 2x6 boards stacked on each side). Because the underlying clay was so hard and poorly draining, we did not want the beds to become giant wooden bathtubs that held water. To solve this, we left the bottom of the beds completely open to the cardboard. We also lined the very bottom with 19-gauge, 1/2-inch galvanized hardware cloth to prevent burrowing pests like gophers and voles from entering the beds from below. The cedar was secured using 3-inch exterior-grade deck screws driven into 4x4 corner braces for maximum structural integrity against the outward pressure of wet soil.
Step 3: Formulating the Perfect Soil Mix
The success of a raised bed relies entirely on the soil you put inside it. We avoided cheap “garden soil” bags from big-box stores, which often compact over time. Instead, we mixed our own premium loam directly in the beds. We used a modified version of the famous square-foot gardening mix: 40% high-quality organic compost, 40% coconut coir (a sustainable alternative to peat moss that retains moisture beautifully), and 20% coarse vermiculite for aeration. The Environmental Protection Agency (EPA) notes that compost not only enriches soil with vital nutrients but also improves its structure and water-holding capacity. By using a diverse blend of mushroom compost, composted cow manure, and homemade leaf mold, we ensured a broad spectrum of micronutrients and beneficial biology.
Cost and Materials Breakdown
Budgeting is a crucial part of any garden transformation. Below is the exact breakdown of what we spent to build and fill two 4x8x18-inch raised beds. Note that prices may vary based on your region and material availability.
| Material | Quantity | Estimated Cost | Purpose |
|---|---|---|---|
| Western Red Cedar (2x6x8) | 12 boards | $185.00 | Bed walls (18 inches deep) |
| 4x4 Cedar Corner Posts | 8 pieces | $45.00 | Structural corner bracing |
| Galvanized Hardware Cloth | 2 rolls (4x8) | $60.00 | Gopher and pest barrier |
| Exterior Deck Screws | 2 boxes | $25.00 | Securing lumber |
| Bulk Organic Compost | 1 cubic yard | $80.00 | Nutrient base (40% of mix) |
| Coconut Coir Bricks | 10 blocks | $95.00 | Moisture retention (40% of mix) |
| Coarse Vermiculite | 4 cu. ft. bags | $110.00 | Aeration and drainage (20% of mix) |
| Total Project Cost | $600.00 | Complete transformation |
While $600 might seem like a significant upfront investment, it is important to view this as a long-term infrastructure project. These cedar beds will easily last 15 to 20 years, and the soil will only improve with age, requiring minimal top-ups of compost in subsequent seasons.
The “After” State: One Year Later
Fast forward fourteen months, and the transformation is nothing short of miraculous. The “before” state of puddling water and cracked earth is entirely gone. Today, the raised beds are a lush, overflowing oasis of productivity. Because the beds are 18 inches deep and sit above the compacted clay, drainage is flawless. Even during heavy spring downpours, water infiltrates the soil mix in seconds, never pooling on the surface.
In our first full growing season, the two beds produced over 220 pounds of organic produce. We grew indeterminate cherry tomatoes, bell peppers, bush cucumbers, and a variety of root vegetables. The carrots, which would have been stunted and deformed in the native clay, grew straight and deep into the fluffy vermiculite and coir mix. Furthermore, the soil biology has exploded. When we pull back the mulch, we see countless earthworms and beneficial mycelium networks working to break down organic matter, a stark contrast to the sterile, dead clay beneath the beds.
“The health of the soil is the foundation of the entire garden ecosystem. When you build the soil structure, you are not just feeding the plant; you are feeding the microbial life that makes nutrients available to the plant.”
Actionable Tips for Your Own Transformation
If you are looking to replicate this before-and-after transformation in your own yard, keep these critical tips in mind:
- Never Step in the Beds: The primary advantage of a 4-foot-wide raised bed is that you can reach the center from either side without ever stepping on the soil. Compacting your carefully formulated soil mix will undo all your hard work.
- Utilize Companion Planting: We interplanted our tomatoes with sweet basil and French marigolds. The basil helps deter hornworms and improves the flavor of the tomatoes, while the marigolds secrete compounds from their roots that deter harmful root-knot nematodes.
- Mulch Heavily: Once your seedlings are established, apply a 2-inch layer of organic straw or shredded leaves. This regulates soil temperature, drastically reduces water evaporation, and suppresses weed growth.
- Top-Dress Annually: Soil levels will naturally drop by a few inches each year as the organic matter decomposes. Every spring, before planting, top-dress the beds with 2 inches of fresh compost and a slow-release organic granular fertilizer.
- Install Drip Irrigation: To maximize efficiency and keep foliage dry (preventing fungal diseases), lay drip irrigation lines on a grid system across the top of the soil, beneath your mulch layer. We use a timer that waters the beds deeply for 30 minutes every other morning.
Conclusion
Transforming a barren, compacted clay patch into a thriving raised bed garden is one of the most rewarding projects a home gardener can undertake. While it requires an initial investment of time, labor, and materials, the “after” results speak for themselves. By elevating your growing space above poor native soil and focusing on a biologically active, well-draining soil mix, you completely bypass the limitations of your yard. Whether you are dealing with heavy clay, rocky terrain, or poor drainage, the raised bed method offers a reliable, scalable, and beautiful solution to grow your own food and flowers for decades to come.

