
Gardening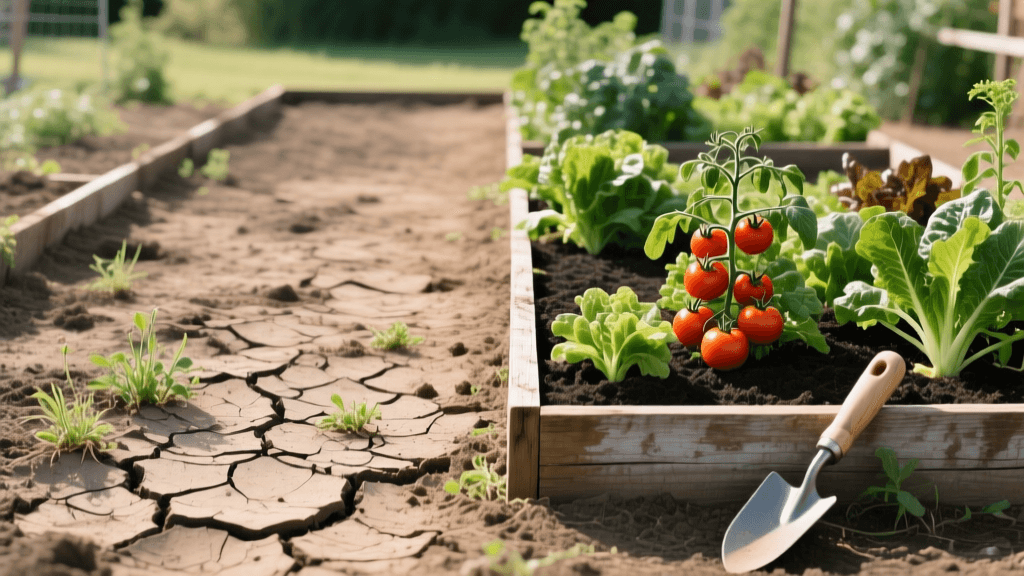
Backyard Garden Transformation: From Bare Clay to Raised Beds
The 'Before' State: Battling Compacted Clay and Poor Drainage
Every gardener dreams of a lush, productive backyard oasis, but the reality of many suburban lots is far from ideal. Our transformation journey began in a neglected 20-by-30-foot patch of backyard that was essentially a barren wasteland of compacted clay soil. During the spring thaw, this area would hold standing water for days, creating a muddy bog that attracted mosquitoes and drowned any unfortunate weed that tried to take root. By mid-summer, the relentless sun baked the clay into a concrete-like crust that repelled water and made digging nearly impossible.
According to soil scientists, heavy clay soils suffer from poor aeration and drainage, which suffocates plant roots and inhibits the microbial life necessary for a healthy garden ecosystem. Attempting to grow vegetables directly in this ground was a recipe for failure. In our first year, carrots came out stunted and deformed, while heirloom tomato plants quickly succumbed to root rot and fungal diseases. We tried amending the native soil with gypsum and endless tilling, but the physical toll was high and the results were disappointing. We knew that to achieve the vibrant, high-yield garden we envisioned, a complete structural transformation was required. The solution? Abandoning the native clay and building a series of elevated, no-till raised beds.
Phase 1: Designing the Raised Bed Layout
The first step in our before-and-after transformation was mapping out the space. We oriented the beds north-to-south to maximize sun exposure throughout the day, ensuring that taller crops would not cast shadows on shorter ones. We opted for three 4-by-8-foot raised beds, a standard size that allows easy access to the center of the bed without ever stepping on and compacting the soil.
According to the Royal Horticultural Society (RHS), raised beds warm up faster in the spring and provide superior drainage, making them the ultimate remedy for heavy clay yards. For the bed material, we chose untreated, rough-sawn cedar. Cedar is naturally rot-resistant and avoids the chemical leaching concerns associated with older pressure-treated lumber. We built the beds to a depth of 11 inches using two stacked 2x6 boards. This depth is sufficient for most shallow-rooted vegetables like lettuce, radishes, and bush beans, while deeper-rooting crops like tomatoes and carrots will happily extend their roots down into the cardboard-smothered native soil below.
Phase 2: The Cardboard Smother and Base Layer
Rather than tilling the compacted clay—which can actually destroy soil structure and bring dormant weed seeds to the surface—we employed a no-till smothering technique. We laid down overlapping layers of plain, uncoated corrugated cardboard directly over the existing grass and weeds, ensuring there were no gaps for aggressive bindweed to slip through.
This layer serves a dual purpose: it blocks sunlight to kill the underlying vegetation, and it eventually breaks down to feed earthworms and beneficial fungi. As the Environmental Protection Agency (EPA) notes, incorporating carbon-rich materials like cardboard into your garden base is an excellent way to recycle household waste while improving soil biology. We wet the cardboard thoroughly with a hose before adding our soil mix to kickstart the decomposition process and create a welcoming environment for deep-soil earthworms.
Phase 3: Mixing the Perfect Raised Bed Soil
The secret to a dramatic 'after' transformation lies entirely in the soil. Because raised beds are a closed environment, you cannot rely on native dirt. We needed a mix that retained moisture but drained flawlessly. We formulated a custom blend inspired by traditional square-foot gardening ratios, adjusted for modern sustainability by swapping peat moss for renewable coconut coir.
The Ultimate Raised Bed Soil Recipe
- 40% High-Quality Topsoil: Provides the mineral base and structural bulk.
- 40% Organic Compost: A blend of mushroom compost, vermicompost, and homemade kitchen scrap compost to provide slow-release nutrients and microbial life.
- 20% Aeration and Moisture Retention: A 50/50 mix of coarse vermiculite and coconut coir to hold water and keep the soil fluffy.
Before mixing, we highly recommend getting a baseline understanding of your inputs. While you are buying bagged soil, if you ever plan to amend with local native soil or well-rotted manure in the future, a professional soil test from an institution like the University of Minnesota Extension can prevent nutrient lockout and toxic over-fertilization.
Soil Investment Breakdown (Per 4x8 Bed)
| Material | Volume Needed | Estimated Cost | Purpose |
|---|---|---|---|
| Organic Topsoil | 12 cubic feet | $60.00 | Mineral base and structure |
| Blended Compost | 12 cubic feet | $85.00 | Nutrients and microbiology |
| Coconut Coir (Bricks) | 3 cubic feet (expanded) | $35.00 | Moisture retention |
| Coarse Vermiculite | 3 cubic feet | $45.00 | Aeration and water holding |
| Organic Granular Fertilizer | 2 cups | $5.00 | Initial NPK boost |
| Total | ~30 cubic feet | $230.00 | Complete soil ecosystem |
While the upfront cost of $230 per bed might seem steep to a beginner, this soil mix will last for years. You will only need to top-dress with an inch or two of fresh compost each spring to maintain the perfect growing medium, making it highly cost-effective over time.
Phase 4: Strategic Planting and Companion Gardening
With the beds filled and watered deeply to let the soil settle, it was time to plant. We utilized intensive companion planting to maximize our yield and naturally deter pests without resorting to synthetic chemicals. In the center bed, we planted indeterminate cherry tomatoes supported by heavy-duty steel trellises. At the base of the tomatoes, we planted sweet basil and French marigolds. The marigolds release alpha-terthienyl from their roots, a compound proven to suppress root-knot nematodes in the soil, while the basil masks the scent of the tomatoes from hornworms.
The second bed was dedicated to leafy greens and root vegetables. We interplanted radishes with carrots; the radishes germinate quickly and break up the soil surface, making it easier for the slower-growing carrot seedlings to emerge. The third bed became our 'salsa garden,' featuring jalapeños, cilantro, and bush cucumbers trained up an A-frame netting trellis to save horizontal space and increase airflow, which is critical for preventing powdery mildew.
The 'After' Transformation: A Season of Abundance
Fast forward four months, and the transformation was nothing short of miraculous. The barren, cracked clay patch that once held puddles of stagnant water was now a vibrant, structured edible landscape. The cedar beds provided clean, geometric lines, while the overflowing foliage created a lush, multi-tiered canopy of green, red, and yellow. The garden had become a focal point of the yard, attracting a diverse array of pollinators, including native bees and monarch butterflies, which had previously ignored our sterile lawn.
The results spoke for themselves. Because the raised bed soil was loose and uncompacted, our carrots grew perfectly straight and deep, a stark contrast to the stunted forks we had pulled from the clay the previous year. The superior drainage prevented the root rot that had plagued our previous in-ground attempts, resulting in over 80 pounds of cherry tomatoes from just four plants. Furthermore, the thick layer of mulch and the underlying cardboard base kept weeds to an absolute minimum, reducing our weekly maintenance time from hours to mere minutes.
Transforming a difficult yard into a productive garden is not about fighting your native soil; it is about building a new, optimized environment above it. By investing in proper bed construction, a science-backed soil recipe, and strategic companion planting, you can turn the most unforgiving clay patch into the envy of the neighborhood and enjoy a bountiful harvest for years to come.

