
Lawn Care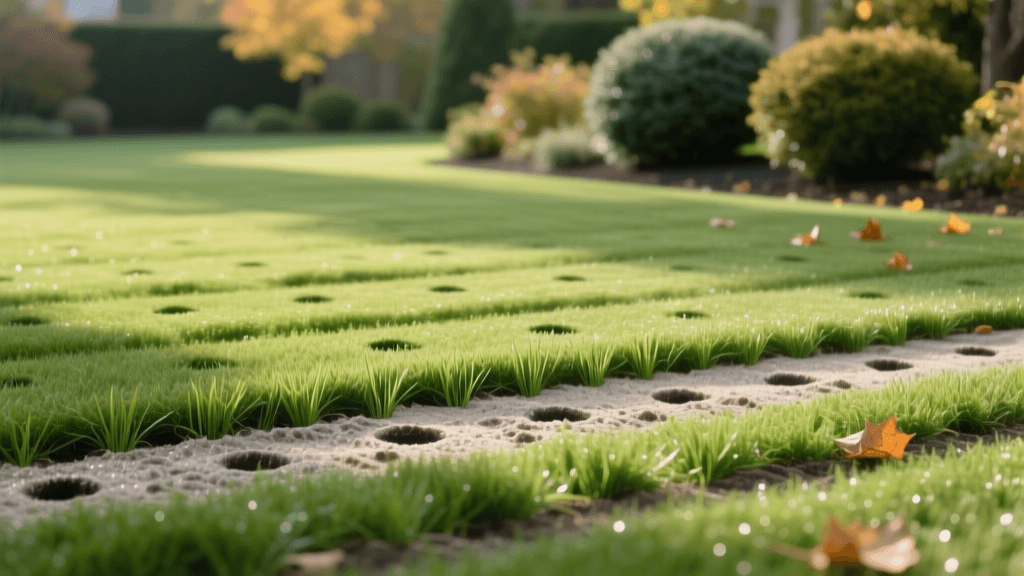
The Ultimate Step-by-Step Cool-Season Lawn Renovation Guide
Why Renovate Your Cool-Season Lawn?
Over time, even the most meticulously maintained cool-season lawns can fall victim to severe environmental stressors. Heavy foot traffic, prolonged drought, soil compaction, thatch buildup, and aggressive weed invasions can leave your turf looking sparse, yellow, and lifeless. Grass species like Kentucky Bluegrass, Tall Fescue, and Perennial Ryegrass are resilient, but they sometimes require a complete reset. Lawn renovation is not just about throwing a few handfuls of seed over dead patches; it is a comprehensive, multi-step recovery process designed to rebuild the soil structure, eradicate competing weeds, and establish a dense, vigorous root system from the ground up.
When to Start the Renovation Process
Timing is the single most critical factor in lawn recovery. According to the University of Minnesota Extension, late summer to early fall (typically mid-August through late September) is the optimal window for renovating cool-season lawns. During this period, soil temperatures remain warm enough to encourage rapid seed germination, while cooling air temperatures reduce heat stress on young seedlings. Furthermore, fall renovation allows the new grass to establish a deep root system before the harsh winter freeze and gives it a significant head start before the aggressive weed germination cycles of spring.
Step 1: Soil Testing and Site Preparation
Before purchasing seed or fertilizer, you must understand the chemical and physical makeup of your soil. Purchase a comprehensive soil test kit from your local university extension office or a reputable private lab (costing roughly $15 to $30). You are looking for two primary metrics: pH level and baseline macronutrient levels (Nitrogen, Phosphorus, and Potassium).
Cool-season grasses thrive in soil with a pH between 6.0 and 7.0. If your soil is too acidic (below 6.0), you will need to apply pelletized limestone to raise the pH. If it is too alkaline (above 7.5), elemental sulfur is required to lower it. Apply these amendments at least four weeks before seeding to give them time to react with the soil profile. Additionally, clear the lawn of debris, large rocks, and heavy thatch. If your thatch layer exceeds half an inch, use a power dethatcher or a stiff metal rake to aggressively pull it up, ensuring the soil surface is exposed.
Step 2: Eradicating Weeds and Dead Turf
If your lawn is heavily infested with weeds or consists of more than 50% dead grass, selective weed control will not be enough. You must clear the canvas. Apply a non-selective, systemic herbicide containing Glyphosate (such as Roundup Pro or a generic equivalent) to kill all existing vegetation. Wait 10 to 14 days for the herbicide to translocate to the roots and fully kill the plants. Once the lawn is completely brown and dead, mow the dead turf as short as your mower will allow (around 1 inch) and bag the clippings. This scalp-mowing removes physical barriers and allows maximum sunlight to reach the soil surface for your new seed.
Step 3: Core Aeration
Soil compaction is a silent lawn killer, preventing water, oxygen, and nutrients from reaching the root zone. Rent a walk-behind core aerator from a local equipment rental center (typically $80 to $100 per day). Core aeration pulls 2-to-3-inch plugs of soil out of the ground, leaving them on the surface to break down and return beneficial microbes to the turf. Run the aerator over the lawn in two perpendicular directions to ensure maximum hole density. Leave the soil plugs on the lawn; they will decompose naturally within a few weeks and help break down any remaining thatch.
Step 4: Slit-Seeding vs. Broadcast Overseeding
When recovering a severely damaged lawn, how you deliver the seed to the soil dictates your success rate. While broadcast overseeding (using a rotary spreader) is fine for minor thinning, slit-seeding is the gold standard for full lawn renovation. As noted by UMass Extension, slit-seeding provides superior seed-to-soil contact, which is vital for moisture retention and germination.
| Feature | Slit-Seeding | Broadcast Overseeding |
|---|---|---|
| Best Use Case | Lawns with >50% damage or bare soil | Lawns with minor thinning (<30% damage) |
| Seed-to-Soil Contact | Excellent (seed is planted in grooves) | Poor to Fair (seed rests on surface) |
| Germination Rate | High (70% - 85%) | Low to Moderate (30% - 50%) |
| Equipment Cost | $70 - $90 / day (rental) | $20 - $40 (purchase spreader) |
| Seed Waste | Minimal | High (eaten by birds, washed away) |
Rent a slit-seeder and calibrate it to cut grooves about 1/4 to 1/2 inch deep. Use a premium seed mix suited to your specific microclimate. For example, a mix containing 80% Turf-Type Tall Fescue and 20% Kentucky Bluegrass (such as Jonathan Green Black Beauty Ultra) offers excellent drought tolerance, disease resistance, and a deep, dark green color. Apply the seed at a rate of 6 to 8 pounds per 1,000 square feet for a complete renovation, running the slit-seeder in two perpendicular directions to create a cross-hatch pattern that ensures uniform coverage.
Step 5: Fertilization and Topdressing
New grass seedlings require a specific nutrient profile to develop strong roots. The definitive Carolina Lawns guide by NC State Extension emphasizes the importance of starter fertilizers, which are high in phosphorus to promote rapid root growth. Apply a high-quality starter fertilizer, such as Scotts Turf Builder Starter Food for New Grass (24-25-4) or Lesco Professional Starter Fertilizer (18-24-12), immediately after seeding. Follow the bag's application rates precisely to avoid burning the tender new shoots.
After fertilizing, consider topdressing the lawn with a thin layer (1/4 inch) of finely screened compost or a peat moss product like Scotts EZ-Mulch. This layer acts as a protective blanket, retaining soil moisture, regulating soil temperature, and shielding the seeds from foraging birds.
Step 6: Irrigation and Early Mowing Routines
Watering is the make-or-break phase of lawn renovation. For the first three to four weeks, the seedbed must remain consistently moist but not waterlogged. Set your sprinklers to run 2 to 3 times a day for 10 to 15 minutes per zone. If the seeds dry out even once during the germination window, they will die. Once the new grass reaches a height of 2 inches, gradually reduce the frequency of watering while increasing the duration, encouraging the roots to grow deeper into the soil profile.
Wait to mow until the new grass reaches about 3.5 to 4 inches tall. Ensure your mower blades are razor-sharp to avoid tearing the delicate seedlings. Set your mower deck to 3 inches and never remove more than the top one-third of the grass blade in a single mowing session. Leave the clippings on the lawn to return valuable nitrogen and organic matter back to the recovering soil.
Estimated Costs for a 5,000 Sq. Ft. Lawn Renovation
- Soil Test: $20
- Core Aerator Rental: $90 (1 day)
- Slit-Seeder Rental: $85 (1 day)
- Premium Grass Seed (40 lbs): $160 - $220
- Starter Fertilizer (1 bag): $35 - $50
- Compost Topdressing (1 cubic yard): $40 - $60
- Total Estimated Cost: $430 - $525
While the upfront cost and physical labor of a full lawn renovation are significant, the result is a lush, resilient, and weed-free turf that will elevate your property value and provide a beautiful outdoor space for years to come. By following this structured, science-backed approach, you ensure that your cool-season lawn recovers fully and thrives through every season.

