
Gardening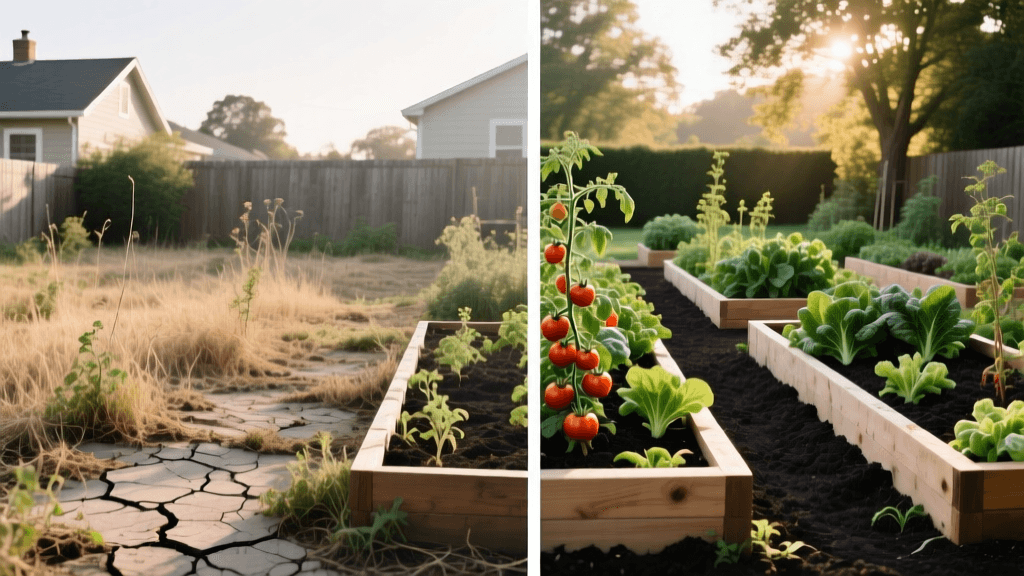
Transform Dead Grass Into A Thriving Raised Bed Garden
The 'Before': Assessing the Backyard Wasteland
Every thriving garden starts with a vision, but the reality of the 'before' state can be incredibly discouraging. Picture this: a 10x10 foot patch of backyard that gets excellent southern exposure but is currently a graveyard of compacted clay soil, creeping charlie, and stubborn crabgrass. The soil is so dense that a standard garden fork bends when you try to pierce the surface. Water pools on top after a light rain, and the few weeds that do grow are spindly and nutrient-starved. This is the classic 'before' scenario for thousands of aspiring gardeners.
Attempting to till this hardpan soil directly is a recipe for disaster. Tilling dormant weed seeds to the surface and destroying the fragile, albeit struggling, soil microbiome will only result in a weedy, compacted mess by mid-July. Instead, we are going to completely bypass the native soil issues by building a thriving, elevated ecosystem. This guide will walk you through the exact transformation from a dead, weedy patch to a highly productive 4x8 foot raised bed vegetable garden, complete with material costs, timelines, and expert soil architecture.
Phase 1: Eradication and Site Preparation (Weeks 1-4)
The first step in our transformation is clearing the canvas without resorting to harsh chemical herbicides like glyphosate, which can linger and harm the sensitive mycorrhizal fungi we want to cultivate in our new bed. We have two highly effective, organic options for the 'before' state: smothering (sheet mulching) or soil solarization.
For a rapid transformation, we recommend the smothering method. Mow the existing weeds as low to the ground as possible. Then, lay down overlapping sheets of plain, uncoated corrugated cardboard directly over the grass and weeds. Remove any plastic tape or staples from the boxes first. Overlap the edges by at least 6 inches to prevent opportunistic weeds from finding the light. Thoroughly soak the cardboard with a garden hose until it is heavy and pliable. This blocks all sunlight, effectively starving the weeds and grass beneath while allowing earthworms to slowly break down the organic matter.
If you are dealing with severe soil-borne diseases or nematodes, and you are in a hot summer climate, soil solarization is a fantastic alternative. According to the University of California Integrated Pest Management (UC IPM) program, covering moist, cleared soil with clear plastic sheeting for 4 to 6 weeks during the hottest part of the year can raise soil temperatures enough to kill many soilborne pathogens, weed seeds, and pests. However, for standard weed eradication, the cardboard smothering method is faster to prep and builds organic matter simultaneously.
Phase 2: Constructing the Framework (Week 5)
Once the cardboard is laid, it is time to build the physical structure of your 'after' garden. We are constructing a 4-foot by 8-foot raised bed that is 18 inches deep. This width ensures you can reach the center of the bed from either side without stepping on the soil, and the 18-inch depth provides ample room for deep-rooting crops like tomatoes and carrots.
- Materials: Six pieces of 2x6x8 foot untreated cedar boards. Cedar is naturally rot-resistant and safe for organic food production. Avoid pressure-treated lumber, as older treatments contained arsenic, and even modern copper-based treatments can leach into the soil.
- Hardware: Exterior-grade 2.5-inch deck screws, four 18-inch metal corner brackets, and a roll of 1/2-inch galvanized hardware cloth.
- Assembly: Screw the cedar boards into the metal corner brackets to form a 4x8 rectangle. Before placing the bed over your cardboard base, staple the hardware cloth to the bottom of the frame. This is a non-negotiable step if you live in an area with gophers or moles; the metal mesh will stop them from tunneling up into your pristine soil and eating your root vegetables.
Phase 3: Engineering the Perfect Soil Architecture (Week 5)
The most critical difference between the 'before' and 'after' is the soil. Never fill a raised bed with native dirt or cheap 'topsoil' from a big box store; it will compact heavily in a confined space and restrict drainage. According to the University of Minnesota Extension, raised bed soils need to be lightweight, well-draining, and rich in organic matter to support intensive planting.
You need exactly 36 cubic feet of soil to fill a 4x8x1.5 foot bed. Here is a comparison of three popular soil recipes to achieve the perfect 'after' texture:
| Soil Recipe | Components & Ratios | Estimated Cost (36 cu ft) | Pros & Cons |
|---|---|---|---|
| Mel's Mix (Square Foot) | 1/3 Coarse Vermiculite, 1/3 Peat Moss (or Coco Coir), 1/3 Blended Compost | $180 - $250 | Pros: Incredible moisture retention, weed-free. Cons: Expensive, vermiculite can be hard to source locally. |
| University Blend | 50% High-Quality Compost, 50% Coarse Sand or Pine Bark Fines | $120 - $160 | Pros: Excellent drainage, highly affordable, sustainable. Cons: Requires annual top-dressing with compost as it settles. |
| Budget Bulk Blend | 60% Screened Topsoil, 40% Mushroom Compost or Leaf Mold | $80 - $110 (Bulk Delivery) | Pros: Cheapest option for large spaces. Cons: Topsoil quality varies wildly; may introduce weed seeds. |
For this transformation, we are using the University Blend. We mixed 18 cubic feet of screened, multi-source compost with 18 cubic feet of coarse pine bark fines. The bark provides long-term aeration and prevents the compost from slumping and compacting over the season.
Phase 4: The 'After' Planting Layout (Week 6)
With the soil mounded slightly above the rim of the cedar boards (it will settle after watering), the transformation is ready for life. To maximize the 'after' yield, we utilize intensive, grid-based planting rather than traditional row cropping. The University of Wisconsin-Madison Extension notes that square foot gardening methods in raised beds can produce up to five times the yield of traditional in-ground row gardens per square foot.
Here is the exact layout for our 4x8 foot bed (32 square feet total):
- North Trellis Zone (2x8 feet): We installed a 6-foot-tall cattle panel trellis on the northernmost edge. This is planted with indeterminate cherry tomatoes (Sun Gold variety) and climbing snap peas, ensuring they do not shade the rest of the bed.
- Center Grid (2x8 feet): Divided into 16 one-foot squares. Planted with 16 bell pepper plants, intercropped with sweet basil. The basil acts as a companion plant, deterring certain pests and maximizing space.
- South Edge Zone (2x8 feet): Planted with low-growing, shade-tolerant crops. We used 16 squares for French breakfast radishes, loose-leaf lettuce, and border marigolds. The marigolds secrete alpha-terthienyl from their roots, which helps suppress root-knot nematodes.
Phase 5: Irrigation, Mulch, and Maintenance
The final step in the visual and functional transformation is the installation of a drip irrigation system and mulch. Overhead watering leads to fungal diseases like powdery mildew and early blight on tomato leaves. We installed a $40 drip irrigation kit featuring 1/4-inch drip lines with emitters spaced every 6 inches. The lines are laid out in a grid pattern, ensuring every square foot receives targeted, slow-release moisture directly at the root zone.
After planting and watering deeply, we applied a 2-inch layer of seed-free straw mulch over the entire soil surface. This mulch suppresses any weed seeds that might have blown in, retains soil moisture during the heat of August, and slowly breaks down to feed the soil microbiome.
The Final Reveal: Costs, Timeline, and Yields
The journey from a compacted, weed-choked wasteland to a lush, structured vegetable garden takes about 6 weeks of active preparation and planting. Let us look at the financial investment for this specific 4x8 transformation:
- Lumber & Hardware: $210 (Cedar boards, brackets, screws, hardware cloth)
- Soil Components: $140 (Bulk compost and pine bark fines)
- Irrigation & Mulch: $65 (Drip kit and straw bales)
- Seeds & Transplants: $45 (Nursery tomatoes, seed packets)
- Total Investment: $460
While the initial 'before and after' transformation requires a moderate upfront investment, the yields tell a compelling story. In its first season, this single 4x8 raised bed can conservatively produce 60 pounds of tomatoes, 15 pounds of peppers, 20 pounds of peas, and countless cut-and-come-again lettuce harvests. At organic farmers market prices, the bed will pay for its initial soil and plant costs in the first year, leaving the cedar structure and drip system to provide virtually free, premium produce for the next decade. The 'after' is not just a beautiful garden; it is a highly efficient, edible landscape.

