
Gardening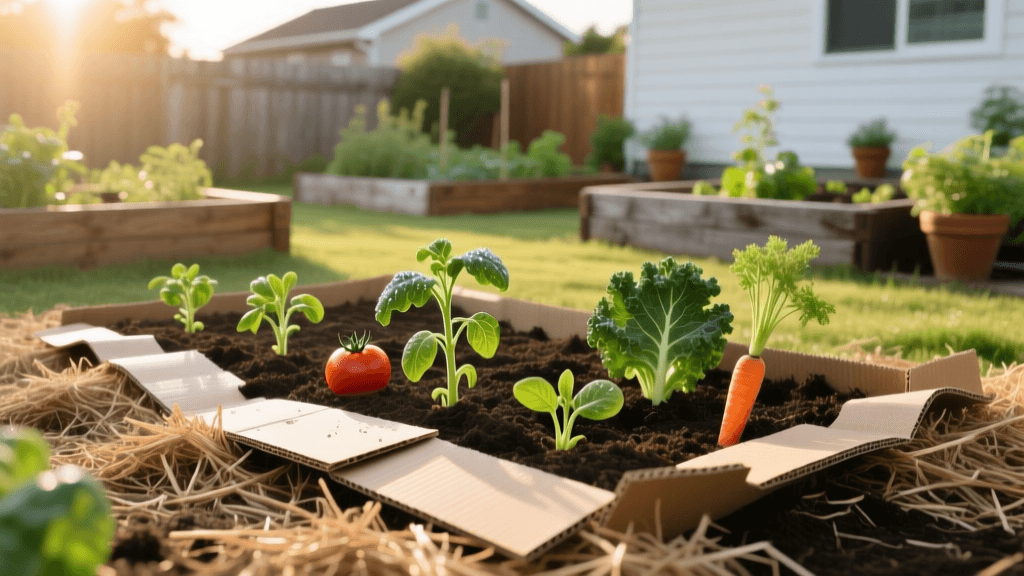
Transform Dead Lawn Into Vegetable Beds: Soil Recovery Guide
The Paradigm Shift: Lawn Renovation Through Ecosystem Recovery
When homeowners face a chronically failing, patchy, or dead lawn, the instinct is often to double down on turfgrass renovation. You might aerate, overseed, apply synthetic fertilizers, and increase irrigation, only to watch the grass wither again by mid-July. However, true lawn renovation and recovery sometimes require a paradigm shift. Instead of forcing turfgrass to survive in depleted, heavily compacted soil, the most sustainable and rewarding recovery method is to transition the failed lawn area into a highly productive vegetable garden. This approach not only solves the aesthetic problem of a dead yard but also actively repairs the local soil food web, turning an ecological dead zone into a vibrant, edible landscape.
Decades of mowing, foot traffic, and chemical reliance strip the soil of its natural structure and organic matter. According to research highlighted by the Cornell University Soil Health Laboratory, urban and suburban soils often suffer from severe compaction and a lack of microbial diversity, making it nearly impossible for deep-rooted plants to thrive. By abandoning the turfgrass and focusing on vegetable garden soil recovery, you can rehabilitate the land, sequester carbon, and grow your own food. This comprehensive guide will walk you through the exact steps to recover dead lawn soil and build a thriving vegetable garden from the ground up.
Step 1: Assessing the Damage and Testing Your Soil
Before you start digging or building beds, you must understand what you are working with. Turfgrass areas are notorious for hiding severe soil imbalances, heavy metal contamination (especially near the foundations of older homes), and extreme pH levels caused by years of synthetic lawn care products. A visual inspection is not enough; you need hard data.
How to Conduct a Proper Soil Test
Use a clean trowel to collect soil samples from the top 6 inches of the dead lawn area. Take 5 to 10 sub-samples from different spots across the planned garden zone and mix them in a clean plastic bucket. Send this composite sample to a reputable university extension laboratory, such as the University of Massachusetts Amherst Soil and Plant Nutrient Testing Laboratory. A comprehensive test will reveal your soil's pH, cation exchange capacity (CEC), macro and micronutrient levels, and organic matter percentage. If your home was built before 1978, it is highly recommended to request a heavy metals screening, particularly for lead, which is common in urban soils where exterior lead paint may have flaked off over the decades.
Step 2: The Sheet Mulching Method for Grass Suppression
If your lawn is dead but still harboring aggressive perennial weeds, or if you are converting a struggling, weedy turf area, you must suppress the existing vegetation without resorting to harsh herbicides like glyphosate, which can further damage soil biology. Sheet mulching, often called 'lasagna gardening,' is the gold standard for organic lawn recovery and preparation.
- Mow as Low as Possible: Set your mower to its lowest setting and scalp the remaining dead grass and weeds. Leave the clippings on the soil; they will decompose and add nitrogen to the recovery process.
- Lay Down Cardboard: Collect plain, uncoated brown cardboard (remove all plastic tape and glossy labels). Overlap the pieces by at least 6 inches to prevent weeds from finding a gap. This layer blocks sunlight, effectively smothering the turfgrass and weeds while allowing earthworms to travel up into the new organic layers.
- Water Thoroughly: Soak the cardboard with a hose until it is completely saturated. This jumpstarts the decomposition process and makes the cardboard more attractive to soil-building fungi and invertebrates.
- Apply a Compost Layer: Spread a 2 to 3-inch layer of high-quality, screened compost directly over the wet cardboard. This provides the necessary microbial inoculant to break down the grass roots below.
- Top with Mulch: Finish with a 3 to 4-inch layer of arborist wood chips or shredded leaves to retain moisture and protect the compost from UV degradation.
Pro Tip: If you plan to plant immediately rather than waiting 6 to 12 months for the sheet mulch to break down, you must build raised beds on top of the cardboard layer to provide immediate depth for vegetable roots.
Step 3: Building Raised Beds Over Compacted Subsoil
In many suburban developments, the topsoil was scraped away during construction, leaving homeowners to grow lawns on compacted, nutrient-poor subsoil. If your soil test revealed a high clay content and severe compaction, in-ground gardening will be an ongoing struggle. The ultimate lawn recovery strategy in these conditions is to install raised garden beds.
Optimal Dimensions and Materials
- Width: Keep beds no wider than 4 feet. This ensures you can reach the center of the bed from either side without stepping on the soil, preventing future compaction.
- Length: 8 to 10 feet is standard, but you can adjust based on your available space and lumber lengths.
- Depth: A depth of 12 to 18 inches is ideal for most vegetables. If you are growing deep-rooted crops like carrots or parsnips over a heavily compacted base, aim for 24 inches.
- Materials: Use untreated cedar, redwood, or composite lumber. Avoid pressure-treated wood, especially older varieties that may contain arsenic or copper compounds that can leach into your food crops.
Place the raised bed frames directly over your prepared cardboard layer. The cardboard will eventually rot away, allowing deep-rooted plants and earthworms to integrate the new garden soil with the recovering subsoil beneath.
Step 4: Soil Amendment and Filling Strategy
Filling a raised bed requires a specific balance of drainage, water retention, and nutrition. Do not fill your beds with cheap 'topsoil' or 'garden soil' bags from big-box stores, as these are often heavy, poorly drained, and lack sufficient organic matter. Instead, create a custom recovery mix using the following amendments.
| Amendment | Cost (Approx.) | Water Retention | pH Impact | Best Application in Garden Recovery |
|---|---|---|---|---|
| Screened Compost | $3 - $5 / cu ft | High | Neutral | Base nutrient source and microbial inoculant. |
| Coco Coir | $1.50 - $2.50 / cu ft | Very High | Neutral | Peat alternative; improves soil aeration and moisture. |
| Coarse Horticultural Sand | $0.50 - $1.00 / cu ft | Low | Neutral | Essential for drainage in heavy clay subsoils. |
| Leaf Mold | Free (DIY) | High | Slightly Acidic | Superior fungal food; mimics natural forest floor. |
| Biochar | $4 - $8 / cu ft | Medium | Alkaline | Long-term carbon sequestration and nutrient holding. |
The Ideal Recovery Mix: For a standard 4x8x1 foot raised bed (32 cubic feet), mix 16 cubic feet of high-quality compost, 8 cubic feet of coco coir or peat moss, 6 cubic feet of coarse sand or perlite, and 2 cubic feet of worm castings or biochar. Blend these thoroughly before planting.
Step 5: Selecting First-Year Crops for Recovered Soil
Even with a perfect soil mix, the transition zone where your new garden bed meets the old lawn subsoil requires careful crop selection. In the first year, focus on plants that actively contribute to soil recovery and are forgiving of minor environmental fluctuations.
Nitrogen Fixers and Soil Builders
Legumes, such as bush beans, peas, and clovers, form symbiotic relationships with Rhizobia bacteria to pull nitrogen from the air and fix it into the soil. Planting a heavy rotation of bush beans in your first year will help establish a robust nitrogen cycle in your newly formed garden ecosystem.
Shallow-Rooted Heavy Feeders
Crops like lettuce, spinach, radishes, and Swiss chard have shallow root systems that will remain entirely within your carefully crafted raised bed mix, avoiding the compacted transition zone at the bottom of the bed. These crops provide quick harvests and keep the soil surface covered, preventing erosion and moisture loss.
Long-Term Soil Recovery and Maintenance
Soil recovery is not a one-time event; it is an ongoing process of stewardship. To maintain the health of your newly established vegetable beds and continue the rehabilitation of the surrounding yard, you must integrate sustainable maintenance practices.
Implementing a Home Composting System
The most effective way to continuously feed your garden and reduce household waste is by composting. The Environmental Protection Agency (EPA) Guide to Composting at Home provides excellent frameworks for balancing 'greens' (nitrogen-rich kitchen scraps) and 'browns' (carbon-rich dry leaves and cardboard). Applying a 1-inch layer of fresh compost to your vegetable beds every spring and fall will replenish the micronutrients that heavy-feeding crops like tomatoes and squash deplete over the growing season.
Utilizing Cover Crops in the Off-Season
Never leave your recovered soil bare. Bare soil is vulnerable to erosion, nutrient leaching, and the encroachment of aggressive lawn weeds. In the late fall, sow a cover crop mix of winter rye and hairy vetch. The rye will develop a massive, fibrous root system that breaks up any lingering compaction near the bottom of the bed, while the vech will fix nitrogen. In the spring, simply chop the cover crop down at the soil line and let it decompose in place as a 'green manure' before planting your summer vegetables.
Conclusion: From Barren Yard to Bountiful Harvest
Renovating a failing lawn doesn't always mean replanting grass. By recognizing the signs of soil exhaustion and choosing to transition dead turf areas into productive vegetable gardens, you are engaging in the highest form of landscape recovery. Through careful soil testing, organic sheet mulching, strategic raised bed construction, and continuous amendment with compost, you can breathe life back into compacted, lifeless dirt. The result is not just a beautiful, lush garden, but a resilient, localized food source and a deeply recovered soil ecosystem that will thrive for decades to come.

