
Landscaping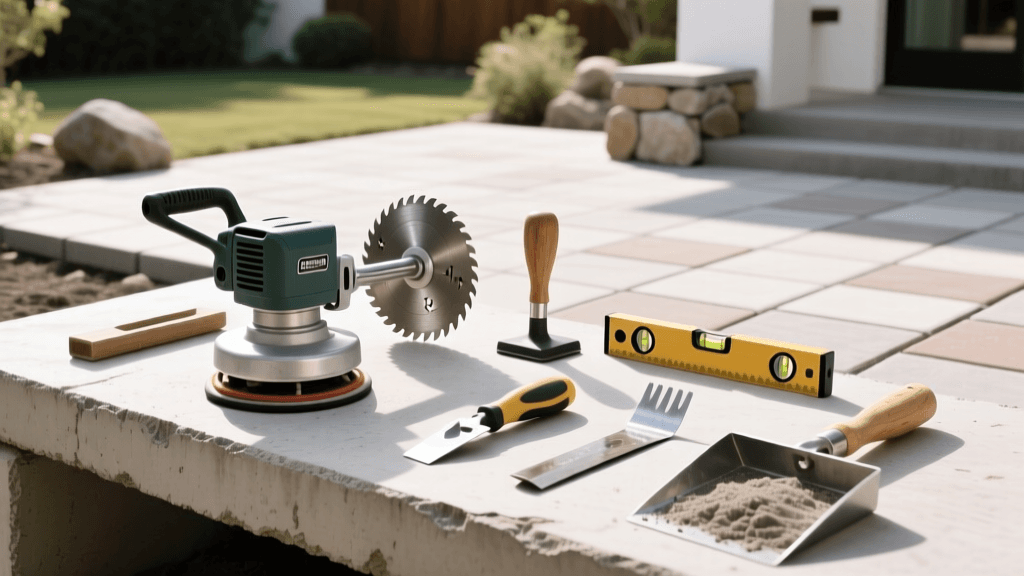
Top Hardscaping Tools And Equipment For Paver Patios
Introduction to Hardscaping and Paver Patio Installation
Building a paver patio is one of the most rewarding landscaping projects a homeowner can undertake. It instantly elevates your outdoor living space, boosts curb appeal, and provides a durable surface for entertainment. However, the longevity and structural integrity of a paver patio rely entirely on the quality of the base preparation and the precision of the installation. To achieve professional-grade results, you must move beyond basic gardening tools and invest in specialized hardscaping equipment. Whether you are laying a simple 100-square-foot walkway or a sprawling 500-square-foot entertainment deck, having the right tools on-site will save you countless hours of backbreaking labor and prevent costly material waste.
In this comprehensive tools and equipment guide, we will break down the essential gear required for every phase of paver patio installation, from excavation and base compaction to precision cutting and joint stabilization. We will also provide practical advice on whether to rent or buy specific equipment, ensuring your landscaping budget is spent wisely.
Phase 1: Excavation and Base Preparation Tools
The most critical phase of any hardscaping project is base preparation. A paver patio is only as strong as the ground beneath it. According to guidelines published by the Environmental Protection Agency (EPA), proper base preparation, aggregate selection, and compaction are critical for preventing settling, managing drainage, and ensuring the structural integrity of paved surfaces.
Excavation Hand Tools
Before you can lay stone, you must remove the topsoil and organic matter. You will need a combination of a flat-nosed trenching spade for clean vertical cuts and a round-point shovel for moving loose dirt. For stubborn roots and compacted clay, a heavy-duty steel mattock or a pickaxe is indispensable. To transport the excavated soil, invest in a contractor-grade steel wheelbarrow with a pneumatic tire, which handles heavy, unbalanced loads much better than standard plastic yard carts.
The Vibratory Plate Compactor
This is the undisputed workhorse of hardscaping. A vibratory plate compactor uses centrifugal force to vibrate and lock aggregate particles together, creating a dense, unyielding sub-base. For residential paver patios, you should look for a compactor that generates between 3,000 and 5,000 pounds of centrifugal force. Reputable brands like Wacker Neuson, Multiquip, and Bartell offer reliable models that can be rented from most local equipment yards. When compacting the base gravel (typically 3/4-inch crushed angular stone), you must work in 2-inch to 4-inch lifts, wetting the gravel slightly to help the stone dust lock together.
Hand Tamper
While the plate compactor handles the open areas, you will need a manual steel hand tamper (typically 10x10 inches) to compact the aggregate in tight corners, along foundation walls, and around obstacles where the mechanical compactor cannot reach.
Phase 2: Screeding and Leveling Equipment
Once the base is compacted, a 1-inch layer of coarse, sharp concrete sand is added. This bedding sand must be perfectly level to ensure the pavers sit flush and drain correctly.
Screed Pipes and Rails
Forget using wooden 2x4s, which can warp and absorb moisture, altering their dimensions. Professional hardscapers use 1-inch outer diameter (OD) aluminum or steel conduit pipes as screed rails. These are laid parallel to each other on top of the compacted base, spaced about 4 to 6 feet apart. They provide a perfectly straight, rigid track for your screed board.
Magnesium Screed Board
A magnesium screed board is lightweight, rust-proof, and exceptionally stiff. By pulling the screed board across the top of the aluminum pipes, you strike off the excess sand, leaving a flawless, 1-inch deep bed ready for paver placement. Once the sand is screeded, the pipes are carefully removed, and the voids are filled with sand and troweled smooth.
Dead-Blow Rubber Mallet
As you lay the pavers, you will need to tap them into the bedding sand to ensure a uniform surface height. A 3-pound polyurethane dead-blow mallet is the ideal tool. The dead-blow design minimizes bounce-back and delivers a solid, concentrated impact without cracking or chipping the edges of the concrete pavers.
Phase 3: Cutting and Shaping Masonry Tools
Very few patios are perfectly square, and you will inevitably need to cut pavers to fit borders, curves, or obstacles like utility poles and house foundations.
Masonry Wet Saw
For high-volume or precision cutting, a 10-inch or 14-inch masonry wet saw equipped with a continuous rim diamond blade is essential. The water feed suppresses hazardous silica dust and keeps the blade cool, extending its lifespan and ensuring clean, chip-free cuts. As noted by Penn State Extension, managing silica dust and utilizing proper safety protocols during masonry cutting is a vital component of safe hardscaping practices.
Brick Hammer and Masonry Chisel
For small notches, chipping away corners, or making quick adjustments where a full saw setup is impractical, a tungsten-carbide-tipped brick hammer and a wide cold chisel are necessary. This method requires practice but is highly effective for minor adjustments.
Phase 4: Edge Restraint and Jointing Tools
Pavers are not mortared together; they rely on friction and edge restraint to maintain their interlocking structure. Without proper edge restraint, the perimeter pavers will creep outward over time, causing the patio to fail.
L-Shaped Edge Restraint and Spikes
Heavy-duty plastic or aluminum L-shaped edge restraints (such as Perma-Edge or SnapEdge) are secured to the compacted base using 10-inch to 12-inch galvanized steel or poly landscape spikes. These spikes must be driven through the restraint and deep into the base aggregate every 12 to 18 inches to prevent frost heave from pushing the edges up.
Poly-Bristle Broom and Plate Compactor
Once the pavers are laid and restrained, polymeric sand is swept into the joints. A stiff poly-bristle broom is required to aggressively push the sand deep into the 1/8-inch joints. Finally, the plate compactor is run over the entire patio one last time (with a protective urethane pad attached to the base plate) to vibrate the sand down and lock the pavers tightly together.
Equipment Comparison and Cost Guide
Understanding the financial commitment of hardscaping tools helps in planning your project budget. Below is a comparison of essential equipment, including estimated costs and professional tips.
| Tool / Equipment | Primary Function | Estimated Cost (Buy/Rent) | Pro Tip |
|---|---|---|---|
| Vibratory Plate Compactor | Compacting sub-base and setting pavers | $75 - $120 / day (Rent) | Always rent a urethane pad to avoid scratching the paver surface during the final pass. |
| Masonry Wet Saw (10-inch) | Precision cutting of concrete and stone pavers | $90 - $150 / day (Rent) | Buy your own diamond blade; rental blades are often dull and will chip your expensive pavers. |
| 1-inch OD Aluminum Pipes | Screed rails for leveling bedding sand | $15 - $25 each (Buy) | Cut them to 6-foot lengths for easier handling and storage in a standard garage. |
| 3 lb Dead-Blow Mallet | Seating pavers into the sand bed | $25 - $40 (Buy) | Choose a white or non-marking polyurethane head to prevent leaving scuff marks on light-colored stone. |
| Stiff Poly-Bristle Broom | Sweeping polymeric sand into joints | $15 - $30 (Buy) | Keep the broom completely dry; moisture will activate the polymeric sand prematurely and ruin the bristles. |
Rent vs. Buy: Making the Smart Choice
When tackling a DIY landscaping project, deciding whether to rent or buy equipment is a major consideration. As a general rule, highly specialized, expensive, and bulky items like vibratory plate compactors and masonry wet saws should be rented. The cost of renting a plate compactor for a weekend is a fraction of the $800 to $1,500 purchase price, and it saves you from the burden of long-term storage and engine maintenance.
Conversely, hand tools, screed pipes, mallets, and brooms are relatively inexpensive and highly versatile. These items should be purchased, as they will be useful for future landscaping projects, garden bed edging, and general home maintenance. Investing in high-quality hand tools ensures they will not break under the heavy stress of hardscaping work.
Safety Gear: The Unsung Heroes of Hardscaping
Hardscaping is physically demanding and exposes you to significant hazards, including flying debris, loud noise, and respirable crystalline silica dust. Do not overlook personal protective equipment (PPE). You must wear ANSI Z87.1-rated safety glasses when chipping or cutting stone. Hearing protection is mandatory when operating a plate compactor or gas-powered saw, as noise levels frequently exceed 85 decibels. Most importantly, when cutting pavers with a dry saw or sweeping dry polymeric sand, a NIOSH-approved N95 or P100 respirator is non-negotiable to protect your lungs from silica dust, which can cause severe long-term respiratory issues.
Tool Maintenance and Cleanup
Concrete sand, stone dust, and polymeric sand are highly abrasive and can ruin tools if left uncleaned. After using your plate compactor, pressure wash the base plate immediately; if concrete dust hardens on the metal, it will create an uneven surface that can scratch your next project. Masonry saws must be thoroughly rinsed to remove slurry buildup from the blade guard and water pump. Hand tools should be wiped down and metal parts lightly oiled to prevent rust. Proper maintenance ensures your equipment remains accurate and safe for years to come.
Conclusion
Successful hardscaping is a blend of meticulous planning, physical labor, and the strategic use of specialized tools. By equipping yourself with the right plate compactors, precision saws, and leveling instruments, you transform an overwhelming landscaping challenge into a manageable, step-by-step process. For further reading on industry standards, base specifications, and best practices, the Interlocking Concrete Pavement Institute (ICPI) remains the premier authority on segmental paving. Armed with the right tools and knowledge, your DIY paver patio will not only look stunning upon completion but will also stand the test of time against weather, frost, and heavy foot traffic.

