
Fall Lawn Renovation: Aeration and Smart Irrigation
The Hidden Enemy: Soil Compaction and Summer Stress
As the scorching heat of summer fades and the crisp air of autumn settles in, your lawn is likely showing the scars of the season. Heavy foot traffic from summer barbecues, intense heat, and infrequent rainfall combine to create a hostile environment for turfgrass. The result is often severe soil compaction and a thick layer of thatch that suffocates root systems. Bridging the gap between robust outdoor landscaping and modern indoor smart home technology is the key to a complete lawn renovation and long-term recovery.
Soil compaction occurs when soil particles are pressed together, reducing the pore space between them. This severely limits the movement of air, water, and essential nutrients to the root zone. When water cannot penetrate compacted soil, it pools on the surface or runs off into storm drains, wasting precious resources and leaving your grass thirsty. According to the Environmental Protection Agency (EPA), outdoor water use accounts for 30% of total household water use, and a significant portion of this is wasted due to inefficient irrigation practices and poor soil absorption.
To truly renovate a damaged lawn, you must address the soil structure first. This comprehensive guide will walk you through the essential steps of core aeration, strategic overseeding, and the integration of smart irrigation controllers to ensure your lawn recovers beautifully and remains resilient for years to come.
Step 1: Core Aeration for Deep Root Recovery
Core aeration is the process of mechanically removing small plugs of soil and thatch from the lawn. Unlike spike aeration, which merely punches holes and can actually worsen compaction by pressing soil outward, core aeration physically removes the compacted material, allowing the surrounding soil to expand and breathe.
Preparing for Aeration
Before you rent an aerator, you must prepare the site. Water your lawn deeply 24 to 48 hours before aerating. The soil should be moist but not muddy. Perform the screwdriver test: push a standard six-inch screwdriver into the soil. If it slides in easily to a depth of three or four inches, the moisture level is perfect. If it meets heavy resistance, water the area again.
- Mark Your Hazards: Use bright landscape flags to mark all shallow sprinkler heads, valve boxes, and underground utility lines. Hitting a sprinkler head with a heavy aerator can cause hundreds of dollars in damage.
- Mow Low: Mow your lawn slightly lower than your normal maintenance height (around 1.5 to 2 inches) to ensure the aerator tines can penetrate deeply and to make seed-to-soil contact easier later.
Executing the Aeration
Rent a walk-behind core aerator from a local equipment rental center. These machines are heavy and self-propelled. Make two passes over your entire lawn. The first pass should be in a straight line, and the second pass should be perpendicular to the first, creating a crisscross pattern. Aim to pull plugs that are 2 to 3 inches deep and spaced 2 to 4 inches apart. Leave the extracted soil plugs on the lawn; they will break down naturally with the next rainfall or mowing, returning beneficial microbes to the surface.
Step 2: Overseeding and Topdressing
Once the soil is open and receptive, it is time to introduce new grass seed and organic matter. Fall is the optimal time for overseeding cool-season grasses like Tall Fescue, Kentucky Bluegrass, and Perennial Ryegrass because soil temperatures are still warm enough to trigger germination, while cooler air temperatures reduce heat stress on young seedlings.
Choosing the Right Seed and Amendments
Select a high-quality, weed-free seed blend that matches your existing lawn and regional climate. For comprehensive regional grass selection and soil testing guidance, consult authoritative resources like the University of Minnesota Extension Lawn Care program or your local university cooperative extension. Apply the seed using a broadcast spreader at the rate recommended on the bag, typically 3 to 5 pounds per 1,000 square feet for overseeding.
After seeding, apply a thin layer of topdressing. A mix of finely screened compost and a natural organic fertilizer like Milorganite provides an immediate nutrient boost and helps retain moisture around the seeds. Apply the topdressing at a depth of no more than 1/4 inch so it does not smother the existing grass or block sunlight from reaching the new seeds.
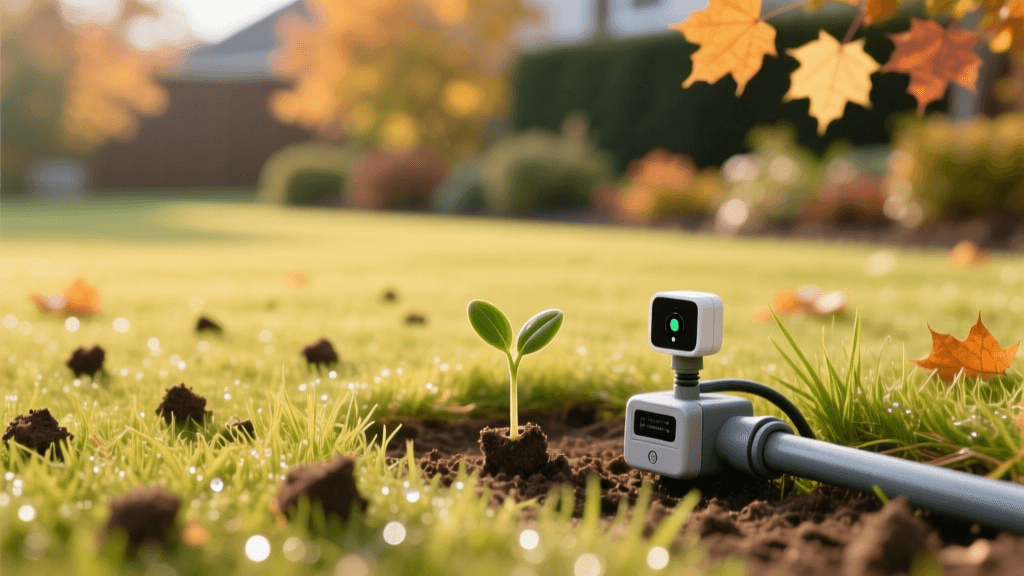
Step 3: Smart Irrigation Integration
A newly aerated and overseeded lawn requires consistent moisture to establish deep roots, but overwatering can lead to fungal diseases and shallow root growth. This is where bridging outdoor care with indoor smart home technology becomes a game-changer. Upgrading from a traditional clock-timer to a smart irrigation controller ensures your lawn gets exactly the water it needs, precisely when it needs it.
According to the EPA, upgrading to a WaterSense labeled smart irrigation controller can save the average home nearly 7,600 gallons of water annually. These devices eliminate the guesswork by adjusting watering schedules based on real-time environmental data.
Types of Smart Controllers
There are two primary types of smart irrigation controllers available for residential integration:
- Weather-Based (ET) Controllers: These use Evapotranspiration (ET) data to calculate how much water your specific landscape is losing to the atmosphere. They connect to your home Wi-Fi and pull data from local weather stations or hyper-local weather services. If rain is forecast, or if humidity is high and evaporation is low, the controller automatically delays or skips the watering cycle.
- Soil Moisture Sensor (SMS) Controllers: These systems use physical sensors buried in the root zone of your lawn to measure the actual volumetric water content of the soil. The controller will only trigger the sprinklers when the soil moisture drops below a predetermined threshold, regardless of what the weather forecast predicts.
Pro Tip: For the ultimate precision in lawn recovery, pair a weather-based smart controller with a secondary soil moisture sensor in your most problematic, sun-baked zones. This hybrid approach guarantees you never water an already saturated lawn, protecting your new seedlings from root rot.
Comparing Irrigation Technologies
Understanding the differences between traditional and smart systems can help you justify the investment for your home and garden ecosystem.
| Feature | Traditional Clock Timer | Weather-Based Smart Controller | Soil Moisture Smart Controller |
|---|---|---|---|
| Average Cost | $40 - $80 | $150 - $250 | $200 - $350 (includes sensors) |
| Water Savings | 0% (often overwaters) | 20% - 40% annually | 30% - 50% annually |
| Setup Complexity | Low (manual dial/button) | Medium (Wi-Fi pairing, zone mapping) | High (requires burying sensors) |
| Best For | Small, uniform lawns | Most residential lawns | Lawns with varied microclimates |
| Smart Home Integration | None | Alexa, Google Home, IFTTT | Alexa, Google Home, IFTTT |
Cost Breakdown and ROI
Renovating a standard 5,000 square foot lawn is a manageable DIY weekend project with a strong return on investment, both in curb appeal and utility savings.
- Core Aerator Rental: $75 - $120 for a half-day or full-day rental.
- Premium Grass Seed: $60 - $90 for 15-20 lbs of Tall Fescue blend.
- Compost Topdressing: $50 - $100 (bulk delivery or bagged).
- Smart Irrigation Controller: $150 - $250 (e.g., Rachio 3 or Orbit B-hyve).
Total initial investment ranges from $335 to $560. However, the integration of a smart controller typically pays for itself in water savings within two to three irrigation seasons, while the aeration and overseeding prevent the need for expensive professional sod replacement, which can cost upwards of $2,000 for the same area.
Your Weekend Renovation Timeline
Friday Afternoon: Preparation
Water the lawn deeply. Mark all sprinkler heads and utility boxes with flags. Mow the grass slightly lower than usual and bag the clippings to expose the soil surface.
Saturday Morning: Aeration and Seeding
Pick up the aerator rental. Run the machine over the lawn in two perpendicular directions. Leave the soil plugs intact. Immediately follow up with a broadcast application of your chosen grass seed, ensuring even coverage across the entire lawn and extra attention to bare patches.
Saturday Afternoon: Topdressing and Tech Setup
Spread the compost topdressing and organic fertilizer using a shovel and a leveling rake. Water the lawn lightly to wash the seed and compost into the aeration holes. While the soil settles, go indoors and unbox your smart irrigation controller. Follow the manufacturer's app to connect it to your Wi-Fi, input your local soil type (e.g., clay loam), set the sun exposure for each zone, and enable seasonal shift features.
Sunday: Calibration and Monitoring
Configure your smart controller to run multiple short watering cycles per day (e.g., three 5-minute cycles) rather than one long cycle. This prevents runoff and keeps the top inch of soil consistently moist, which is critical for seed germination. Over the next three weeks, monitor the app's automatic weather adjustments and watch your new lawn transform into a thick, resilient, and water-efficient landscape.

