
Lawn Care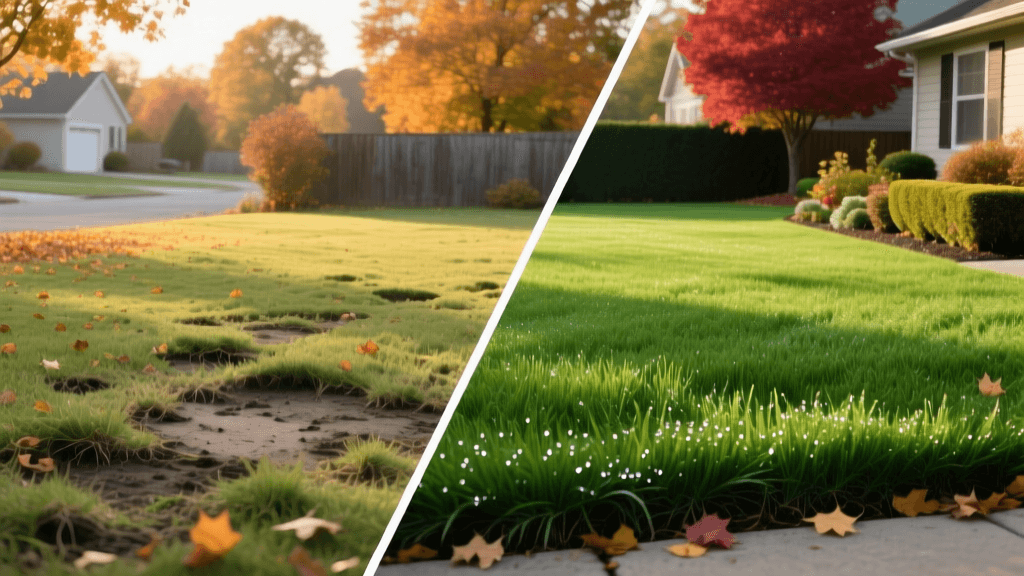
Fall Lawn Renovation: A Before and After Transformation Guide
The 'Before' State: Diagnosing a Failing Cool-Season Lawn
Every lawn care enthusiast has faced the dreaded 'before' stage. You look out at your yard in late August and see a patchy, yellowing landscape riddled with crabgrass, creeping charlie, and bare dirt. The soil feels like concrete underfoot, and a thick layer of thatch prevents water from reaching the roots. This is the reality for millions of homeowners with neglected cool-season lawns. However, this failing ecosystem is not a permanent state. With a strategic, aggressive fall renovation plan, you can completely transform your yard from a weed-infested eyesore into a thick, vibrant, dark-green carpet.
This guide documents the ultimate before-and-after transformation of a severely compacted, thatch-heavy Tall Fescue and Kentucky Bluegrass lawn. We will break down the exact steps, products, measurements, and costs required to achieve a stunning 'after' result in just 90 days.
Phase 1: The 'Before' Assessment and Soil Testing (Weeks 1-2)
The biggest mistake homeowners make during a renovation is throwing expensive grass seed onto untested, hostile soil. Before any physical transformation begins, you must understand your soil's chemistry. A failing lawn often suffers from severe pH imbalances or nutrient lockouts.
Actionable Steps:
- Order a Soil Test: Skip the cheap DIY kits from the hardware store. Use a mail-in service like SoilKit or contact your local university extension office. Cost: $20 to $30.
- Analyze the Results: Cool-season grasses thrive in a pH range of 6.2 to 6.8. If your 'before' soil test shows a pH below 6.0, you will need to apply fast-acting calcitic lime. If it is above 7.5, elemental sulfur is required.
- Apply Amendments: Based on a typical acidic soil profile, apply 25 to 50 pounds of pelletized lime per 1,000 square feet. This will not change the visual 'after' immediately, but it unlocks the soil for the upcoming seed.
According to the University of Minnesota Extension, understanding your baseline soil health is the single most critical factor in long-term turf success, as it dictates how efficiently your grass will absorb the fertilizers applied later in the renovation process.
Phase 2: Eradication and Dethatching (Week 3)
To get a beautiful 'after' photo, you must first embrace the ugly phase. If your lawn is more than 50% weeds and bare dirt, a total renovation using a non-selective herbicide might be necessary. However, for a lawn that is 50% or more salvageable grass, we focus on mechanical preparation.
Tackling the Thatch Layer
Thatch is a dense mat of dead organic matter resting between the green blades and the soil surface. If your thatch layer exceeds 0.5 inches, water, air, and fertilizer cannot penetrate to the root zone. Rent a power dethatcher (also known as a vertical mower) from a local equipment rental center for about $60 to $80 for a half-day.
- Mow Low: Drop your mower deck to 1.5 inches and bag all clippings. Scalping the lawn slightly exposes the thatch layer.
- Power Rake: Run the dethatcher over the lawn in two perpendicular directions. This will rip up a massive amount of dead, brown material.
- Cleanup: Rake and remove all the debris. Your lawn will look terribly thin and damaged—this is normal and necessary for the transformation.
Phase 3: Core Aeration (Week 4)
Compacted soil is the silent killer of the 'before' lawn. It restricts root growth and causes water runoff. Core aeration physically removes plugs of soil, alleviating compaction and creating perfect micro-environments for new grass seed to fall into and germinate.
Execution Details:
- Equipment: Rent a walk-behind core aerator ($80 to $100 per day) or hire a professional landscaping crew ($150 to $250 depending on yard size). Avoid spike aerators, as they actually increase compaction around the holes.
- Moisture is Key: Water the lawn deeply 24 hours before aerating. The machine needs to pull plugs that are 2 to 3 inches deep. If the soil is dry, the tines will bounce off the surface.
- Leave the Plugs: Do not rake up the soil cores. Let them break down naturally over the next few weeks, returning valuable microbes to the surface.
Phase 4: Overseeding and Starter Fertilizer (Week 4)
This is where the 'after' transformation truly begins. Fall is the undisputed king of cool-season lawn renovations because soil temperatures are still warm (promoting rapid germination), while air temperatures are cooling (reducing heat stress on seedlings).
Selecting the Right Seed
Do not buy cheap, generic seed from a big-box store; it often contains annual ryegrass and weed seeds. Invest in premium, certified seed. For a durable, drought-tolerant 'after' lawn, choose a Turf-Type Tall Fescue (TTTF) blend, such as Jonathan Green Black Beauty or a local university-recommended TTTF mix. Apply at a rate of 4 to 5 pounds per 1,000 square feet for overseeding.
Fueling the Growth
New seedlings need immediate access to phosphorus for root development. Apply a high-quality starter fertilizer immediately after seeding. A product like Scotts Turf Builder Starter Food for New Grass (NPK 24-25-4) provides the exact nutrient profile required. Apply at the rate specified on the bag, typically around 3.5 pounds per 1,000 square feet.
Phase 5: Watering and Nurturing the 'After' (Weeks 5-12)
You have done the hard physical labor; now you must manage the moisture. Grass seed will die if it dries out during the first 21 days of germination.
The Watering Schedule:
- Days 1 to 21: Water lightly 2 to 3 times per day for 10 to 15 minutes per zone. The goal is to keep the top half-inch of soil constantly moist, not muddy.
- Days 22 to 45: As the new grass reaches 2 inches tall, reduce watering to once a day, but increase the duration to 30 minutes to encourage deeper root growth.
Days 46 and Beyond: Transition to the standard 'after' maintenance schedule. Water deeply and infrequently, aiming for 1 to 1.5 inches of water per week.
Proper irrigation is vital for resource conservation and lawn health. The EPA WaterSense program emphasizes that transitioning to deep, infrequent watering schedules not only builds deeper, more resilient root systems but also significantly reduces outdoor water waste and runoff.
Transformation Timeline and Cost Breakdown
To help you plan your own before-and-after project, here is a structured breakdown of the timeline, actions, and estimated costs for an average 5,000 square foot cool-season lawn.
| Phase | Action Item | Timeline | DIY Cost (5k sq ft) | Pro Cost (5k sq ft) |
|---|---|---|---|---|
| 1. Assessment | Mail-in Soil Test & Lime Application | Weeks 1-2 | $45 - $70 | $100 - $150 |
| 2. Prep | Low Mow & Power Dethatching | Week 3 | $70 - $90 (Rental) | $200 - $300 |
| 3. Aeration | Core Aeration (Machine Rental/Service) | Week 4 | $90 - $120 (Rental) | $150 - $250 |
| 4. Seed & Feed | Premium TTTF Seed & Starter Fertilizer | Week 4 | $180 - $250 | $300 - $450 |
| 5. Nurture | Watering & First Mow (at 3.5 inches) | Weeks 5-8 | $30 - $50 (Water) | Included |
| Total | Complete Fall Renovation | 90 Days | $415 - $580 | $750 - $1,150 |
The Final 'After' Reveal and Ongoing Maintenance
By day 90, the transformation is complete. The bare, compacted dirt and invasive weeds of the 'before' photo have been replaced by a dense, emerald-green canopy of Turf-Type Tall Fescue. The soil is loose, the thatch is gone, and the root system is deep and vigorous.
Maintaining this 'after' state requires a shift in mindset. According to the USDA Natural Resources Conservation Service, maintaining long-term soil health through organic matter retention and minimizing soil disturbance is key to sustaining vibrant plant ecosystems. For your lawn, this means leaving grass clippings on the yard to decompose, applying slow-release organic fertilizers in the spring and fall, and never mowing lower than 3 to 4 inches to shade the soil and naturally suppress future weed growth.
Your before-and-after transformation is not just a visual upgrade; it is a complete ecological reset for your yard. By following this precise, step-by-step renovation schedule, you ensure that your lawn will remain the envy of the neighborhood for years to come.

