
Landscaping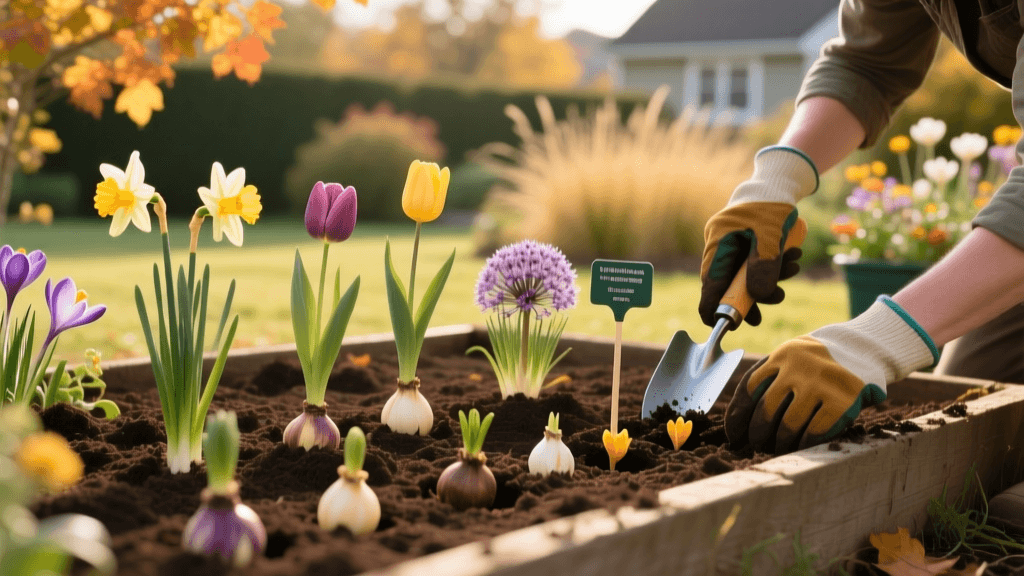
Fall Planting Schedule for Spring Bulbs and Perennials
Landscaping is often mistakenly viewed as a purely springtime endeavor, with homeowners rushing to garden centers in April to install vibrant blooms. However, professional landscape designers and horticulturists know a fundamental secret: the most resilient, vibrant, and well-established spring gardens are actually born in the fall. By leveraging the seasonal timing of autumn, you allow plants to focus entirely on root development rather than foliage production, resulting in a vastly superior landscape the following year.
Whether you are installing a new curved garden bed along a walkway, naturalizing a woodland edge, or upgrading your front yard curb appeal, understanding the precise fall planting schedule for spring-blooming bulbs and perennials is critical. This comprehensive guide will walk you through the science of autumn planting, exact monthly timelines, soil amendment costs, and professional techniques to ensure your landscape thrives.
The Science of Fall Planting: Soil Temperature Matters
While the autumn air may feel crisp and cool, the soil retains the summer's heat long after the first frost. This thermal lag creates an ideal environment for root growth. According to the University of Minnesota Extension, roots continue to grow and establish themselves as long as the soil temperature remains above 40°F (4°C). Because the plant does not have to expend energy pushing out leaves or flowers in the fall, 100% of its energy is directed downward, building a massive, drought-resistant root system.
Pro Tip: Invest in a basic soil thermometer (around $10-$15). Wait until your soil temperature at a 4-inch depth consistently drops below 60°F before planting spring-blooming bulbs to prevent premature sprouting and fungal diseases.
Month-by-Month Fall Planting Timeline
Timing is everything in landscaping. Your exact schedule will depend on your specific region, which you can verify using the USDA Plant Hardiness Zone Map. The general rule of thumb is to plant bulbs and perennials 6 to 8 weeks before the ground freezes solid in your area.
September: Perennials, Peonies, and Bed Preparation
Early fall is the optimal window for planting and dividing bare-root perennials, particularly peonies, daylilies, and hostas. The warm soil encourages rapid root establishment before winter dormancy. September is also the time to perform heavy soil amendment. If you are building a new landscape bed, outline it with a garden hose, cut the edges with a flat spade, and remove the sod. Incorporate 2 to 3 inches of organic compost into the top 6 inches of native soil.
October: The Major Bulb Planting Window
October is the prime month for planting the backbone of your spring landscape: tulips, daffodils, hyacinths, and alliums. In zones 3-5, aim for early to mid-October. In zones 6-8, you can push this window to late October or even early November. Planting too early in warm soil can trigger premature top growth, which will be killed by the first hard freeze, depleting the bulb's energy reserves.
November: Late Planting and Winterization
In milder climates (zones 7 and above), November is perfect for planting garlic and late-season spring bulbs like crocus and snowdrops. For colder zones, November shifts from planting to winterization. This is the time to apply a protective layer of mulch over your newly planted beds to prevent frost heaving, which can push shallow-rooted bulbs and perennials out of the soil.
Soil Preparation and Amendment Costs
Spring-blooming bulbs and perennials require well-draining soil. Heavy clay soils will hold winter moisture and cause bulbs to rot. Before planting, conduct a soil test through your local Iowa State University Extension or equivalent local university office to determine your pH and nutrient levels. Most bulbs prefer a slightly acidic to neutral pH between 6.0 and 7.0.
When planting, avoid high-nitrogen fertilizers, which promote weak, leafy growth at the expense of roots and blooms. Instead, use a phosphorus-rich amendment to stimulate root development. Here is a breakdown of common landscape soil amendments and their estimated costs:
- Bulk Organic Compost: $30 to $45 per cubic yard (delivered). Essential for improving soil structure and drainage.
- Espoma Organic Bone Meal (4-12-0): $10 to $14 per 4-pound bag. Add a small handful to the bottom of each planting hole to provide slow-release phosphorus.
- Coarse Builder's Sand: $30 to $50 per ton. Mix into heavy clay beds at a 1:3 ratio with compost to drastically improve drainage.
- Elemental Sulfur (for pH adjustment): $15 per 4-pound bag. Apply according to soil test results if your soil is too alkaline.
Bulb and Perennial Planting Depth Chart
Planting depth is the most common point of failure for DIY landscapers. Plant too shallow, and the bulbs may freeze or be eaten by foraging squirrels; plant too deep, and the spring shoots will exhaust their energy before reaching the sunlight. The standard rule is to plant bulbs at a depth equal to three times their height. Below is a structured reference chart for common landscape plants.
| Plant Type | Example Varieties | Planting Depth | Spacing | Soil Temp Requirement |
|---|---|---|---|---|
| Large Bulbs | Alliums, Large Tulips | 8 - 10 inches | 6 - 8 inches | Below 60°F |
| Medium Bulbs | Daffodils, Hyacinths | 6 - 8 inches | 4 - 6 inches | Below 60°F |
| Small Bulbs | Crocus, Snowdrops, Muscari | 3 - 4 inches | 2 - 3 inches | Below 55°F |
| Bare-Root Peonies | Herbaceous & Itoh Peonies | 2 inches (eyes below soil) | 36 - 48 inches | Below 65°F |
| Perennial Plugs | Echinacea, Salvia, Hosta | Crown level with soil line | 12 - 18 inches | Below 70°F |
Advanced Technique: Lasagna Planting for Continuous Bloom
If you are designing a high-impact landscape bed with limited square footage, professional designers utilize a technique known as 'lasagna planting' or layering. This involves digging a single, wide excavation area (rather than individual holes) and layering different bulbs at varying depths based on their bloom times and sizes.
- Bottom Layer (8-10 inches deep): Plant large, late-spring blooming bulbs like Allium 'Globemaster' or Giant Darwin Tulips. Cover with 2 inches of soil.
- Middle Layer (6 inches deep): Plant mid-spring blooming Daffodils (like 'Ice Follies') or Hyacinths. Cover with another 2 inches of soil.
- Top Layer (3-4 inches deep): Plant early-spring bloomers like Crocus, Snowdrops, or species tulips. Cover with the remaining soil.
This method ensures that as one plant finishes blooming and its foliage begins to die back, the next layer is emerging to take its place, providing continuous color in your landscape from March through May.
Essential Tools for the Landscaping Job
Efficiency and ergonomics are vital when planting hundreds of bulbs or large perennial specimens. Ditch the traditional handheld bulb dibber, which often creates compacted, glazed holes that trap water. Instead, invest in these professional-grade landscaping tools:
- Cordless Drill Bulb Auger ($25 - $40): A 2-inch to 3-inch wide auger bit that attaches to any standard cordless drill (like a Milwaukee M18 or DeWalt 20V). This tool allows you to drill perfectly cylindrical, deep holes in seconds, even in tough clay soils, saving your wrists and back.
- Hori Hori Soil Knife ($25 - $35): A traditional Japanese landscaping knife with a serrated edge and depth measurements etched into the blade. It is perfect for slicing through roots, measuring exact planting depths, and scooping soil into tight spaces.
- Tile Spade or Trenching Shovel ($40 - $60): Ideal for digging the wide, flat-bottomed trenches required for the lasagna planting method mentioned above.
Post-Planting Care and Winterization
Once your bulbs and perennials are in the ground, the work is not entirely finished. Proper winterization is the final step in the fall planting schedule.
First, water the beds deeply immediately after planting. Even though the air is cool, the roots need moisture to initiate growth and settle the soil, eliminating dangerous air pockets around the bulbs. Apply about 1 inch of water using a soaker hose to avoid disturbing the soil surface.
Second, wait until the ground begins to freeze (usually late November or early December in northern zones) before applying mulch. Applying mulch too early can trap residual heat in the soil and invite rodent nesting. Apply a 2 to 3-inch layer of shredded hardwood bark or pine straw over the beds. This insulating layer prevents the freeze-thaw cycle from causing frost heaving, which can snap delicate new roots and expose bulbs to the harsh winter air.
By adhering to this precise seasonal timing and planting schedule, you are investing in the long-term health and aesthetic superiority of your landscape. When your neighbors are struggling to plant muddy, struggling annuals in the spring, your professionally timed fall-planned landscape will already be erupting in a vibrant, deeply rooted display of color.

