
Backyard Fire Pit Patio Design: Boost Curb Appeal & Entertain
The Intersection of Curb Appeal and Outdoor Entertaining
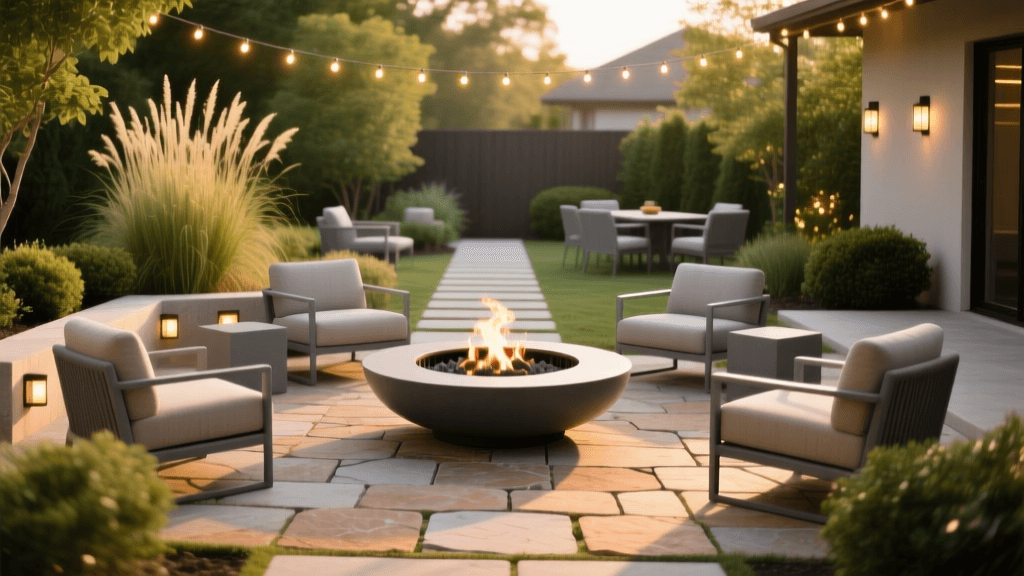
Transforming your backyard into a premier entertainment hub while simultaneously boosting your home's curb appeal is the ultimate landscaping double-win. A well-designed fire pit patio serves as the focal point of outdoor living, bridging the gap between functional hardscaping and aesthetic landscape design. Whether you are hosting an intimate evening gathering or simply enjoying a quiet night under the stars, the right patio setup elevates your property value and extends your living space well beyond the back door. According to data compiled by the National Association of Realtors (NAR), outdoor living upgrades, particularly those involving fire features and structured patios, consistently yield high returns on investment and significantly improve a home's overall marketability and curb appeal.
Choosing the Right Fire Pit: Wood vs. Gas
The anchor of your entertaining space is the fire pit itself. Selecting between a traditional wood-burning model and a modern gas-powered alternative will dictate your maintenance routine, ambiance, and budget. Wood-burning pits offer a classic, nostalgic crackle and intense heat, making them ideal for roasting marshmallows and creating a rustic aesthetic. However, they require constant wood storage, ash cleanup, and are subject to local burn bans. Gas fire pits, fueled by propane tanks or natural gas lines, offer instant ignition, zero ash cleanup, and precise temperature control via smart home integration. While the upfront installation cost for a gas line is higher, the long-term convenience and sleek, modern curb appeal often make it the preferred choice for high-end landscape designs.
| Feature | Wood-Burning Fire Pit | Gas Fire Pit (Natural/Propane) |
|---|---|---|
| Initial Cost | $300 - $1,500 | $1,500 - $4,500+ |
| Maintenance | High (Ash removal, wood storage) | Low (Annual burner inspection) |
| Ambiance | Authentic crackle, high heat, smoke | Clean flame, adjustable, no smoke |
| Smart Integration | None | High (Smart valves, app control) |
| Curb Appeal Style | Rustic, Traditional, Cabin-chic | Modern, Sleek, Contemporary |
Hardscaping Materials: Pavers That Elevate Curb Appeal
The foundation of any great patio is its hardscape. For maximum curb appeal and environmental responsibility, consider permeable pavers. According to the Environmental Protection Agency (EPA), permeable pavements reduce stormwater runoff, filter pollutants, and help replenish local groundwater systems. From a design perspective, they offer a clean, structured look that complements modern and transitional home exteriors. To install a durable permeable patio, you must prepare a robust base. Excavate the area to a depth of 8 to 10 inches, ensuring a slight 1% slope away from your home's foundation for proper drainage. Lay a heavy-duty geotextile fabric to prevent weed growth and soil migration. Next, add a 4-to-6-inch sub-base of open-graded crushed angular stone (typically 3/4-inch clean gravel), followed by a 1-inch bedding layer of smaller aggregate. After laying your pavers, sweep open-graded jointing stone into the gaps rather than traditional polymeric sand, allowing water to flow freely through the surface. Always remember to use a rubber mallet when setting permeable pavers to avoid chipping the edges, and check your level frequently with a 4-foot carpenter's level to maintain the crucial drainage slope.
Integrating Smart Outdoor Lighting for Evening Ambiance
Entertaining doesn't stop at sunset, and your curb appeal shouldn't fade into the dark. Smart outdoor lighting extends your patio's usability and dramatically highlights your landscaping at night. The U.S. Department of Energy recommends utilizing LED fixtures paired with smart controls to maximize energy efficiency while maintaining optimal illumination. For a high-end entertaining vibe, stick to a warm color temperature between 2700K and 3000K. Use low-voltage LED uplights to graze the trunks of mature trees surrounding the patio, creating dramatic silhouettes. Install smart pathway lights along the walkway leading to the fire pit to guide guests safely. By integrating a smart transformer connected to your home's Wi-Fi network, you can sync your patio lights with your fire pit routine—dimming the perimeter lights and brightening the overhead string lights with a single voice command or scheduled automation. Furthermore, consider adding smart LED strip lighting under the built-in bench seating or along the retaining wall capstones. This indirect illumination prevents harsh glare in the eyes of your guests while providing enough ambient light to navigate safely with drinks and plates.
Budgeting Your Fire Pit Patio Project
Understanding the financial commitment is crucial for planning your outdoor living upgrade. While costs vary wildly based on regional labor rates and material choices, here is a realistic breakdown for a standard 12x12 foot permeable paver patio with a mid-tier gas fire pit and smart lighting:
- Excavation and Base Materials: $800 - $1,200 (Gravel, geotextile fabric, sand)
- Permeable Pavers: $1,500 - $3,000 ($10 to $20 per square foot)
- Gas Fire Pit Kit & Media: $1,200 - $2,500 (Includes burner pan, glass lava rock, and enclosure)
- Gas Line Trenching & Plumbing: $800 - $1,500 (Must be done by a licensed professional)
- Smart Low-Voltage Lighting: $600 - $1,200 (Transformer, fixtures, wiring, and smart hub)
- Professional Labor (if not DIY): $3,000 - $6,000
Total DIY Cost: $4,900 - $9,400. Total Professional Installation: $7,900 - $15,400.
Step-by-Step Installation Timeline
If you are tackling this as a DIY weekend warrior project, expect the build to span across three to four weekends. Weekend 1: Design and Demolition. Call 811 to have underground utilities marked. Outline your patio with landscaping paint, excavate the soil, and compact the native subgrade. Weekend 2: Base and Hardscape. Lay the geotextile fabric, haul in the crushed stone, and compact it in 2-inch lifts using a rented vibratory plate compactor. Lay the bedding sand and set your pavers, cutting edge pieces with a rented masonry wet saw. Weekend 3: Fire Pit and Utilities. Assemble the fire pit enclosure using masonry adhesive. Have a licensed plumber trench and connect the gas line. Weekend 4: Lighting and Softscaping. Run your low-voltage lighting wires beneath the mulch beds, mount the fixtures, and program your smart transformer. Finish by planting your privacy screens and ornamental grasses.
Landscaping and Softscaping for Year-Round Curb Appeal
A patio is only as beautiful as the landscape that frames it. To ensure your entertaining space maintains its curb appeal even when not in use, invest in strategic softscaping. Plant evergreen screens, such as Thuja occidentalis 'Emerald Green' arborvitae, along the property line to provide wind blocking and privacy from neighbors. Flank the entrance of the patio with large, weather-resistant fiberglass planters filled with ornamental grasses like Miscanthus sinensis (Maiden Grass), which provide kinetic movement and a soft rustling sound when the evening breeze rolls in. Finally, replace traditional organic mulch around the patio perimeter with 3/4-inch polished river rock. River rock doesn't wash away onto the pavers during heavy rain, doesn't harbor fungus gnats, and provides a clean, high-contrast border that makes the green foliage and structured hardscape pop from the street. For seasonal color, incorporate perennial blooms like Black-Eyed Susans or Coneflowers in the adjacent garden beds. These drought-tolerant natives attract pollinators during the day and provide beautiful seed heads that add structural interest to the winter landscape, ensuring your outdoor space never looks barren or neglected.

