
Landscaping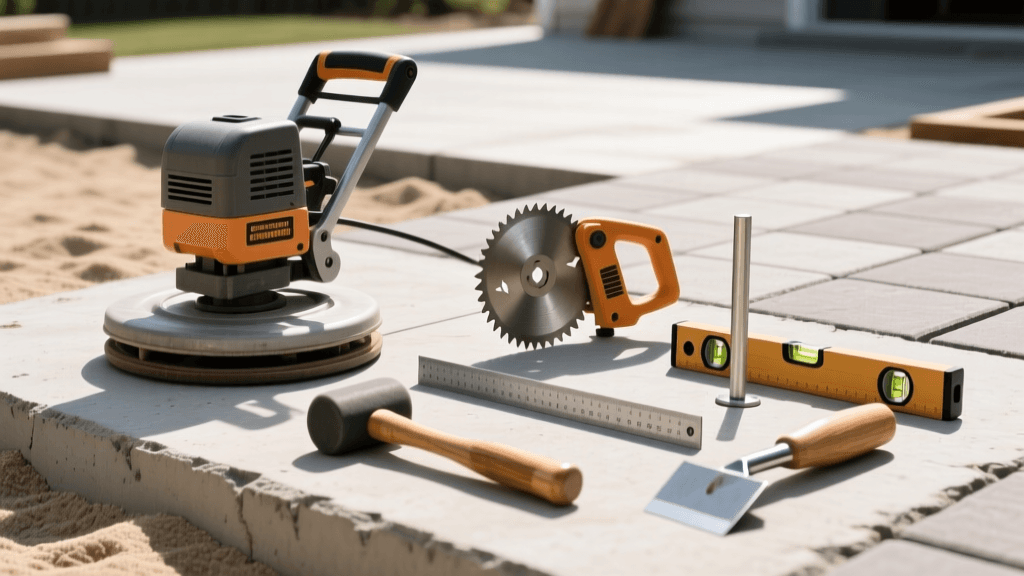
Essential Hardscaping Tools for DIY Paver Patio Projects
Introduction to Hardscaping and Paver Patios
Building a paver patio is one of the most rewarding landscaping projects a homeowner can undertake. It expands your outdoor living space, boosts curb appeal, and increases property value. However, the difference between a professional-looking patio that lasts for decades and a sunken, weed-filled eyesore comes down to two things: proper base preparation and using the right hardscaping tools. According to the Interlocking Concrete Pavement Institute (ICPI), the structural integrity of any paved surface relies entirely on the underlying base and the precision of the installation. This comprehensive guide breaks down the essential tools and equipment you need for every phase of a DIY paver patio project, helping you decide what to buy, what to rent, and how to use them safely.
Phase 1: Excavation and Earthmoving Tools
Before you can lay a single stone, you must excavate the site to accommodate the base materials, bedding sand, and the pavers themselves. This typically requires digging down 7 to 9 inches below your desired final grade.
Shovels and Spades
- Flat Spade: Essential for cutting clean, vertical edges along your patio perimeter and slicing through sod.
- Round-Point Shovel: Your primary workhorse for moving large volumes of soil and gravel.
- Trenching Shovel: Features a narrow blade ideal for digging trenches for edge restraints and drainage pipes.
Wheelbarrows and Carts
Excavating a 200-square-foot patio to a depth of 8 inches yields roughly 5 cubic yards of soil, weighing several tons. A heavy-duty, dual-wheel contractor wheelbarrow with a steel tray and pneumatic tires will save your back and prevent tipping when hauling heavy loads of wet soil or crushed stone.
Phase 2: Base Preparation and Compaction
The base is the most critical component of your hardscape. A poorly compacted base will lead to settling, pooling water, and heaving during freeze-thaw cycles.
Geotextile Fabric and Landscape Staples
For areas with poor drainage or high clay content, laying a non-woven geotextile fabric over the subgrade prevents the base aggregate from mixing with the underlying soil. Use heavy-duty steel landscape staples to pin it down before adding gravel.
Plate Compactors vs. Hand Tampers
While a manual hand tamper is sufficient for small walkways or setting edge restraint spikes, it is entirely inadequate for compacting the 4-to-6-inch layer of crushed angular gravel (usually 3/4-inch minus) required for a patio. You must use a vibratory plate compactor. Look for a machine that delivers at least 3,000 to 4,000 pounds of centrifugal force. The vibration forces the jagged edges of the crushed stone to lock together, creating a nearly concrete-like sub-base.
Phase 3: Precision Layout and Screeding
Paver patios require a precise slope to ensure water drains away from your home's foundation. The industry standard is a minimum drop of 1/8 inch per linear foot.
Layout and Leveling Tools
- Masonry String Line and Wooden Stakes: Used to outline the patio perimeter and establish the final grade and slope.
- Line Level: A small, inexpensive level that hooks onto your string line to ensure your slope is accurate.
- Rotary Laser Level: For larger or more complex landscapes, renting a laser level with a grade rod provides pinpoint accuracy over long distances.
Screed Pipes and Rails
To achieve a perfectly flat, 1-inch-deep bed of concrete sand, professionals use screed rails. You can purchase specialized aluminum hardscape screed rails, or use 1-inch outside-diameter (OD) PVC or galvanized steel pipes. You will also need a straight, knot-free 2x4 or a specialized aluminum screed board to drag across the pipes, leveling the sand perfectly before removing the pipes and filling the voids.
Phase 4: Cutting and Shaping Pavers
Rarely does a patio layout fit perfectly without requiring cuts along the borders or around obstacles like posts and drains.
Wet Masonry Saws vs. Block Splitters
A manual block splitter operates like a giant paper cutter, using a hardened steel blade to snap pavers cleanly. It is quiet, requires no power, and is excellent for straight, rough cuts. However, for L-cuts, notches, or precise curved borders, a 14-inch wet masonry saw equipped with a continuous-rim diamond blade is mandatory. The water pump attached to the saw suppresses dust and keeps the blade cool.
Equipment Guide: Rent vs. Buy
Hardscaping tools range from inexpensive hand tools to heavy, expensive machinery. Here is a breakdown to help you budget your project.
| Tool / Equipment | Avg. Rental Cost (Daily) | Avg. Purchase Cost | Verdict for DIYers |
|---|---|---|---|
| Vibratory Plate Compactor | $75 - $110 | $800 - $1,500 | Rent. Essential for base and final sand compaction, but too expensive and bulky to store. |
| 14-inch Wet Masonry Saw | $85 - $120 | $600 - $1,200 | Rent. Diamond blades alone are costly. Rent for the final cutting day only. |
| Rotary Laser Level | $40 - $60 | $300 - $800 | Rent. Highly recommended for large patios to ensure perfect drainage slope. |
| Manual Block Splitter | $35 - $50 | $150 - $300 | Buy or Rent. Consider buying if you have extensive retaining wall or border work. |
| Heavy-Duty Wheelbarrow | N/A | $120 - $200 | Buy. A staple for any ongoing landscaping and garden maintenance. |
Crucial Safety Gear and Silica Dust Prevention
Hardscaping is physically demanding and presents specific respiratory hazards. Cutting concrete pavers generates respirable crystalline silica dust, which can cause severe, irreversible lung diseases such as silicosis. The Occupational Safety and Health Administration (OSHA) enforces strict standards regarding silica dust exposure in construction and landscaping. Even as a DIYer, you must protect yourself.
- Respirator: A standard surgical mask is useless against silica. You must wear a NIOSH-approved N95 or P100 half-face respirator when cutting or dry-sweeping pavers.
- Eye and Ear Protection: Safety goggles (not just glasses) to prevent stone chips from entering your eyes, and over-ear muffs to protect against the 100+ decibel noise of wet saws and plate compactors.
- Vibration Gloves: Padded gloves reduce the risk of Hand-Arm Vibration Syndrome (HAVS) when operating heavy compaction equipment for extended periods.
Sustainable Hardscaping Options
Modern landscaping increasingly focuses on sustainability and stormwater management. Traditional impermeable patios contribute to runoff, which can overwhelm municipal drainage systems and cause localized flooding. If your landscape design requires managing heavy water flow, consider using permeable pavers. The Environmental Protection Agency (EPA) highlights permeable pavement as a vital green infrastructure tool that allows rainwater to infiltrate through the joints and filter naturally into the underlying soil aquifer. Installing permeable pavers requires a specialized, open-graded crushed stone base (without fine dust) and specific permeable jointing aggregates, demanding even more precise excavation and compaction tools to ensure the void spaces do not clog.
Phase 5: Finishing and Edge Restraint
Once the pavers are laid and cut, the perimeter must be secured. Without edge restraint, the outer pavers will slowly migrate outward, causing the entire patio to unravel.
Edge Restraints and Spikes
Use heavy-duty, commercial-grade plastic or aluminum L-shaped edge restraints. Secure them to the compacted base using 10-inch steel landscaping spikes, driven in with a 3-pound drilling hammer (club hammer) every 6 to 8 inches.
Jointing Sand and Plate Compactor
The final step is sweeping polymeric sand or fine masonry sand into the joints. Polymeric sand contains water-activated polymers that bind the sand together, deterring weeds and ants. After sweeping the sand into the joints, you must run the plate compactor over the entire patio one last time. Crucial Tip: Always attach a polyurethane pad to the bottom of the plate compactor during this final pass to prevent scratching and scuffing your newly installed pavers.
Conclusion
Equipping yourself with the proper hardscaping tools is an investment in the longevity and beauty of your outdoor space. While it may be tempting to cut corners by using a hand tamper instead of renting a plate compactor, or by guessing the slope without a string line, these shortcuts inevitably lead to costly repairs. By utilizing the right excavation equipment, precision layout tools, and cutting machinery, while strictly adhering to safety protocols regarding silica dust, you can achieve a professional-grade paver patio that will serve as the centerpiece of your landscape for decades to come.

