
How to Build a Hot Compost Bin for Thriving Garden Soil
Why Choose Hot Composting Over Cold Composting?
For gardeners focused on bridging the gap between outdoor yard maintenance and indoor garden-to-table cooking, soil health is the ultimate foundation. The quality of your tomatoes, herbs, and leafy greens is directly tied to the microbial life and nutrient density of the soil they grow in. While tossing scraps into a pile and waiting a year (cold composting) works for casual gardeners, mastering hot composting is a game-changer for those serious about soil biology. Hot composting accelerates the decomposition process, generating enough internal heat to destroy weed seeds and harmful plant pathogens, ultimately yielding a superior, biologically active soil amendment in a fraction of the time.
According to the Environmental Protection Agency (EPA), composting is one of the most effective ways to divert organic waste from landfills while creating a valuable soil conditioner. However, achieving the thermophilic (heat-loving) phase requires specific conditions that cold piles simply never reach. By managing oxygen, moisture, and the carbon-to-nitrogen ratio, you cultivate a thriving ecosystem of thermophilic bacteria that break down complex organic matter rapidly.
| Feature | Hot Composting | Cold Composting |
|---|---|---|
| Time to Finish | 18 to 45 days | 6 to 12 months |
| Internal Temperature | 131°F to 160°F (55°C - 71°C) | Ambient to 90°F (32°C) |
| Weed Seed Destruction | Yes (High efficacy) | No (Seeds often survive) |
| Pathogen Elimination | Yes | No |
| Labor & Maintenance | High (Requires turning & monitoring) | Low (Add and ignore) |
The Science of Soil Health: Carbon to Nitrogen Ratios
The secret to a steaming, active compost pile lies in the diet you feed your microbes. Microorganisms require carbon for energy and nitrogen for protein synthesis and reproduction. The ideal Carbon-to-Nitrogen (C:N) ratio for a hot compost pile is roughly 30:1. If the ratio is too high (too much carbon), the pile will stall and take months to break down. If the ratio is too low (too much nitrogen), the pile will become anaerobic, slimy, and emit a strong ammonia odor.
Research from Penn State Extension highlights that achieving this ratio is best done by volume rather than weight for home gardeners. A reliable rule of thumb is to mix three parts "browns" (carbon-rich materials) to one part "greens" (nitrogen-rich materials) by volume.
- Carbon-Rich Browns: Dry autumn leaves, straw, shredded corrugated cardboard, pine needles, wood chips, and dried corn stalks.
- Nitrogen-Rich Greens: Fresh grass clippings, vegetable kitchen scraps, coffee grounds, spent garden plants, and herbivore manure (e.g., horse, cow, or rabbit).
Pro Tip: Coffee grounds are a fantastic nitrogen source, but they are dense and can mat together. Always mix them thoroughly with bulky browns like straw to maintain airflow.
Step-by-Step: Building Your 3-Bin Hot Compost System
To maintain a continuous supply of finished compost for your garden beds, a three-bin system is the gold standard. This setup allows you to have one bin for fresh materials, one bin for the active hot cooking phase, and one bin for curing finished compost.
Materials, Dimensions, and Costs
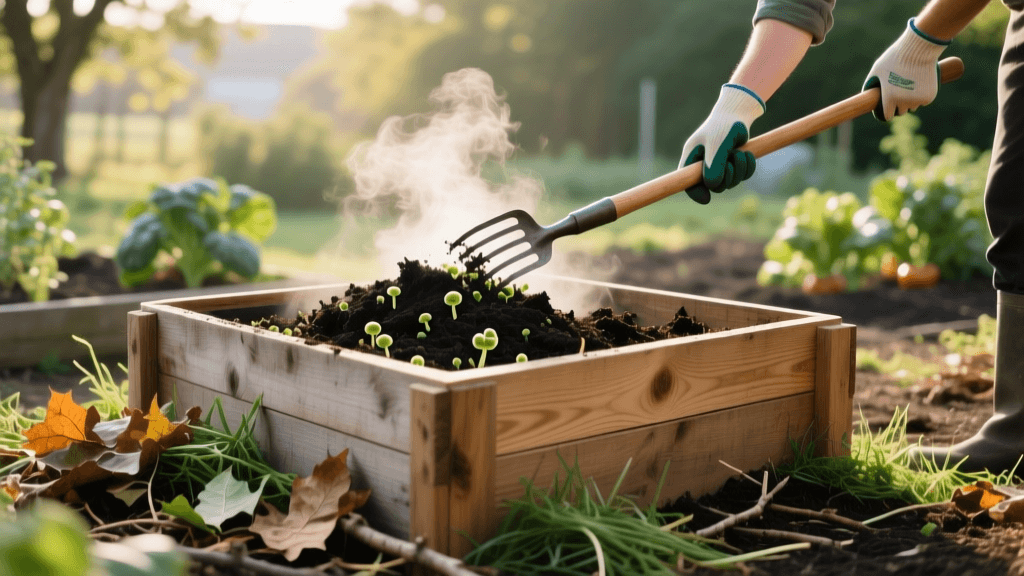
Each individual bin should measure at least 4 feet wide, 4 feet deep, and 4 feet high. This 64-cubic-foot volume is the minimum threshold required to retain the heat necessary for thermophilic decomposition. Smaller bins will lose heat to the surrounding air too quickly.
- Lumber: Untreated cedar or redwood is ideal for rot resistance. Avoid pressure-treated wood, as older treatments contained arsenic, and even modern copper-based treatments can leach into your organic compost. Cost: Approximately $150 to $250 for cedar boards.
- Hardware: Exterior-grade galvanized or stainless steel deck screws (2.5-inch and 3-inch). Cost: $20.
- Aeration Base: Heavy-duty galvanized hardware cloth (1/2-inch mesh) placed at the bottom of the bins to allow airflow from beneath while keeping out rodents. Cost: $30.
- Dividers: Removable front slats (using wooden cleats as tracks) make turning the pile and harvesting the finished compost significantly easier.
Total Estimated Cost: $200 - $300 depending on local lumber prices. If you are on a budget, you can build a functional single-bin hot composter using four heat-treated (HT) wooden shipping pallets lashed together with bungee cords or zip ties for under $20.
Managing the Pile: Temperature, Moisture, and Turning
Building the bin is only the first step; managing the biological engine is where the real work begins. To track your progress, invest in a long-stem compost thermometer, such as the REOTEMP 20-inch Backyard Compost Thermometer (approx. $35). This tool is non-negotiable for hot composting, as it tells you exactly when the microbes are active and when it is time to turn the pile to reintroduce oxygen.
The 18-Day Berkeley Hot Composting Method
Developed by the University of California, the Berkeley method is a highly structured approach to hot composting that yields finished soil in just over two weeks. The Rodale Institute frequently advocates for similar intensive aerobic methods to rapidly build soil organic matter for regenerative farming.
- Day 1 (The Build): Chop all materials into 1-inch to 2-inch pieces to increase surface area. Mix your greens and browns (1:3 ratio by volume) and build the entire 4x4x4 pile all at once. Water the pile thoroughly as you build it; it should feel like a wrung-out sponge.
- Days 2 to 4 (The Heat Up): Let the pile sit undisturbed. Thermophilic bacteria will multiply rapidly, and the core temperature should spike to between 140°F and 160°F.
- Day 5 (First Turn): Using a pitchfork, turn the pile completely. Move the outer, cooler edges into the center of the new pile, and move the hot center to the outside. This redistributes heat and introduces vital oxygen.
- Days 6 to 18 (Maintenance Turning): Turn the pile every two days. Monitor the temperature daily. If the temperature drops below 110°F after turning, the active hot phase is complete.
Troubleshooting Common Hot Compost Issues
Even experienced gardeners encounter hiccups in the composting process. Here is how to diagnose and fix the most common problems:
- The Pile Smells Like Ammonia: This indicates an excess of nitrogen (too many greens). Solution: Turn the pile and thoroughly mix in high-carbon bulking agents like dry leaves, shredded cardboard, or straw to absorb the excess moisture and balance the C:N ratio.
- The Pile Smells Like Rotten Eggs or Sulfur: The pile has gone anaerobic due to a lack of oxygen or excessive moisture. Solution: Turn the pile immediately to introduce oxygen. Add dry, coarse browns like wood chips or straw to create air pockets and absorb excess water.
- The Pile is Not Heating Up: This usually means the pile is too dry, too small, or lacks nitrogen. Solution: Check the moisture level by squeezing a handful of compost (while wearing gloves). If no water droplets appear, add water while turning. If it is moist but cold, add a nitrogen boost like blood meal or fresh grass clippings.
- The Center is Ashy and Dry: The pile has overheated and dried out, killing the microbes. Solution: Break the pile down, add water, and mix in fresh greens to restart the biological process.
Harvesting and Applying Your Finished Compost
Once the pile no longer heats up after turning and the original materials are unrecognizable, your compost is biologically stable. However, it is not quite ready for the garden. It must undergo a "curing" phase. Move the finished compost to your third bin and let it sit for 2 to 4 weeks. Curing allows the pH to neutralize and prevents the compost from robbing nitrogen from your soil as it finishes breaking down.
Before applying, sift the compost through a 1/4-inch or 1/2-inch mesh screen. Return any large, undecomposed chunks to your active hot pile to be broken down further. The resulting fine, dark, earthy-smelling humus is black gold for your garden.
Application Rates for Garden-to-Table Beds:
For established garden beds, apply a 1/4-inch to 1/2-inch layer of sifted compost as a top dressing in early spring, gently scratching it into the topsoil. For new garden beds or poor soil, incorporate 2 to 3 inches of compost into the top 6 inches of native soil before planting. This dramatically improves soil structure, water retention, and microbial diversity, setting the stage for a bountiful, nutrient-dense harvest.
By mastering the hot composting process, you close the loop on your garden's ecosystem. Kitchen scraps and yard waste are no longer garbage; they are the foundational inputs for next year's vibrant, healthy, and delicious garden-to-table crops.

