
Landscaping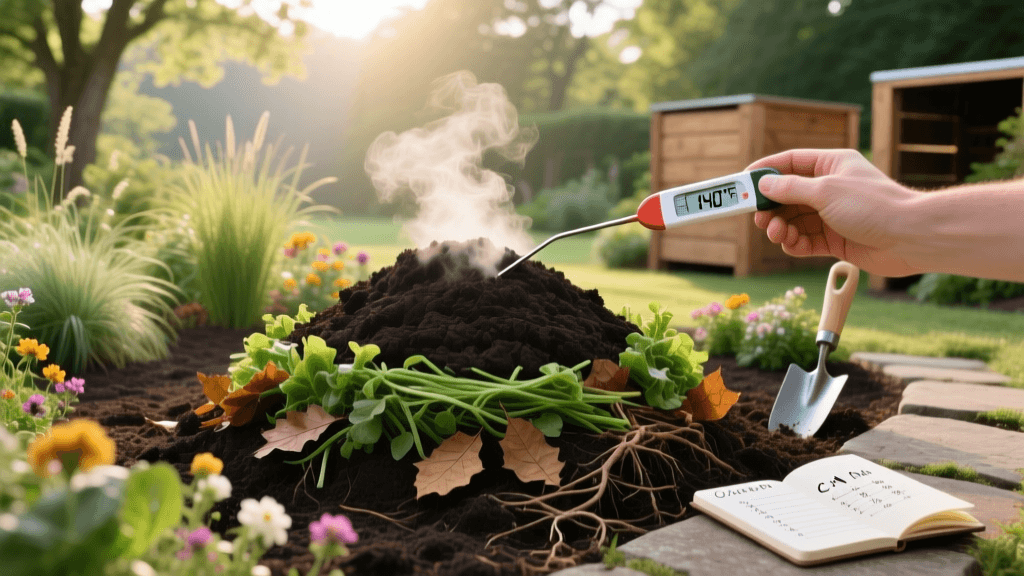
Hot Composting Guide: Build Rich Soil for Landscape Beds
The Foundation of Landscape Design: Soil Health
When homeowners envision a landscape renovation, they often focus on hardscaping elements, vibrant perennials, or pristine turfgrass. However, the true foundation of any thriving outdoor living space lies beneath the surface. Soil health is the single most critical factor in sustainable landscaping, and mastering the art of composting is the most effective way to improve it. While cold composting is a passive, slow process, hot composting is an active, scientifically driven method that rapidly transforms organic waste into a pathogen-free, nutrient-dense soil amendment. By harnessing the power of thermophilic bacteria, you can create premium compost that supercharges your garden beds, improves soil structure, and enhances water retention.
The Science of Hot Composting
Hot composting relies on creating an optimal environment for thermophilic (heat-loving) microorganisms. When the right balance of carbon, nitrogen, moisture, and oxygen is achieved, these microbes rapidly break down organic matter, generating significant heat as a byproduct. According to the Environmental Protection Agency (EPA), properly managed compost piles can reach internal temperatures between 130°F and 160°F. This thermophilic phase is crucial for landscape professionals and dedicated gardeners because it effectively destroys weed seeds, plant pathogens, and harmful bacteria that might otherwise survive in a cold compost pile. The resulting finished compost is a stable, humus-rich material that acts as a slow-release fertilizer and a powerful soil conditioner.
Mastering the Carbon-to-Nitrogen (C:N) Ratio
The engine of a hot compost pile is the balance between carbon-rich 'browns' and nitrogen-rich 'greens'. Carbon provides the energy source for microbes, while nitrogen supplies the essential proteins needed for microbial reproduction and growth. The ideal target for a hot compost pile is a C:N ratio of approximately 30:1.
Carbon Sources (Browns)
- Dried autumn leaves (shredded for faster breakdown)
- Straw or hay (ensure it is seed-free)
- Untreated cardboard and newspaper (torn into small pieces)
- Pine needles (use in moderation as they are acidic)
- Wood chips or sawdust (best for long-term fungal compost)
Nitrogen Sources (Greens)
- Fresh grass clippings (layer thinly to prevent matting)
- Vegetable and fruit kitchen scraps
- Coffee grounds and paper filters
- Herbivore manure (horse, cow, or rabbit; avoid carnivore waste)
- Alfalfa meal or kelp meal (excellent compost activators)
To achieve the 30:1 ratio by volume, a good rule of thumb is to mix roughly three parts browns to one part greens. Research from Penn State Extension emphasizes that while precision is helpful, observing the pile's temperature and moisture levels will guide you in making necessary adjustments.
Step-by-Step Guide to Building Your Pile
Step 1: Sizing and Siting
For a pile to retain enough heat to become thermophilic, it must have sufficient mass. The minimum recommended size for a hot compost pile is a 3x3x3-foot cube (one cubic yard). Choose a level, well-draining site that receives partial shade to prevent the pile from drying out too quickly in the summer sun.
Step 2: Layering and Mixing
Begin with a 4-inch base layer of coarse twigs or wood chips to promote bottom-up airflow. Alternate layers of browns and greens, watering each layer lightly as you build. Once the pile reaches three feet, use a pitchfork or a specialized compost aerator tool to thoroughly mix the materials. Homogenizing the pile ensures that microbes have immediate access to both carbon and nitrogen.
Step 3: Moisture Management
Microbes require water to survive and transport nutrients. The ideal moisture content is between 40% and 60%. Perform the 'squeeze test': grab a handful of compost and squeeze it firmly. It should feel like a damp sponge, yielding one or two drops of water. If it is too dry, add water with a watering can. If it is too wet, mix in dry, absorbent browns like shredded cardboard.
Step 4: Monitoring and Turning
Invest in a long-stemmed compost thermometer (such as those made by REOTEMP) to track the internal temperature. Within 48 to 72 hours of building the pile, temperatures should spike above 110°F. Once the core reaches 130°F to 150°F, allow it to cook for three to five days. When the temperature begins to drop, it is time to turn the pile. Turning introduces fresh oxygen and moves the cooler outer materials into the hot center. Repeat this turning process every time the temperature drops below 110°F until the pile no longer heats up, indicating the active phase is complete.
Hot vs. Cold Composting: A Comparison
Understanding the differences between hot and cold composting helps landscapers choose the right method for their specific project timelines and waste volumes.
| Feature | Hot Composting | Cold Composting |
|---|---|---|
| Time to Finish | 2 to 3 months (active management) | 6 to 12+ months (passive) |
| Core Temperature | 130°F - 160°F | Ambient to 100°F |
| Effort Level | High (frequent turning, monitoring) | Low (pile and ignore) |
| Weed Seed Destruction | Yes (thermophilic phase kills seeds) | No (many seeds survive) |
| Pathogen Elimination | Yes (heat neutralizes harmful bacteria) | No (pathogens may persist) |
| Best For | Landscape beds, vegetable gardens, bulk waste | Small yard trimmings, low-maintenance areas |
Applying Finished Compost to Landscape Beds
Once your hot compost has cured for a few weeks and smells rich, earthy, and crumbly, it is ready to be integrated into your landscape design. Proper application ensures that plant roots can access the nutrients without being overwhelmed by actively decaying matter.
Amending New Garden Beds
When establishing new perennial borders or shrub beds, spread a 2- to 4-inch layer of finished compost over the entire planting area. Use a broadfork or rototiller to incorporate the compost into the top 6 to 8 inches of native soil. This dramatically improves soil tilth, breaks up heavy clay, and increases the water-holding capacity of sandy soils.
Top-Dressing Existing Beds
For established landscape beds, avoid deep tilling which can damage existing root systems. Instead, apply a 1- to 2-inch layer of compost around the base of your plants, keeping it a few inches away from the main stems or trunks to prevent rot. Earthworms and soil microbes will naturally incorporate the organic matter into the soil profile over time.
Compost Tea for Foliar Feeding
Steep finished compost in aerated water for 24 to 48 hours to create compost tea. This liquid extract is teeming with beneficial microbes and soluble nutrients. Strain the liquid and apply it as a foliar spray or soil drench to give your landscape plants a rapid biological boost during the peak growing season.
Troubleshooting Common Compost Issues
Even experienced landscapers encounter hiccups in the composting process. Here is how to diagnose and fix the most common hot composting problems:
- The pile smells like ammonia: This indicates an excess of nitrogen (too many greens). Remedy the issue by thoroughly mixing in high-carbon browns like dried leaves or shredded paper to restore the C:N balance.
- The pile smells like rotten eggs: A sulfurous odor means the pile has gone anaerobic due to a lack of oxygen or excessive moisture. Turn the pile immediately to introduce air, and add bulky, dry materials like wood chips or straw to absorb excess water and create air pockets.
- The pile is not heating up: If the pile fails to reach thermophilic temperatures, it may be too small, too dry, or lacking nitrogen. Ensure the pile is at least one cubic yard, perform the squeeze test to check moisture, and add a nitrogen-rich activator like alfalfa meal or fresh grass clippings.
- Pests and rodents are invading: To deter animals, never add meat, dairy, fats, or oils to your compost. Always bury food scraps deep within the center of the pile under a thick layer of carbon-rich browns, and consider using a wire mesh bin to block access.
By mastering hot composting, you close the loop on your landscape's organic waste cycle. The resulting soil health improvements will lead to more resilient plants, reduced need for synthetic fertilizers, and a vibrant, thriving outdoor environment that stands the test of time.

