
Hot Composting Guide: Build a 3-Bin System for Rapid Soil Health
Healthy garden soil is the foundation of a thriving outdoor space, and compost is the most effective, sustainable way to build it. While many homeowners rely on passive, cold composting methods that take a year or more to yield results, hot composting offers a dramatically faster alternative. By harnessing the power of thermophilic (heat-loving) bacteria, you can transform raw yard waste and kitchen scraps into rich, dark, crumbly humus in as little as 18 to 21 days. This rapid process not only speeds up soil amendment but also generates enough internal heat to destroy weed seeds and harmful plant pathogens, ensuring your garden soil remains healthy and productive.
The Science of Thermophilic Composting
Hot composting is a highly active biological process. When carbon-rich and nitrogen-rich materials are combined in the correct ratios, along with adequate moisture and oxygen, microorganisms rapidly multiply and break down the organic matter. According to the United States Environmental Protection Agency (EPA), a well-managed hot compost pile will reach internal temperatures between 135°F and 160°F (57°C to 71°C). This thermophilic phase is critical. It accelerates the decomposition process and sanitizes the compost, killing off common soil-borne diseases and weed seeds that would otherwise survive a cold composting cycle and wreak havoc on your garden beds.
Balancing Browns and Greens: The C:N Ratio
The secret to generating heat lies in the Carbon-to-Nitrogen (C:N) ratio. Carbon provides the energy source for microbes, while nitrogen provides the protein needed for them to grow and reproduce. The ideal C:N ratio for a hot compost pile is approximately 30:1. If your pile has too much carbon, decomposition will stall. If it has too much nitrogen, the pile will become anaerobic, slimy, and emit a strong ammonia odor.
Carbon-rich materials (often called "browns") include dry leaves, straw, wood chips, and shredded cardboard. Nitrogen-rich materials ("greens") include fresh grass clippings, vegetable scraps, and coffee grounds. The Cornell University Composting Resource Site emphasizes that understanding the specific C:N ratios of your inputs is the most reliable way to predict and maintain pile temperatures.
Carbon to Nitrogen (C:N) Ratio Cheat Sheet
| Material | Average C:N Ratio | Category |
|---|---|---|
| Wood Chips / Sawdust | 400:1 | Brown (Carbon) |
| Dry Autumn Leaves | 60:1 | Brown (Carbon) |
| Straw / Hay | 75:1 | Brown (Carbon) |
| Shredded Newspaper | 175:1 | Brown (Carbon) |
| Fresh Grass Clippings | 20:1 | Green (Nitrogen) |
| Vegetable Kitchen Scraps | 25:1 | Green (Nitrogen) |
| Coffee Grounds | 20:1 | Green (Nitrogen) |
| Manure (Herbivore) | 15:1 | Green (Nitrogen) |
To achieve a 30:1 ratio in practice, aim for a volume mix of roughly three parts browns to one part greens. Because browns are often bulkier and lighter than dense, wet greens, this volumetric ratio naturally balances the chemical C:N ratio.
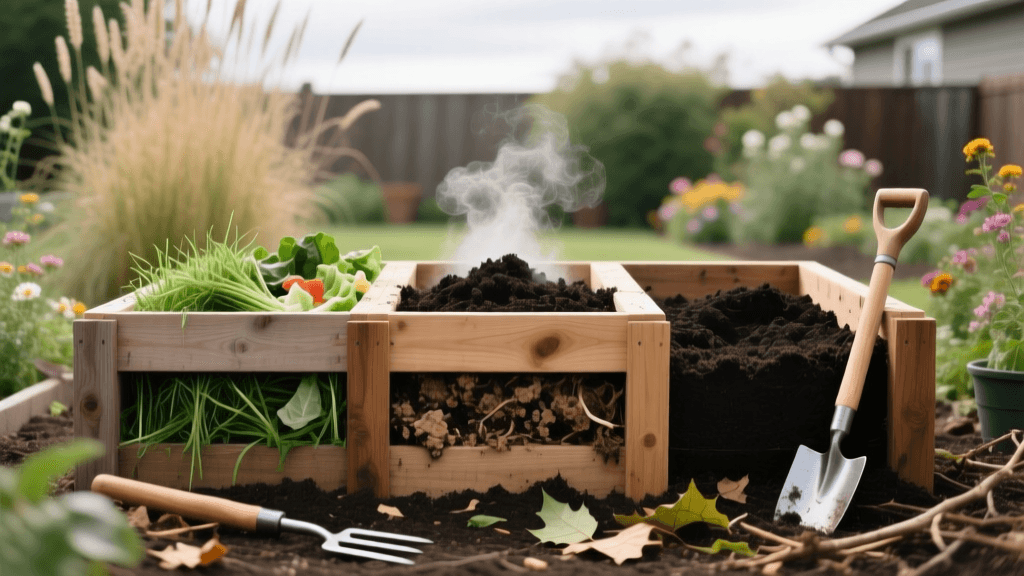
How to Build a DIY Three-Bin Compost System
To maintain a continuous supply of hot compost, a three-bin system is the gold standard for home gardeners. This setup allows you to have one bin for fresh materials, one bin for the active heating and turning phase, and one bin for curing and finished compost.
Dimensions and Materials
Each bin should measure at least 3 feet wide, 3 feet deep, and 3 feet high (1 cubic yard). This minimum volume is essential for retaining the heat required for thermophilic activity. You will need:
- Lumber: Untreated cedar or redwood 2x6 planks (avoid pressure-treated wood, as chemicals can leach into your soil).
- Posts: 4x4 untreated wooden posts for structural corners.
- Hardware: Galvanized deck screws and heavy-duty metal brackets.
- Base: 1/2-inch galvanized hardware cloth to line the bottom and prevent burrowing rodents from entering the pile.
Cost Breakdown and Assembly
Building this system yourself is highly cost-effective. Expect to spend approximately $80 to $110 on lumber, $15 on galvanized screws and brackets, and $25 on hardware cloth, bringing the total project cost to around $120 to $150. Assemble the three bins side-by-side, leaving the front of each bin open or fitted with removable slats so you can easily access the compost with a pitchfork or shovel for turning.
The 18-Day Hot Composting Schedule
The most famous hot composting protocol is the Berkeley Method, developed by Dr. Louis Golueke. It requires strict adherence to a turning and watering schedule to maintain oxygen levels and distribute heat evenly.
- Day 1 (Assembly): Chop all materials into 1-inch to 2-inch pieces to increase surface area. Mix your greens and browns thoroughly before adding them to the first bin. Water the pile as you build it until it feels like a wrung-out sponge.
- Days 2-4 (Initial Heating): The pile will rapidly heat up. Do not disturb it during this time; allow the thermophilic bacteria to establish.
- Day 5 (First Turn): Using a pitchfork, move the entire pile into the second bin. Turn the material inside-out, moving the cooler outer edges to the hot center. Check moisture; add water if the pile feels dry.
- Days 6-18 (Continuous Turning): Turn the pile every other day (Days 7, 9, 11, etc.). Each time you turn it, move it back and forth between the first and second bins. Monitor the temperature with a long-stemmed compost thermometer. It should consistently read between 135°F and 155°F.
- Day 19+ (Curing): Once the pile no longer heats up after turning and the original materials are unrecognizable, move it to the third bin to cure for two to three weeks before applying it to your garden.
Troubleshooting Common Hot Compost Issues
Even with careful planning, hot compost piles can occasionally go off track. Here is how to diagnose and fix the most common problems:
- The Pile Smells Like Ammonia: This indicates an excess of nitrogen (too many greens). Solution: Mix in high-carbon bulking agents like dry leaves, shredded cardboard, or straw, and turn the pile thoroughly to introduce oxygen.
- The Pile is Cold and Inactive: The pile may be too dry, too small, or lacking nitrogen. Solution: Perform the "squeeze test" by grabbing a handful of compost (wear gloves). If you cannot squeeze out a drop or two of water, it is too dry. Add water while turning. If moisture is fine, add more nitrogen-rich greens or a compost activator like alfalfa meal.
- The Pile Attracts Pests: Rodents and raccoons are drawn to exposed food scraps. Solution: Never put meat, dairy, or oils in your compost. Always bury kitchen scraps deep in the center of the pile, covered by at least 6 inches of brown materials, and ensure your hardware cloth base is secure.
- Temperatures Exceed 165°F: Extremely high temperatures can kill off beneficial microbes and lead to spontaneous combustion in massive agricultural piles (though rare in home bins). Solution: Turn the pile immediately to release trapped heat and cool it down.
Integrating Finished Compost into Your Garden
Once your hot compost has cured, it will be dark brown, earthy-smelling, and uniform in texture. This "black gold" is teeming with beneficial microbes that improve soil structure, increase water retention, and make nutrients more bioavailable to plant roots. For new garden beds, spread a 2-inch layer of finished compost over the soil surface and till it into the top 6 inches of earth. For established lawns and perennial beds, use it as a top-dressing, applying a thin 1/4-inch layer in the spring or fall to naturally fertilize and protect your landscape. By mastering the three-bin hot composting system, you close the loop on your yard waste and create a perpetual, free source of premium soil amendments.

