
Lawn Care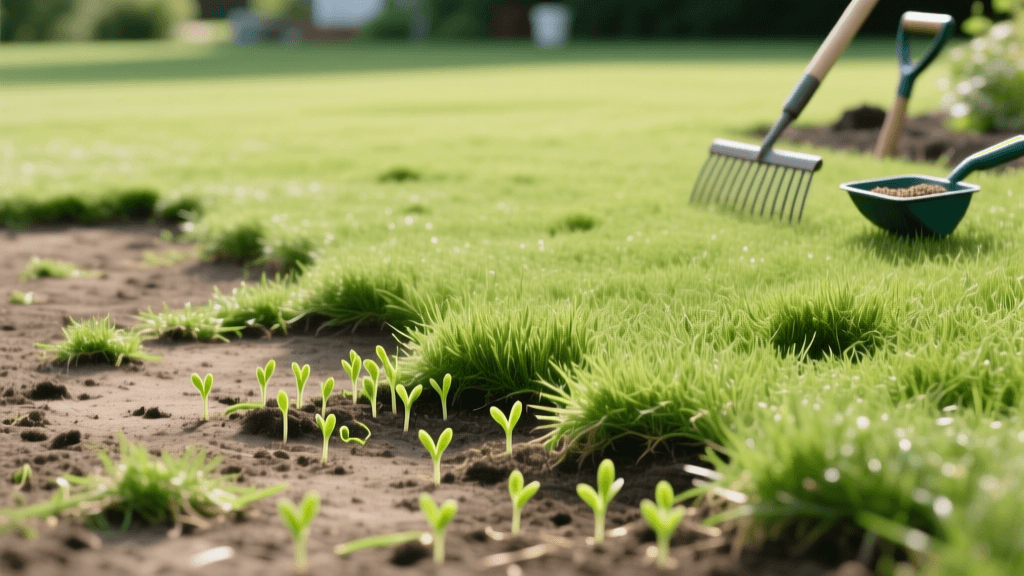
How to Renovate and Restore a Severely Damaged Lawn
Every homeowner dreams of a lush, vibrant carpet of grass that enhances their property's curb appeal and provides a beautiful space for outdoor activities. However, environmental stressors like severe drought, heavy foot traffic, persistent weed infestations, and general neglect can quickly turn a pristine lawn into a patchy, brown eyesore. When your turf has reached a point of no return, simple maintenance and spot treatments are no longer enough. It is time for a complete lawn renovation and recovery.
Renovating a lawn is a significant undertaking that requires careful planning, the right materials, and precise timing. According to the University of Minnesota Extension, late summer to early fall (mid-August through mid-September) is the absolute best window for renovating cool-season lawns. The soil is still warm, promoting rapid seed germination, while the cooling air temperatures and increased autumn rainfall reduce heat stress on young seedlings. This comprehensive guide will walk you through the exact steps, products, and measurements needed to successfully renovate and recover a severely damaged lawn.
Assessing the Damage: The 50 Percent Rule
Before you purchase a single bag of seed or rent a core aerator, you must objectively evaluate the current state of your turf. Turfgrass professionals rely on the "50 Percent Rule" to determine whether a lawn needs overseeding or a full-scale renovation. Walk your property and estimate the percentage of the lawn that consists of bare dirt, dead grass, or dense weed patches.
If more than 50 percent of your lawn is compromised, a complete renovation is necessary. Attempting to simply overseed a heavily degraded lawn will result in poor seed-to-soil contact, intense competition from established weeds, and ultimately, wasted time and money. If your lawn passes the 50 percent threshold, you must commit to killing off the existing vegetation and starting from scratch.
Step 1: Eradicating Existing Weeds and Poor Turf
The first step in lawn recovery is clearing the canvas. You must eliminate all existing vegetation, including desirable grass, broadleaf weeds, and invasive grasses like crabgrass or quackgrass. There are two primary methods for achieving this: chemical eradication and solarization.
Chemical Eradication
For the fastest results, apply a non-selective systemic herbicide containing glyphosate. Apply the product according to the label instructions on a calm, dry day. Glyphosate works by traveling down to the root system, ensuring that perennial weeds do not return. You will typically need to wait 7 to 14 days for the vegetation to completely die off. If stubborn weeds persist, a second application may be required.
Soil Solarization (The Organic Alternative)
If you prefer to avoid synthetic herbicides, soil solarization is a highly effective, albeit slower, alternative. Mow the damaged lawn as short as your mower will allow, water the soil deeply, and cover the entire area with clear, thick plastic sheeting (2 to 4 mil). Anchor the edges with soil or rocks. The sun will heat the trapped moisture, essentially cooking the existing grass, weed seeds, and soil-borne pathogens. This process takes 4 to 6 weeks during the peak heat of summer.
Step 2: Comprehensive Soil Testing and Preparation
Healthy grass requires a healthy foundation. Before laying down new seed, you must understand your soil's chemical and physical properties. Purchase a professional soil test kit from a local university extension office or a reputable private lab. The Penn State Extension highly recommends soil testing prior to any major renovation to determine exact lime and fertilizer requirements.
Once your results return, address the pH level first. Cool-season grasses thrive in a pH range of 6.0 to 7.0. If your soil is too acidic (below 6.0), apply pelletized calcitic or dolomitic lime at the rate recommended by your test (typically 25 to 50 lbs per 1,000 square feet). If the soil is too alkaline, apply elemental sulfur. Next, address soil compaction. Rent a heavy-duty core aerator and make two passes over the lawn in perpendicular directions. This pulls out 2-to-3-inch plugs of soil, relieving compaction and creating perfect pockets for new seed and amendments.
Step 3: Selecting the Right Seed and Seeding Rates
Choosing the correct grass species is critical for long-term lawn recovery. For cool-season climates, a mix of Kentucky Bluegrass, Tall Fescue, and Perennial Ryegrass offers the best balance of durability, disease resistance, and aesthetic appeal. Avoid cheap "contractor grade" seed mixes, as they often contain high percentages of annual ryegrass or weed seeds. Always look for a seed tag that guarantees 99 percent weed-free and zero percent noxious weed content.
| Grass Type | Seeding Rate (per 1,000 sq ft) | Germination Time | Best Use Case |
|---|---|---|---|
| Kentucky Bluegrass | 2.0 - 3.0 lbs | 14 - 28 days | High aesthetic, rhizome spreading for self-repair |
| Tall Fescue (Turf-Type) | 6.0 - 8.0 lbs | 7 - 14 days | Deep roots, high drought and traffic tolerance |
| Perennial Ryegrass | 4.0 - 6.0 lbs | 5 - 10 days | Rapid germination, nurse crop for slower seeds |
Step 4: Seeding, Starter Fertilizer, and Topdressing
Once the soil is prepped and the dead vegetation is raked away or mowed down to the dirt, it is time to seed. Use a broadcast spreader for large areas and a drop spreader for precise edges. Split your seed quantity in half, applying the first half in a north-south direction and the second half in an east-west direction to ensure even coverage.
Immediately after seeding, apply a high-quality starter fertilizer. Starter fertilizers are rich in phosphorus (the middle number in the N-P-K ratio), which is essential for vigorous root development in new seedlings. A product like Scotts Turf Builder Starter Food for New Grass (24-25-4) or Lesco Professional Starter Fertilizer (18-24-12) is ideal. Apply at a rate that delivers exactly 1.0 lb of nitrogen per 1,000 square feet.
To lock in moisture and protect the seed from birds and wind, apply a thin layer of topdressing. Use a finely screened compost or a specialized peat-based seeding mulch (like Scotts Lawn Soil). Spread it no thicker than 1/4 inch over the seed. You should still be able to see the grass seed peeking through the topdressing; burying it too deep will prevent germination.
Step 5: The Critical Post-Renovation Watering Schedule
Watering is the single most important factor in lawn renovation success. Grass seed must remain consistently moist until it establishes a deep root system. If the seed dries out even once during the germination phase, the embryo will die, and you will be left with bare patches.
- Weeks 1 and 2 (Germination Phase): Water the lawn lightly 2 to 3 times per day. The goal is to keep the top 1 inch of soil constantly damp but not waterlogged. Use a fine mist sprinkler head to avoid washing the seeds away.
- Weeks 3 and 4 (Establishment Phase): As the grass reaches 1 to 2 inches in height, reduce watering frequency to once a day, but increase the duration. You want to encourage the roots to grow deeper by moistening the top 2 to 3 inches of soil.
- Week 5 and Beyond (Maintenance Phase): Transition to a standard deep and infrequent watering schedule. Provide 1 to 1.5 inches of water per week, split across two or three morning watering sessions.
Estimated Lawn Renovation Costs
Budgeting for a full lawn renovation helps prevent surprises midway through the project. Below is a structured breakdown of estimated costs per 1,000 square feet for a DIY renovation:
- Non-Selective Herbicide: $10 - $15
- Soil Testing: $15 - $30 (One-time fee, amortized across the whole lawn)
- Core Aerator Rental: $20 - $40 (Based on a $100 daily rental for a 3,000 sq ft lawn)
- Premium Grass Seed: $35 - $60
- Starter Fertilizer: $15 - $25
- Compost / Seeding Mulch: $40 - $70
Expect to spend between $135 and $240 per 1,000 square feet for a high-quality DIY renovation. While this is a significant investment, it is vastly more cost-effective than hiring a professional landscaping crew, which can easily charge $3 to $5 per square foot for complete tear-out and re-sodding.
"Patience is the most critical tool in lawn renovation. Do not mow your newly renovated lawn until the new grass has reached at least 3.5 inches in height, and ensure your mower blades are freshly sharpened to avoid tearing the delicate young seedlings out of the soil."
Conclusion
Recovering a severely damaged lawn is not a weekend quick-fix; it is a seasonal commitment. By strictly following the 50 percent rule, properly preparing your soil, selecting premium seed, and adhering to a rigorous watering schedule, you can transform a barren yard into a thick, resilient turf. Remember that the first year of a newly renovated lawn is about root establishment rather than perfection. Treat your new grass gently, stay on top of broadleaf weed control in the spring, and enjoy the long-term rewards of a properly renovated landscape.

