
Transform Your Lawn: Xeriscape Before And After Guide
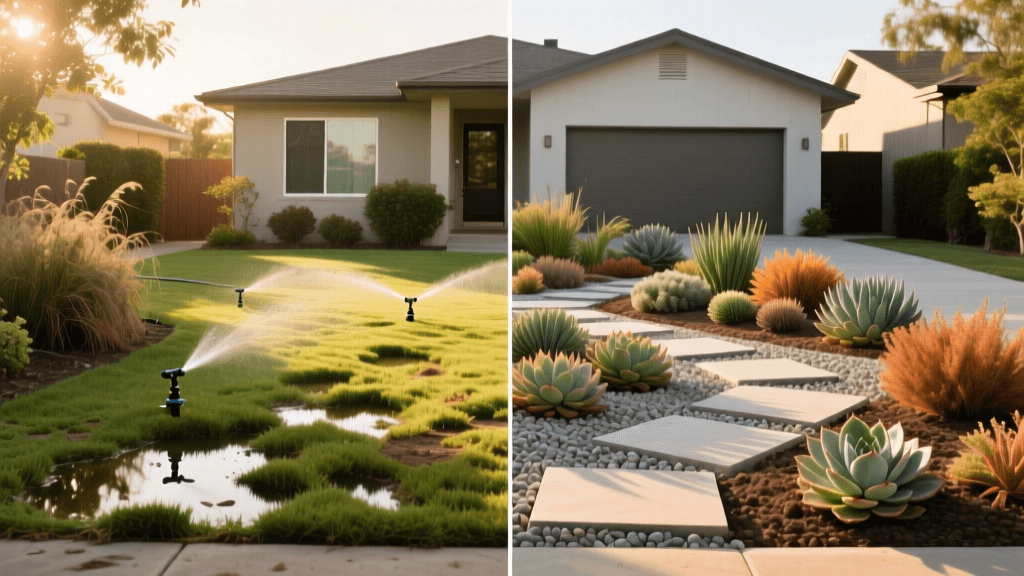
The Vision: From Thirsty Turf to Drought-Tolerant Oasis
For decades, the quintessential American dream has included a sprawling, emerald-green front lawn. However, the reality of maintaining that turf—especially in regions prone to drought and water restrictions—is often a nightmare of high utility bills, constant mowing, and chemical fertilizers. This comprehensive before-and-after guide chronicles the transformation of a 1,000-square-foot, water-wasting Kentucky Bluegrass front yard into a vibrant, energy-efficient, and smart-irrigated xeriscape. Whether you are looking to lower your water bill, reduce your weekend chore list, or boost your curb appeal, this step-by-step breakdown provides the exact measurements, product recommendations, and costs required to execute your own landscape makeover.
The "Before" State: A Thirsty, Patchy Lawn
The project site was a typical 1980s suburban front yard measuring roughly 1,000 square feet. It featured a traditional spray-head irrigation system that lost massive amounts of water to wind drift and evaporation. The soil was heavy, compacted clay, which caused runoff during heavy rain and left the grass parched and brown by mid-July. The homeowners were spending an average of $115 per month on summer water bills and dedicating 2.5 hours every weekend to mowing, edging, and fertilizing. According to the EPA WaterSense program, outdoor water use accounts for nearly 30% of total household water use, and can be as high as 60% in arid regions. The homeowners decided it was time for a radical change.
Step 1: Turf Removal and Soil Preparation
The first phase of any xeriscape transformation is removing the existing water-hungry turf. While sheet mulching (smothering the grass with cardboard and mulch over several months) is an eco-friendly option, the homeowners wanted an immediate transformation and opted for mechanical removal.
Actionable Steps:
- Rent a Sod Cutter: A walk-behind sod cutter was rented from a local hardware store for $90 for a half-day. The blade was set to 2.5 inches to remove the grass and a thin layer of thatch.
- Remove and Compost: The removed sod was rolled up and hauled to a local municipal composting facility (cost: $40 for disposal).
- Amend the Clay Soil: Proper soil preparation is critical for drought tolerance. As outlined by the Texas A&M AgriLife Extension Earth-Kind program, incorporating organic matter into heavy clay soils improves moisture retention and root development. We spread 3 cubic yards of premium organic compost ($120) over the exposed clay and tilled it into the top 6 inches of soil using a rented rear-tine tiller ($85).
Step 2: Hardscaping and Pathway Installation
To break up the visual expanse and create a functional, low-maintenance walkway, we designed a meandering dry creek bed and pathway using decomposed granite (DG) and native flagstone.
Materials and Measurements:
- Excavation: We dug out the pathway area to a depth of 3 inches.
- Weed Barrier: Instead of cheap plastic sheeting (which traps water and degrades quickly), we installed a commercial-grade woven geotextile fabric (Vigoro Professional Weed Block, $65). This allows water to permeate the soil while blocking weed growth.
- Edging: Aluminum landscape edging was staked along the curves to keep the pathway materials contained.
- Decomposed Granite: We ordered 3 tons of 3/8-inch stabilized DG ($165, including delivery). The DG was spread to a depth of 2 inches, moistened with a hose, and compacted using a hand tamper to create a firm, natural-looking surface.
Step 3: Smart Irrigation Overhaul
One of the most critical elements of bridging outdoor living with smart home technology is upgrading from a dumb, timer-based sprinkler clock to a weather-based smart controller. The existing PVC mainline was kept, but all traditional spray heads were capped off.
The Smart Setup:
- Controller: We installed a Rachio 3 Smart Sprinkler Controller ($229). This device connects to Wi-Fi and uses local weather data, soil type, and plant type to automatically adjust watering schedules, skipping irrigation when rain is in the forecast.
- Drip Conversion: Instead of spraying water into the air, we converted the zones to a low-volume drip system. We used 1/2-inch NDS drip tubing snaked through the planting beds, punching in 1.0 Gallon Per Hour (GPH) pressure-compensating emitters directly at the root zone of each new plant. Total cost for drip supplies, connectors, and a pressure regulator: $115.
Step 4: Plant Selection and Placement
The "After" vision relied on a diverse palette of drought-tolerant, native, and adapted plants that provide year-round visual interest, attract pollinators, and require minimal supplemental water once established.
The Plant Palette:
- Focal Point (Canopy): One Desert Willow (Chilopsis linearis) planted near the front window. This deciduous tree provides dappled summer shade (reducing home cooling costs) and allows winter sunlight to warm the house. Cost: $140 for a 15-gallon specimen.
- Mid-Layer (Architectural Interest): Three Agave parryi (Parry's Agave) placed as structural anchors near the pathway. Cost: $45 each.
- Mid-Layer (Color & Movement): Five Red Yuccas (Hesperaloe parviflora) planted in a sweeping drift. These produce towering spikes of coral-red blooms from late spring through fall, attracting hummingbirds. Cost: $25 each.
- Groundcover: Creeping Thyme (Thymus serpyllum) planted between the flagstone steppers to soften the hardscape edges and release a pleasant fragrance when stepped on. Cost: $60 for a flat of 32 plugs.
After planting, a 3-inch layer of shredded hardwood mulch was applied to all planting beds ($85) to lock in soil moisture, regulate soil temperature, and suppress weeds.
The Data: Before vs. After Transformation Metrics
The true value of a landscape transformation is best understood through the numbers. Below is a comparison chart detailing the operational and financial impact of the xeriscape makeover over a 12-month period.
| Metric | Before (Kentucky Bluegrass) | After (Smart Xeriscape) | Net Impact |
|---|---|---|---|
| Peak Summer Water Usage | 4,500 gallons / month | 900 gallons / month | 80% Reduction |
| Average Summer Water Cost | $115.00 / month | $28.00 / month | $87.00 Monthly Savings |
| Weekly Maintenance Time | 2.5 hours (mowing, edging) | 0.5 hours (weeding, pruning) | 2 Hours Reclaimed Weekly |
| Annual Fertilizer/Chemicals | $85.00 | $0.00 | $85.00 Annual Savings |
| Total Upfront Project Cost | N/A | $1,294.00 | Estimated ROI: 14 Months |
Long-Term Maintenance and Smart Home Integration
The transition from a traditional lawn to a xeriscape does not mean the yard is entirely "zero-maintenance," but it drastically shifts the type of work required. During the first 12 months, the smart irrigation system was programmed to water deeply but infrequently to encourage deep root growth. The Rachio app provided monthly water usage reports, confirming that the system was performing optimally. After the first year, the Desert Willow and Agaves were fully established, allowing the smart controller to reduce watering schedules to just once every 10 days during peak summer heat.
Seasonal maintenance now consists of a single afternoon in early spring: cutting back the dried foliage of the Red Yuccas, pulling the occasional winter weed that bypasses the geotextile fabric, and topping off the mulch layer by an inch. The integration of smart home technology ensures that the landscape remains resilient against unpredictable weather patterns without any manual intervention from the homeowner.
Conclusion: A Sustainable Curb Appeal
Transforming a barren, water-wasting front lawn into a thriving xeriscape is one of the most impactful home improvement projects a homeowner can undertake. The before-and-after contrast is staggering: what was once a flat, high-maintenance sponge for municipal water is now a dynamic, textured landscape that supports local ecology and integrates seamlessly with modern smart home technology. By investing roughly $1,300 and a weekend of hard labor, the homeowners not only reclaimed their weekends but also future-proofed their property against rising water costs and drought restrictions, proving that sustainable landscaping and stunning curb appeal can beautifully coexist.

