
Landscaping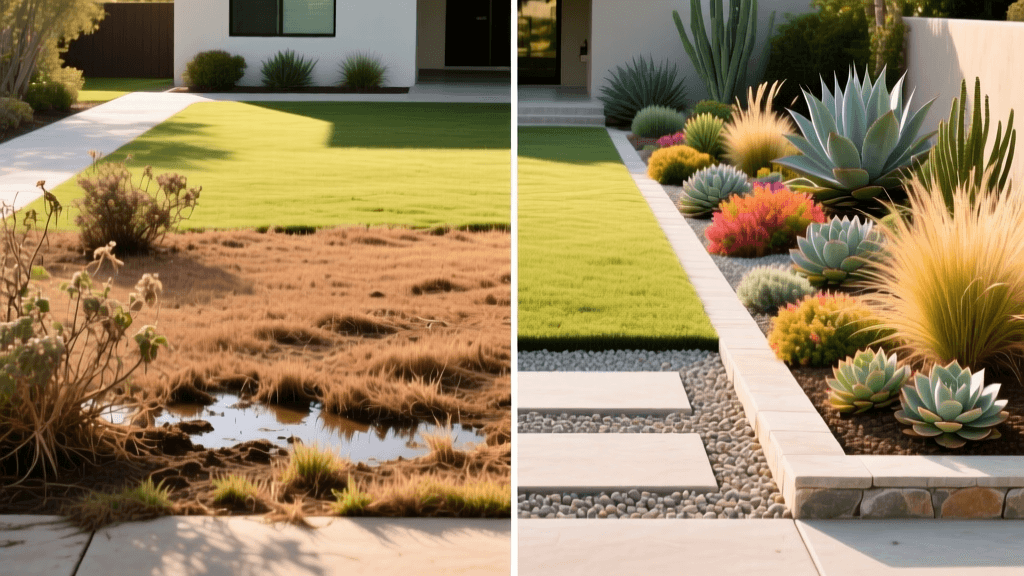
Before & After: Transforming a Thirsty Lawn to Xeriscape
The Challenge: A Water-Wasting Front Yard
For many homeowners, the traditional front lawn is a source of pride, but it can quickly become a costly burden, especially in regions prone to drought and strict water restrictions. According to the EPA WaterSense program, the average American family uses 320 gallons of water per day, and nearly 30 percent of that is dedicated to outdoor use. In arid climates, landscape irrigation can account for up to 60 percent of total household water consumption. This staggering statistic was the primary catalyst for our latest landscaping project: a complete before-and-after transformation of a failing, high-maintenance front lawn into a vibrant, drought-tolerant xeriscape.
The "Before" State: Patchy Grass and Poor Drainage
Our project site was a 600-square-foot front yard in a suburban neighborhood that received full, unrelenting sun from dawn until dusk. The existing landscape consisted of patchy Bermuda grass that struggled to survive the summer heat. Despite running the sprinkler system for 45 minutes every other day, the grass remained brown, thin, and susceptible to weed invasion. Furthermore, the soil was heavily compacted clay, leading to poor drainage and runoff onto the sidewalk during heavy rains. The homeowners were spending over $150 a month on water bills during the peak summer season, yet the curb appeal of their property continued to decline. It was time for a radical change.
Step 1: Lawn Removal and Site Preparation
Removing an established lawn requires patience and the right technique to avoid damaging the underlying soil ecology. We opted for sheet mulching, an eco-friendly method that suppresses grass while simultaneously building soil health. First, we mowed the remaining Bermuda grass as short as possible, down to about one inch. Next, we laid down overlapping layers of plain, uncoated corrugated cardboard directly over the grass, ensuring there were no gaps where sunlight could penetrate. We thoroughly soaked the cardboard with water to accelerate the decomposition process and keep it firmly in place. Finally, we covered the cardboard with a two-inch layer of organic compost. This entire area was left to sit for six weeks. During this time, the grass died and began to compost, while beneficial earthworms and microbes worked to break down the cardboard and aerate the compacted clay beneath.
Step 2: Hardscaping and Soil Amendment
Before introducing new plants, we needed to address the topography and create visual interest through hardscaping. The yard had a slight slope toward the street, which previously caused water runoff. To mitigate this and add a striking design element, we designed a dry creek bed. We excavated a shallow, meandering trench roughly 18 inches wide and 6 inches deep, lining it with heavy-duty woven landscape fabric to prevent weed growth. We then filled the trench with a mix of 3-inch and 5-inch rounded river rocks, securing the edges with larger, dark basalt boulders. This dry creek bed would act as a beautiful rain garden feature, capturing and slowly percolating stormwater into the ground. For the remaining planting beds, we tilled the top four inches of the soil-compost mix to ensure a loose, friable medium that would encourage deep root penetration for our new drought-tolerant plants.
Step 3: Hydrozoning and Plant Selection
A critical principle of xeriscaping is hydrozoning—the practice of grouping plants with similar water and sunlight requirements together. This prevents overwatering drought-tolerant species while ensuring thirstier plants get what they need. We divided the 600-square-foot space into two primary hydrozones: a "very low water" zone near the driveway and a "low water" zone closer to the house. When selecting plants, we prioritized native species, which are naturally adapted to the local climate and provide essential habitat for local pollinators. The National Wildlife Federation strongly advocates for native plant gardening to support declining bird and insect populations. Our plant palette included:
- Texas Sage (Leucophyllum frutescens): Planted as a backdrop anchor, this silvery-gray shrub produces stunning purple blooms after rainfall and requires virtually no supplemental water once established.
- Red Yucca (Hesperaloe parviflora): Positioned along the dry creek bed, its arching evergreen foliage and tall spikes of coral-red flowers provide excellent architectural contrast.
- Autumn Sage (Salvia greggii): Grouped in the "low water" zone near the front porch, these compact shrubs offer continuous red blooms that attract hummingbirds.
- Gulf Coast Muhly Grass (Muhlenbergia capillaris): Planted in clusters of three, this ornamental grass creates a breathtaking, wispy pink haze in the autumn months.
Step 4: Installing Drip Irrigation and Mulch
Even drought-tolerant plants require consistent moisture during their first year of establishment. However, traditional spray sprinklers lose massive amounts of water to wind drift and evaporation. We completely removed the old PVC sprinkler heads and capped the lines, replacing them with a highly efficient drip irrigation system. We ran 1/2-inch poly tubing along the main planting corridors and branched off with 1/4-inch micro-tubing to individual plants. Each shrub received two 2-gallon-per-hour (GPH) pressure-compensating emitters, while the ornamental grasses received single 1-GPH emitters. A smart irrigation controller was installed to automatically adjust watering schedules based on local weather data and soil moisture levels. To finish the beds and lock in moisture, we applied a 3-inch layer of shredded hardwood mulch over the entire soil surface, keeping it a few inches away from the base of the plant stems to prevent rot.
The "After" State: A Thriving, Drought-Tolerant Oasis
Six months after installation, the transformation was nothing short of spectacular. The patchy, brown lawn was replaced by a lush, multi-layered landscape bursting with color, texture, and movement. The dry creek bed became a focal point, beautifully directing rainwater away from the street and into the soil. The homeowners reported a 65 percent reduction in their outdoor water usage during the first summer, translating to significant financial savings. Furthermore, the maintenance dropped from weekly mowing and edging to a simple monthly walk-through to pull the occasional weed and check the drip emitters. The curb appeal of the home skyrocketed, drawing compliments from neighbors and passersby alike.
Project Cost and Timeline Breakdown
Investing in a xeriscape transformation yields long-term dividends in water savings and reduced lawn care costs. Below is a detailed breakdown of the materials and labor for this 600-square-foot project.
| Item / Phase | Quantity / Details | Estimated Cost |
|---|---|---|
| Lawn Removal (Sheet Mulching) | Cardboard, Compost (2 cu. yds) | $180 |
| Hardscape Materials | River rock, Basalt boulders, Fabric | $650 |
| Plants (15-gallon & 5-gallon) | 12 Shrubs, 9 Grasses, 6 Yuccas | $1,100 |
| Drip Irrigation Kit | Tubing, emitters, smart controller | $275 |
| Mulch (Shredded Hardwood) | 6 cubic yards | $360 |
| Labor (Professional Installation) | 3 days, 2-person crew | $2,400 |
| Total Project Cost | $4,965 |
Maintenance Tips for Your New Xeriscape
While xeriscapes are famously low-maintenance, they are not entirely no-maintenance. The Lady Bird Johnson Wildflower Center emphasizes that native plants still require seasonal care to thrive. During the first year, you must monitor the drip irrigation closely to ensure plants establish deep root systems. Once established, you can gradually reduce watering to only supplemental irrigation during extreme droughts. Pruning should be done in late winter or early spring to shape shrubs like Texas Sage and remove dead foliage from ornamental grasses. Avoid using synthetic fertilizers, as most native xeriscape plants are adapted to poor soils and excessive nutrients can actually harm them or promote weak, leggy growth. Instead, top-dress the beds with a half-inch of fresh compost every spring to naturally replenish soil nutrients.
Conclusion
Transforming a thirsty, failing lawn into a functional xeriscape is one of the most rewarding landscaping projects a homeowner can undertake. Not only does it drastically reduce water consumption and utility bills, but it also creates a dynamic, ecologically beneficial outdoor space that looks beautiful year-round. By utilizing sheet mulching, strategic hydrozoning, and native plant selections, you can achieve a stunning before-and-after transformation that stands the test of time and climate challenges.

