
Lawn Care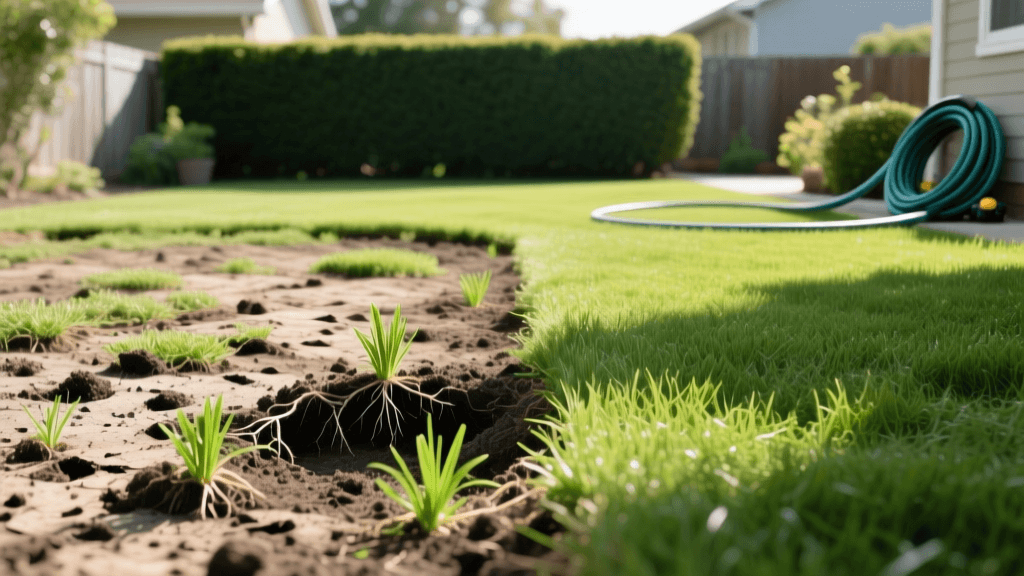
Lawn Transformation: Aeration and Overseeding Before & After
The 'Before' State: Diagnosing a Failing Lawn
Every homeowner dreams of a lush, carpet-like lawn, but the reality of soil compaction, heavy thatch, and seasonal stress often leaves us staring at a patchy, thin, and weed-infested yard. This transformation guide chronicles the complete rehabilitation of a 5,000-square-foot cool-season Tall Fescue lawn that had fallen victim to heavy foot traffic, clay-heavy soil, and years of neglect.
Before any seed was dropped or any machine was rented, the lawn was in a state of severe decline. The grass was thinning out, revealing bare dirt and encroaching crabgrass. Water pooled on the surface after light rain rather than absorbing into the soil, a classic symptom of severe compaction. Furthermore, a dense layer of thatch—a tangled mat of dead and living roots and stems—was suffocating the turf.
According to the Clemson University Home & Garden Information Center, a thatch layer exceeding one-half of an inch prevents water, air, and nutrients from reaching the root zone, creating a breeding ground for disease and drought stress. Our 'before' assessment revealed a thatch layer nearly an inch thick, coupled with soil so hard that a standard screwdriver could barely penetrate the top half-inch.
The Transformation Blueprint: Step-by-Step Renovation
To take this lawn from a patchy eyesore to a dense, dark-green carpet, we implemented a rigorous renovation plan centered on core aeration and heavy overseeding. Here is the exact process, timing, and product lineup used to achieve a stunning 'after' result.
Phase 1: Soil Testing and Preparation
Before spending a dime on seed or fertilizer, a soil test was conducted. Grass cannot thrive if the soil pH is locked. Tall Fescue prefers a pH between 6.0 and 7.0. Our test results showed a pH of 5.8, requiring the application of fast-acting calcitic lime at a rate of 50 lbs per 1,000 square feet to begin correcting the acidity.
Two weeks later, preparation began. We mowed the existing lawn down to a height of 1.5 inches—much lower than the standard 3-inch maintenance height. This 'scalping' process is crucial for an overseeding transformation because it removes the top canopy, allowing new seeds to make direct contact with the soil rather than getting trapped in the existing grass blades.
Phase 2: Dethatching and Core Aeration
Using a rented power dethatcher, we made two passes over the lawn in perpendicular directions. This violent but necessary process ripped up the suffocating thatch layer, which was then raked up and removed, revealing the hard, compacted soil beneath.
Next came the most critical step for compaction relief: core aeration. We rented a walk-behind gas-powered core aerator. The University of Minnesota Extension recommends core aeration because it physically removes plugs of soil (typically 2 to 3 inches deep and 0.5 to 0.75 inches in diameter), allowing the surrounding soil to expand and creating deep channels for water, oxygen, and roots. We made three passes over the entire 5,000-square-foot area, leaving thousands of soil cores on the surface to break down naturally over the next few weeks.
Phase 3: Overseeding and Starter Fertilizer
With the soil opened up, it was time to introduce new life. We selected a premium Turf-Type Tall Fescue blend known for its deep rooting and drought tolerance. For a complete renovation or heavy overseeding, the application rate is 5 to 8 lbs of seed per 1,000 square feet. We applied 30 lbs of seed across the 5,000-square-foot lawn using a broadcast spreader, ensuring even coverage by walking in a grid pattern.
Immediately after seeding, we applied a high-phosphorus starter fertilizer (10-18-10). Phosphorus is vital for early root development in newly germinated seeds. Research from Penn State Extension confirms that combining core aeration with overseeding and starter fertilizer dramatically increases seed-to-soil contact and germination rates, as the seeds fall directly into the aeration holes and dethatching grooves.
Transformation Timeline and Cost Breakdown
Transforming a lawn requires an investment of both time and money. Below is the exact breakdown of costs and the timeline for our 5,000-square-foot Tall Fescue renovation.
| Project Phase | Materials / Equipment | Estimated Cost | Timing |
|---|---|---|---|
| Soil Amendment | Fast-acting Calcitic Lime (250 lbs) | $45.00 | 14 Days Prior |
| Preparation | Power Dethatcher Rental (4 hours) | $75.00 | Day 1 |
| Aeration | Walk-Behind Core Aerator Rental | $90.00 | Day 1 |
| Seeding | Premium Tall Fescue Seed (30 lbs) | $85.00 | Day 1 |
| Fertilization | Starter Fertilizer 10-18-10 (1 bag) | $35.00 | Day 1 |
| Total Investment | Complete DIY Renovation Package | $330.00 | 1 Day Labor |
Phase 4: The Germination Watering Schedule
The most common point of failure in any lawn transformation is improper watering during the first 21 days. Tall Fescue seed takes 10 to 14 days to germinate, and the seeds must remain consistently moist during this window. If the seed dries out even once after the germination process has begun, the sprout will die.
- Days 1-14: Water lightly 2 to 3 times per day for 10-15 minutes per zone. The goal is not to soak the deep soil, but to keep the top half-inch of soil and the seeds constantly damp.
- Days 15-28: As seeds sprout and establish shallow roots, reduce watering frequency to once per day, but increase the duration to 20-30 minutes to encourage deeper root growth.
- Days 29+: Transition to a standard deep-and-infrequent watering schedule of 1 to 1.5 inches of water per week, divided into two heavy watering sessions.
The 'After' Results: 90 Days Later
The transformation from a patchy, compacted yard to a vibrant, thick lawn did not happen overnight, but the milestones were incredibly rewarding.
Day 30: The First Mow
By day 30, the new Tall Fescue had reached about 3.5 inches in height. We performed the 'tug test'—gently pulling on the new grass blades to ensure the roots were firmly anchored in the soil and aeration holes. With the roots secure, we mowed the lawn to 3 inches using a mower with freshly sharpened blades to prevent tearing the tender young grass.
Day 60: Filling the Gaps
At the two-month mark, the bare patches that once defined the 'before' state were completely filled in. The soil cores from the aeration process had fully dissolved, top-dressing the lawn with nutrient-rich subsoil. The thatch layer was entirely disrupted, and the lawn felt noticeably softer underfoot due to the alleviation of soil compaction.
Day 90: The Final Reveal
Ninety days post-renovation, the lawn was unrecognizable. The thin, yellowing turf was replaced by a dense, dark-green carpet of Turf-Type Tall Fescue. The deep root systems established in the aeration holes allowed the grass to withstand late-season heat spikes without wilting. Furthermore, because the turf was so thick, there was virtually no room for weed seeds to germinate, naturally suppressing crabgrass and dandelions.
Pro-Tip for Long-Term Success: To maintain your 'after' results, never remove more than one-third of the grass blade during a single mowing, and commit to annual fall core aeration and overseeding. This annual maintenance prevents compaction from returning and continuously introduces fresh, vigorous grass plants to replace older, dying tillers.
Conclusion
A failing lawn is rarely a lost cause; it is usually just a victim of poor soil conditions and neglect. By diagnosing the core issues of thatch and compaction, and executing a disciplined aeration and overseeding protocol, you can completely transform your outdoor space. The $330 investment and a weekend of hard labor yielded a professional-grade lawn that added immediate curb appeal and a lush, usable space for years to come.

