
Lawn Care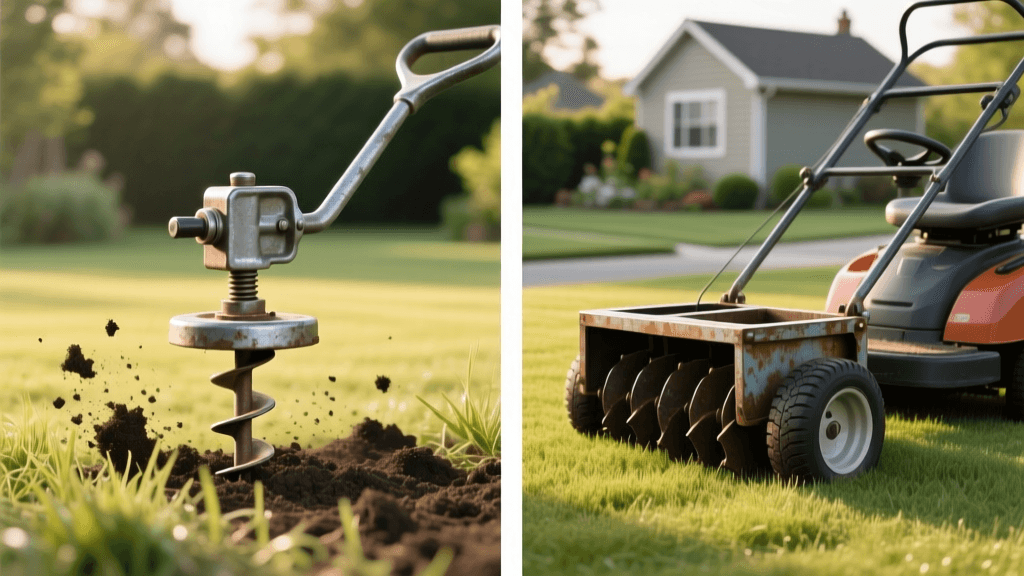
Manual vs Tow-Behind Core Aerators: Which Tool is Best?
The Science of Soil Compaction and the Need for Aeration
The foundation of a lush, vibrant lawn lies beneath the surface. Over time, soil becomes compacted due to foot traffic, heavy mowing equipment, and natural settling. This compaction chokes grassroots, restricting the flow of essential oxygen, water, and nutrients. According to the University of Minnesota Extension, core aeration is the most effective mechanical method to alleviate soil compaction and manage thatch buildup. By physically extracting small plugs of soil, you create pathways for resources to reach the root zone. However, selecting the right tool for this vital task depends heavily on your property size, budget, and physical capabilities. In this comprehensive equipment guide, we break down the differences between manual core aerators and tow-behind core aerators to help you make an informed investment for your lawn care arsenal.
Manual Core Aerators: The Precision Approach
Manual core aerators, often referred to as step aerators, are human-powered tools designed for precision and simplicity. These tools typically feature a T-shaped handle, a horizontal foot bar, and two to four hollow coring tines welded to the base. To operate, you push the tines into the turf using your foot, pull the handle back to extract the soil plug, and step forward to repeat the process.
Advantages of Manual Aerators
- Cost-Effective: Manual aerators are highly affordable, generally ranging from $30 to $70, making them accessible for homeowners on a strict budget.
- Eco-Friendly and Quiet: With no gas engine or battery required, they produce zero emissions and operate in complete silence.
- Maneuverability: Their compact footprint allows you to easily navigate tight garden beds, narrow side yards, and around delicate landscaping features where heavy machinery would cause damage.
Drawbacks of Manual Aerators
The primary disadvantage is the intense physical labor required. Aerating a standard 5,000-square-foot lawn with a manual tool can take several hours and is incredibly taxing on the back, shoulders, and knees. Furthermore, if your soil is heavily compacted clay or exceptionally dry, human body weight alone may not be sufficient to drive the tines to the recommended three-inch depth.
Tow-Behind Core Aerators: The Heavy-Duty Workhorse
For expansive properties, rural estates, or lawns with severe compaction, a tow-behind core aerator is the industry standard for DIY enthusiasts. These units consist of a heavy-duty steel frame, a weight tray, and a series of rotating wheels equipped with hollow coring tines. They attach to the hitch of a riding lawn mower, garden tractor, or ATV via a universal pin.
Advantages of Tow-Behind Aerators
- Efficiency and Speed: What takes a weekend with a manual tool can be completed in an hour or two with a tow-behind unit, as the tines continuously rotate and extract plugs while you drive.
- Superior Penetration: The weight tray allows you to add sandbags, cinder blocks, or concrete blocks. Adding 150 to 200 pounds of weight forces the tines deep into stubborn clay soils, ensuring optimal three-to-four-inch plug extraction.
- Less Physical Strain: Aside from lifting weights onto the tray and attaching the hitch, the actual aeration process requires minimal physical exertion.
Drawbacks of Tow-Behind Aerators
Tow-behind models are significantly more expensive, typically costing between $150 and $300. They also require substantial garage or shed space for storage. Additionally, because they lack a dedicated drive mechanism, turning corners requires a wide radius to avoid tearing the turf, making them unsuitable for small, obstacle-dense urban yards.
Head-to-Head Equipment Comparison
Use the following comparison chart to evaluate which aeration tool aligns with your specific lawn care needs.
| Feature | Manual Core Aerator | Tow-Behind Core Aerator |
|---|---|---|
| Ideal Yard Size | Under 3,000 sq. ft. | Over 5,000 sq. ft. |
| Average Cost | $30 - $70 | $150 - $300 |
| Physical Effort | Very High | Low (requires lifting weights) |
| Time Required (5k sq ft) | 4 - 6 Hours | 1 - 2 Hours |
| Storage Footprint | Minimal (hangs on wall) | Large (requires floor space) |
| Tine Penetration Depth | 2 - 3 inches (weight dependent) | 3 - 4 inches (with added weight) |
Timing Your Aeration: Cool-Season vs. Warm-Season Grasses
Owning the right tool is only half the battle; knowing when to use it is equally critical. According to turfgrass experts at UMN Turfgrass Science, aeration should always coincide with a period of active, vigorous grass growth. This allows the turf to rapidly heal the open holes and outcompete emerging weeds.
Rule of Thumb: Never aerate a dormant or drought-stressed lawn. The mechanical stress can cause irreversible damage to the root system.
- Cool-Season Grasses (Kentucky Bluegrass, Fescue, Ryegrass): The optimal window is early fall (late August to October). The soil is still warm enough to encourage root growth, but the cooling air temperatures reduce heat stress on the grass blades.
- Warm-Season Grasses (Bermuda, Zoysia, Centipede): Aerate in late spring to early summer (May through June), just as the grass breaks dormancy and enters its peak growing phase.
Step-by-Step Execution for Maximum Soil Relief
Whether you are pushing a manual step aerator or towing a heavy-duty unit, proper preparation ensures the best results. Better Homes & Gardens recommends the following preparation steps before you begin:
- Hydrate the Soil: Aerate one to two days after a heavy rain or a deep irrigation session. The soil should be moist but not muddy. Perform the screwdriver test: if you can easily push a six-inch screwdriver into the ground, the moisture level is perfect.
- Mark Hidden Hazards: Use brightly colored flags to mark shallow irrigation lines, sprinkler heads, and buried utility cables. Hitting a sprinkler head with a steel coring tine will result in costly repairs.
- Overlap Your Passes: For severely compacted areas, make two passes over the lawn. The first pass should be in one direction, and the second pass should be perpendicular to the first to create a dense grid of aeration holes.
- Leave the Plugs: Do not rake up the extracted soil cores. Allow them to dry and break down naturally over the next few weeks. They deposit beneficial microorganisms back onto the surface and act as a natural topdressing.
Tool Maintenance and Off-Season Storage
To protect your investment and ensure your equipment lasts for decades, proper maintenance is non-negotiable. Soil is naturally abrasive and retains moisture, which is a recipe for rust and dull tines.
Cleaning the Tines
After every use, use a wire brush or a putty knife to scrape out impacted clay and thatch from inside the hollow tines. Clogged tines will fail to extract plugs on your next pass, essentially turning your core aerator into an ineffective spike aerator. Wash the tool with a garden hose and allow it to dry completely in the sun.
Rust Prevention and Lubrication
Once dry, wipe down all metal components with an oiled rag or spray them with a light coat of silicone lubricant or WD-40. This creates a protective barrier against oxidation. Store manual aerators hanging on a pegboard to keep the tines off damp concrete floors. For tow-behind models, cover the weight tray with a tarp to prevent water accumulation and rusting of the hitch mechanism.
Alternative Option: Walk-Behind Motorized Aerators
If you have a mid-sized lawn (3,000 to 7,000 square feet) and find manual tools too exhausting but lack the space or tractor for a tow-behind unit, consider renting a motorized walk-behind aerator. These gas-powered machines resemble heavy rototillers and feature self-propelled tines that pull themselves forward while extracting deep cores. While purchasing one is cost-prohibitive for most homeowners (often exceeding $3,000), renting one from a local equipment supply store for $70 to $100 a day is an excellent middle-ground solution for annual lawn renovation.

