
Gardening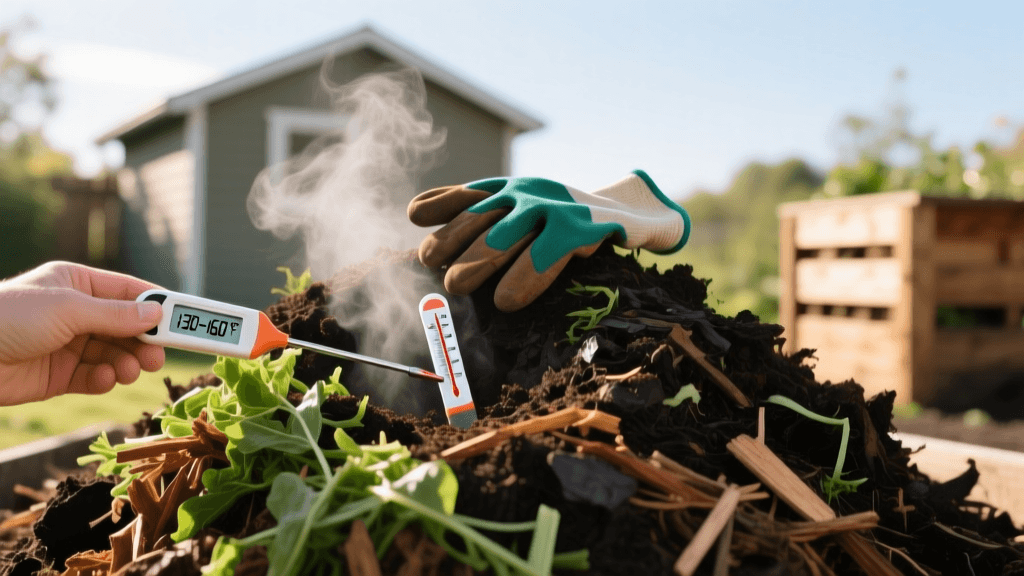
Mastering Hot Composting: Fast-Track Your Garden Soil Health
Why Choose Hot Composting for Soil Health?
Soil health is the undisputed foundation of a thriving, productive garden. While many gardeners rely on passive, cold composting methods that take a year or more to yield finished humus, hot composting offers a rapid, biologically superior alternative. Hot composting is an active, managed process that harnesses the power of thermophilic (heat-loving) bacteria to break down organic matter in as little as one to three months. According to the United States Environmental Protection Agency (EPA), maintaining the right balance of materials and aeration not only speeds up decomposition but also creates a nutrient-dense amendment that dramatically improves soil structure, water retention, and microbial diversity.
Beyond speed, the primary advantage of hot composting for garden soil health is pathogen and weed seed destruction. When a compost pile reaches and sustains temperatures between 130°F and 160°F, it effectively sterilizes the organic matter. This means you can safely compost diseased plant foliage, invasive weed roots, and seeds without risking the spread of blights or weeds back into your garden beds. The resulting compost is teeming with beneficial aerobic microbes that help suppress soil-borne diseases and make nutrients more bioavailable to plant roots.
The Biology of the Hot Compost Pile
Understanding the microscopic workforce inside your compost bin is key to mastering the process. Decomposition occurs in three distinct temperature phases:
- Mesophilic Phase (50°F to 110°F): Immediately after building the pile, mesophilic bacteria begin consuming easily digestible sugars and starches. Their rapid metabolism generates the initial heat that warms the pile.
- Thermophilic Phase (110°F to 160°F): As the temperature rises, mesophilic bacteria die off and are replaced by thermophilic bacteria and actinomycetes. These organisms break down complex carbohydrates, proteins, and fats. This is the critical phase for killing weed seeds and pathogens.
- Cooling and Curing Phase (Below 100°F): Once the complex materials are exhausted, the pile cools. Mesophilic organisms, along with beneficial fungi, macro-invertebrates like earthworms, and pillbugs, return to finish the breakdown process, converting the remaining matter into stable humus.
The Science of the Carbon-to-Nitrogen (C:N) Ratio
The secret to achieving those vital thermophilic temperatures lies in the Carbon-to-Nitrogen (C:N) ratio. Microbes require carbon for energy and nitrogen for protein synthesis and reproduction. The ideal C:N ratio for a hot compost pile is approximately 30:1 by weight. If the pile has too much carbon (browns), the microbes will starve for nitrogen, and the pile will fail to heat up. If the pile has too much nitrogen (greens), the excess nitrogen will off-gas as ammonia, creating a foul odor and wasting valuable nutrients.
As noted by the Rodale Institute, balancing these materials is essential for fostering a robust soil food web. Below is a reference chart to help you balance your inputs:
| Organic Material | Approximate C:N Ratio | Category |
|---|---|---|
| Dry Autumn Leaves | 60:1 | Brown (Carbon) |
| Wheat Straw | 80:1 | Brown (Carbon) |
| Shredded Corrugated Cardboard | 350:1 | Brown (Carbon) |
| Fresh Grass Clippings | 15:1 | Green (Nitrogen) |
| Vegetable Kitchen Scraps | 25:1 | Green (Nitrogen) |
| Used Coffee Grounds | 20:1 | Green (Nitrogen) |
| Aged Chicken Manure | 10:1 | Green (Nitrogen) |
Pro Tip: To achieve a 30:1 ratio in practice, aim for roughly two to three parts brown materials to one part green materials by volume, as browns are generally lighter and less dense than wet greens.
Step-by-Step Guide to Building a Hot Compost Pile
Unlike cold composting, where you add materials continuously over time, hot composting requires a batch method. You must build the entire pile at once to generate sufficient thermal mass.
Step 1: Gather and Shred Materials
Surface area is the enemy of slow decomposition. Before building your pile, shred all materials into pieces no larger than one to two inches. Use a leaf mulcher for dry leaves, run your lawnmower over straw, and chop kitchen scraps. Smaller particles allow bacteria to access the cellular structure of the organic matter much faster, accelerating the heating process.
Step 2: Build the Pile to Critical Mass
To trap heat effectively, your compost pile must meet a minimum volume requirement. The golden rule of hot composting is the 3x3x3 foot dimension (one cubic yard, or 27 cubic feet). Anything smaller will lose heat to the surrounding air faster than the microbes can generate it. Build the pile in alternating layers: start with a four-inch base of coarse browns (like twigs) for drainage, add a two-inch layer of greens, sprinkle a thin layer of finished compost or native garden soil to inoculate the pile with microbes, and water lightly. Repeat this layering process until you reach the three-foot mark.
Step 3: Hydrate the Pile
Microbes require a watery environment to thrive and transport nutrients across their cell membranes. The ideal moisture content is between 40% and 60%. As you build the layers, water each one. When the pile is complete, perform the 'wrung-out sponge test': grab a handful of compost (wearing gloves) and squeeze it tightly. It should feel like a damp sponge, yielding only one or two drops of water. If water streams out, it is too wet; if it crumbles and feels dry, add more water.
Monitoring Temperature and Turning the Pile
You cannot manage what you do not measure. Invest in a high-quality, 20-inch dial compost thermometer (such as those made by REOTEMP). Insert the probe deep into the center of the pile to read the core temperature. Within 48 to 72 hours of building the pile, you should see the temperature spike into the thermophilic zone (130°F to 150°F).
Oxygen is just as critical as carbon, nitrogen, and water. As the thermophilic bacteria work, they consume the oxygen trapped inside the pile. Once the core temperature begins to drop below 110°F, it is time to turn the pile. Using a heavy-duty garden fork or a specialized compost aerator tool, thoroughly mix the pile, moving the cooler outer materials into the hot center and breaking up any clumps. A well-managed hot pile will typically require turning every three to five days for the first three weeks. According to The Old Farmer's Almanac, frequent turning introduces fresh oxygen, which reinvigorates the aerobic bacteria and causes the pile to heat up repeatedly, ensuring an even, rapid breakdown.
Warning: If your compost thermometer reads 160°F or higher, turn the pile immediately. Excessive heat will kill off your beneficial microbes and can lead to the spontaneous combustion of extremely dry, carbon-heavy piles.
Troubleshooting Common Hot Composting Issues
Even experienced gardeners encounter hiccups. Here is how to diagnose and fix the most common hot composting problems:
- The Pile Smells Like Ammonia: This indicates an excess of nitrogen (too many greens). The microbes cannot process it all, and the surplus is off-gassing. Solution: Turn the pile and thoroughly mix in two parts dry, shredded leaves or straw to absorb the moisture and balance the C:N ratio.
- The Pile Smells Like Rotten Eggs or Sulfur: This is the scent of hydrogen sulfide, a byproduct of anaerobic bacteria. Your pile has become compacted and waterlogged, starving the core of oxygen. Solution: Turn the pile immediately. Add bulky, dry brown materials like wood chips or shredded cardboard to create air pockets and improve drainage.
- The Pile Refuses to Heat Up: This is usually caused by three factors: the pile is too small, too dry, or lacks nitrogen. Solution: Verify your pile is at least 3x3x3 feet. Check the moisture level and add water if necessary. If moisture and size are correct, mix in a nitrogen booster like fresh grass clippings, blood meal, or alfalfa meal to kickstart microbial activity.
Curing and Applying Your Finished Compost
Once the pile no longer heats up after turning, and the materials have broken down into a dark, crumbly, earthy-smelling substance, the active hot phase is complete. However, do not apply it to your garden immediately. The compost must 'cure' for three to four weeks. Curing allows the pH to stabilize, lets mesophilic organisms and fungi recolonize the humus, and ensures that any remaining organic acids that could harm tender plant roots are fully broken down.
When applying your finished hot compost to improve garden soil health, moderation and technique are key. For established garden beds, apply a half-inch to one-inch layer as a top dressing in the spring or fall, allowing earthworms and rain to incorporate it into the soil profile naturally. For new raised bed construction, utilize the 'thirds rule' to create the ultimate soil environment: mix one-third finished hot compost, one-third high-quality topsoil, and one-third coarse aeration material (such as pumice, perlite, or coarse sand). This guarantees exceptional drainage, immense water-holding capacity, and a thriving soil food web that will sustain your plants for seasons to come.

