
Landscaping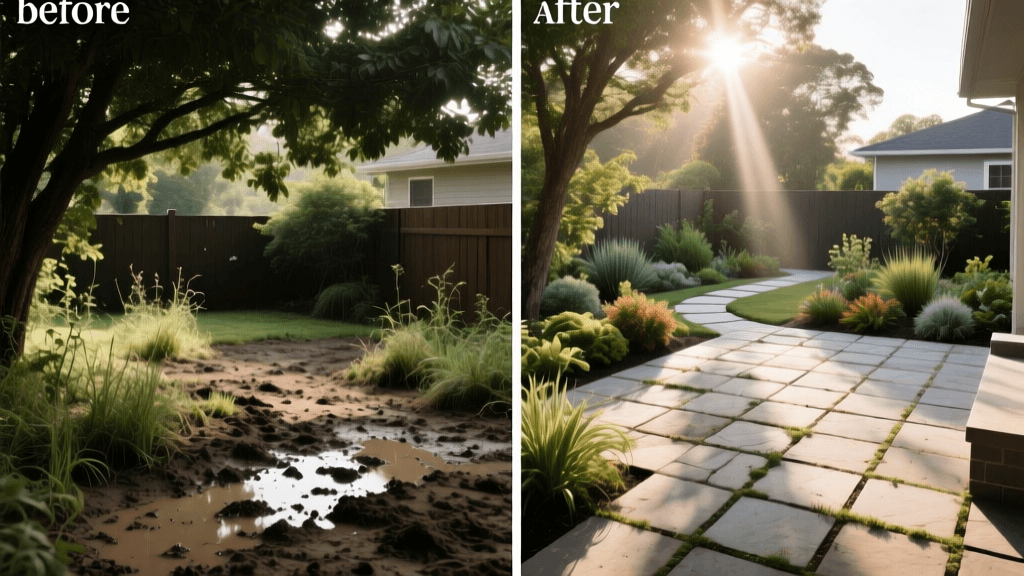
Backyard Before and After: Muddy Shade to Paver Patio
The Challenge: A Muddy, Unusable Shade Trap
Every homeowner dreams of a lush, functional backyard oasis, but the reality of mature landscaping often presents unique hurdles. For this specific before and after transformation, we tackled a 600-square-foot backyard dominated by three massive, decades-old oak trees. While these trees provided glorious summer shade, they also created a microclimate where traditional turfgrass simply refused to grow. The result was a patchy, moss-covered expanse of heavy clay soil that turned into a slippery, muddy trap after even the lightest rainfall.
The homeowners, a family with two large dogs, were tired of tracking mud into the house and had essentially abandoned the backyard. Standing water would pool near the back door for days, creating a mosquito breeding ground and causing minor foundation concerns. The goal was clear: reclaim the space, eliminate the mud, and create a functional outdoor living area that respected the existing shade canopy.
The Vision: Hardscaping Meets Sustainable Landscaping
To solve the drainage and mud issues while creating a beautiful gathering space, we designed a two-part solution. First, a 192-square-foot (12x16 feet) permeable paver patio directly adjacent to the back door. Second, a curved, terraced native shade garden wrapping around the patio to manage runoff and introduce vibrant, low-maintenance greenery.
"Transforming a problem area into a functional space not only increases your property value but fundamentally changes how you interact with your home's outdoor environment."
By integrating permeable hardscaping with deep-rooted native plants, we aimed to create a sustainable ecosystem in the backyard. According to the Environmental Protection Agency (EPA), incorporating green infrastructure like permeable pavements and rain gardens helps reduce stormwater runoff, filters pollutants, and recharges local groundwater. This philosophy became the backbone of our design.
Phase 1: Excavation and Drainage Solutions
The most labor-intensive part of any hardscape project is the groundwork. Because the soil was heavy, compacted clay with poor percolation, we could not simply lay pavers on the existing grade. We had to excavate to a depth of 10 inches across the entire 192-square-foot patio area, plus an additional 2-foot perimeter for the garden bed edging.
- Excavation: We removed approximately 60 cubic yards of clay soil, which was hauled off-site to a local recycling center.
- French Drain Installation: To intercept subsurface water moving toward the house, we trenched a 30-foot line along the foundation. We installed an NDS 4-inch perforated corrugated pipe wrapped in landscape fabric, surrounded by washed 3/4-inch gravel, and routed the daylight outlet to the side yard storm drain.
- Geotextile Fabric: The entire excavated patio base was lined with a heavy-duty, non-woven geotextile fabric to prevent the native clay from migrating up into the aggregate base layers over time.
Phase 2: Installing the Permeable Paver Base and Surface
For permeable pavers to function correctly, the base must act as a subterranean reservoir for water. We utilized an open-graded aggregate system, which lacks fine particles, allowing water to flow freely through the voids.
Building the Reservoir Base
We laid down a 6-inch base layer of #57 crushed stone (washed 3/4-inch angular granite). This layer was compacted in two 3-inch lifts using a 5,000-pound vibratory plate compactor. Angular stone is critical here; round river rock will shift and settle, whereas angular stone locks together to provide structural integrity. Above this, we spread a 1-inch bedding layer of #8 stone (washed 1/4-inch chip stone), which was screeded perfectly level using aluminum rails.
Laying the Pavers
We selected Belgard Urbana permeable concrete pavers in a slate grey color. These pavers feature built-in spacer lugs that automatically create a 1/4-inch joint gap. We laid the pavers in a running bond pattern, cutting the border pieces with a 14-inch gas-powered masonry saw equipped with a diamond blade. Once the field was laid, we swept #8 stone into the joints and ran the plate compactor over the surface with a urethane pad to lock the joint stone in place without scratching the paver faces.
Phase 3: The Native Shade Garden Transformation
With the hardscape complete, attention turned to the surrounding garden beds. The clay soil excavated from the patio area was heavily amended to create a rich, loamy environment for shade-tolerant plants. When selecting plants for heavy shade, the University of Minnesota Extension recommends focusing on foliage texture and native species that are naturally adapted to the dry, competitive conditions found beneath mature trees.
Soil Amendment and Bed Preparation
We rototilled the existing garden bed soil to a depth of 6 inches and incorporated a 3-inch layer of premium leaf compost and pine bark fines. This dramatically improved soil aeration and moisture retention. We installed 4-inch heavy-duty aluminum landscape edging to create a crisp, permanent border between the permeable patio and the garden beds, preventing mulch from washing onto the pavers.
Plant Selection and Installation
The National Park Service highlights that native plants require less water, fewer fertilizers, and provide essential habitats for local pollinators. We designed a layered planting scheme to maximize visual interest throughout the seasons:
- Canopy Layer (Understory Shrubs): We planted three Oakleaf Hydrangeas (Hydrangea quercifolia) along the back fence to provide massive, textured leaves and brilliant fall color.
- Mid-Layer (Perennials): We mass-planted native Wild Geranium (Geranium maculatum) and Columbine (Aquilegia canadensis) for spring blooms, interspersed with Ostrich Ferns (Matteuccia struthiopteris) for lush, tropical-looking summer foliage.
- Groundcover Layer: To eliminate any remaining bare soil and suppress weeds, we planted Creeping Phlox (Phlox stolonifera) and native Foamflower (Tiarella cordifolia).
Finally, the beds were topped with 2 inches of triple-shredded hardwood mulch. We avoided dyed mulches to ensure no artificial chemicals leached into our newly installed permeable drainage system.
Before & After: Project Breakdown and Costs
Understanding the financial and time investment is crucial for any landscaping transformation. Below is a detailed breakdown of the materials, costs, and labor time required to complete this 600-square-foot backyard overhaul. Note that this project was completed by a mix of DIY weekend labor and hired professional excavation help.
| Project Phase | Key Materials Used | Estimated Cost | Time Required |
|---|---|---|---|
| Excavation & Haul Away | Skid steer rental, dump fees | $1,450 | 2 Days |
| Drainage & Base Prep | NDS pipe, #57 stone, geotextile fabric | $950 | 3 Days |
| Paver Installation | Belgard Urbana pavers, #8 joint stone, edge restraints | $1,600 | 4 Days |
| Garden Beds & Soil | Aluminum edging, leaf compost, shredded mulch | $650 | 2 Days |
| Plants & Planting | Hydrangeas, Ferns, Native Perennials | $1,100 | 2 Days |
| Total | Complete Transformation | $5,750 | 13 Days |
Maintenance and Long-Term Results
The after results were nothing short of spectacular. The muddy trap was replaced by a sophisticated, dry, and highly functional outdoor living room. The permeable pavers performed flawlessly during the first heavy spring storm; water vanished through the joints instantly, leaving the surface completely puddle-free and safe for the dogs to walk on immediately after the rain stopped.
Maintenance for this new landscape is minimal but specific. The permeable joints require occasional vacuuming or sweeping to prevent organic debris from clogging the stone voids. The native shade garden requires deep, infrequent watering during the first year to establish root systems. Once established, the deep roots of the native ferns and geraniums will outcompete weeds and require only an annual cut-back in early spring before new growth emerges.
Final Thoughts
Transforming a difficult, shaded, and poorly draining yard requires a departure from traditional lawn-care mindsets. By embracing the shade rather than fighting it with failing turfgrass, and by utilizing modern permeable hardscape technologies, you can turn your property's biggest liability into its greatest asset. This before and after project proves that with proper engineering, thoughtful plant selection, and a bit of elbow grease, even the muddiest backyard can become a pristine, sustainable sanctuary.

