
Landscaping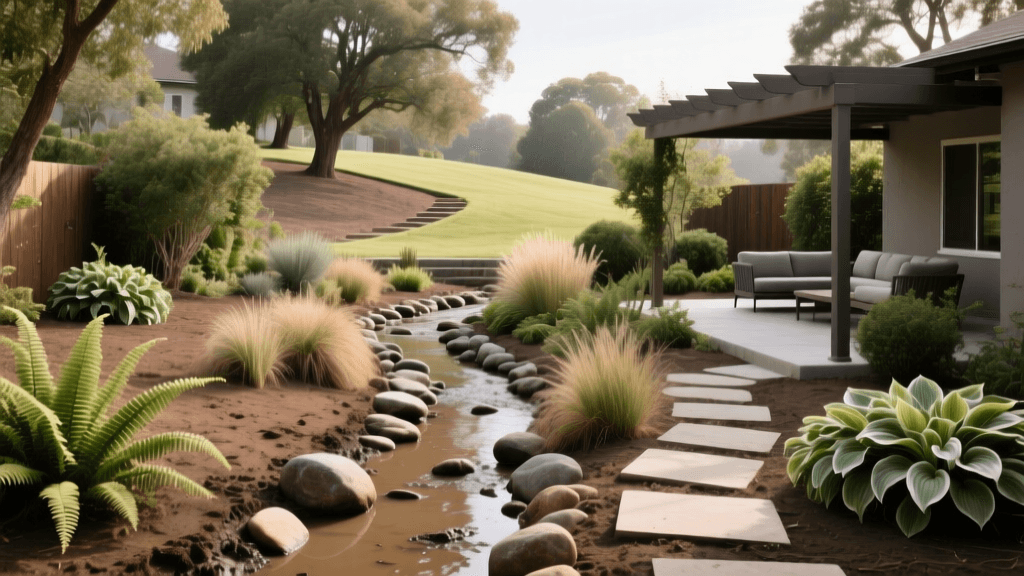
Before and After: Transforming Muddy Yards With Dry Creek Beds
The 'Before': A Muddy, Unusable Backyard
Every homeowner dreams of a lush, usable backyard, but heavy clay soil and poor grading can quickly turn that dream into a soggy nightmare. In this transformation project, the 'before' scenario was all too common for homes built in the last two decades. The backyard featured a dense clay subsoil left behind by heavy construction equipment, compacted to the point where water infiltration was nearly impossible. Whenever the area received more than an inch of rainfall, water would pool in the center of the yard, creating a muddy depression that took up to three days to drain completely. The existing turfgrass—a struggling mix of Kentucky Bluegrass and fine fescue—had thinned out into patchy, yellowing clumps, leaving bare dirt that turned into a slippery hazard. The homeowners were unable to use their patio furniture, and their dog was constantly tracking mud into the house. A traditional French drain was considered, but the cost of trenching to the municipal storm drain was prohibitive. Instead, we opted for a visually stunning and highly functional dry creek bed paired with a water-tolerant shade garden.
The 'After': A Functional Dry Creek Bed and Shade Garden
The 'after' reveal completely changed the dynamic of the outdoor space. By mimicking the natural flow of water, the newly installed dry creek bed captures runoff from the roof downspouts and gently guides it toward a lower-elevation rain garden at the back of the property. The muddy depression was replaced with a winding, 36-inch-wide channel lined with landscape fabric, crushed angular gravel, and beautiful 1-to-3-inch mixed river rock. Strategically placed limestone boulders anchor the curves of the creek, giving it a natural, aged appearance. Surrounding the hardscaping, we installed a lush shade garden featuring native and water-tolerant perennials that thrive in the newly balanced moisture environment. Not only did this solve the standing water issue, but it also created a striking visual focal point that increased the property's curb appeal and usable outdoor living space.
Step-by-Step Transformation Guide
Transforming a poorly drained yard requires careful planning, proper grading, and the right materials. Here is the exact process we used to achieve this dramatic before and after transformation.
1. Planning the Route and Trenching
The first step was mapping the natural flow of water. Using landscaping spray paint, we marked a winding path from the primary problem area near the patio down to a lower corner of the yard. According to the Environmental Protection Agency (EPA), utilizing green infrastructure like bioswales and dry creek beds is one of the most effective ways to manage stormwater runoff and reduce erosion. We dug a trench 36 inches wide and 18 inches deep. The most critical measurement during this phase was the slope. A dry creek bed must have a minimum slope of 1% (a 1-inch drop for every 8 feet of length) to ensure water flows away from the home's foundation rather than pooling inside the trench. We used a line level and a wooden stake to verify the grade continuously as we dug.
2. Laying the Foundation: Fabric and Base Rock
Once the trench was shaped, we lined the entire channel, including the sides, with a heavy-duty, permeable geotextile fabric. We chose DeWitt Pro 5 (3 oz/sq yd) landscape fabric because it allows water to percolate through while preventing the underlying clay soil from mixing with the rocks and causing clogs. Over the fabric, we added a 4-inch base layer of 3/4-inch crushed angular limestone gravel. It is crucial to use angular gravel rather than smooth pea gravel for the base; the sharp edges lock together, creating a stable, porous foundation that will not shift or wash away during heavy downpours.
3. Placing Feature Boulders and River Rock
With the foundation set, we moved on to the aesthetic layer. We began by placing six 12-to-18-inch limestone boulders along the outside edges of the creek bed's curves. In nature, water pushes heavier rocks to the outside of bends, so mimicking this pattern makes the installation look authentic rather than manufactured. After setting the boulders, we filled the remaining trench with a 3-inch layer of 1-to-3-inch mixed river rock. We made sure to pull the river rock up slightly against the boulders and the landscape fabric edges to completely hide the underlayment. The varied colors of the river rock—ranging from slate gray to warm tan—provided a beautiful, natural contrast against the surrounding greenery.
4. Amending the Soil and Planting the Shade Garden
The soil surrounding the dry creek bed was heavily compacted and nutrient-poor. Before planting, we tilled the top 6 inches of the adjacent garden beds and incorporated 2 inches of LeafGro organic compost. This improved soil structure, increased microbial activity, and boosted water retention for the new plants. For the planting palette, we relied on guidance from the University of Minnesota Extension, which recommends deep-rooted, moisture-tolerant plants for areas managing heavy runoff. We planted Matteuccia struthiopteris (Ostrich Fern) in the wettest zones near the creek bed, Hosta 'Francee' in the transitional zones, and Astilbe 'Deutschland' for early summer blooms. As noted by the National Wildlife Federation, incorporating native and regionally appropriate plants not only solves landscaping challenges but also provides vital habitat for local pollinators and wildlife.
Cost and Materials Breakdown
One of the biggest advantages of a dry creek bed over a traditional underground French drain is the cost-effectiveness and DIY-friendly nature of the project. Below is the detailed breakdown of materials and costs for this 40-foot-long transformation.
| Material | Quantity | Unit Cost | Total Cost |
|---|---|---|---|
| DeWitt Pro 5 Landscape Fabric | 1 Roll (4x100ft) | $120.00 | $120.00 |
| 3/4-inch Crushed Limestone (Base) | 2 Tons | $80.00 / ton | $160.00 |
| 1-3 inch Mixed River Rock | 1.5 Tons | $120.00 / ton | $180.00 |
| 12-18 inch Limestone Boulders | 6 Pieces | $25.00 / piece | $150.00 |
| LeafGro Organic Compost | 1 Cubic Yard | $45.00 | $45.00 |
| Shade Perennials (1-Gallon) | 15 Plants | $15.00 / plant | $225.00 |
| Premium Cedar Mulch | 10 Bags | $5.00 / bag | $50.00 |
| Total Project Cost | $930.00 |
Note: Labor costs are not included as this was a DIY weekend project completed by two adults over approximately 16 hours. Hiring a professional landscaping crew for a similar project typically ranges from $2,500 to $4,500 depending on regional labor rates and site accessibility.
Expert Tips for Long-Term Success
A dry creek bed is relatively low maintenance, but it is not entirely 'no maintenance.' To ensure your before and after transformation lasts for decades, follow these expert care tips:
- Manage Autumn Leaves: The biggest enemy of a dry creek bed is debris buildup. In the fall, use a leaf blower on a low setting to gently remove leaves from the river rock. If leaves decompose in the rocks, they will create a sludge that blocks water flow and encourages weed growth.
- Reset Rocks Annually: After a few seasons of heavy rain and freeze-thaw cycles, some of the smaller river rocks may shift or settle into the base gravel. Plan to spend an hour each spring raking the river rock back into place and adding a few fresh bags of stone if necessary to maintain the 3-inch depth.
- Prune Overhanging Branches: While shade gardens thrive under tree canopies, too much overhanging foliage will drop excessive debris into the creek bed. Keep lower tree branches pruned back at least 4 feet from the direct path of the water flow.
- Monitor the Outlet: Check the area where the dry creek bed terminates (in this case, the rain garden). Ensure the water is dispersing evenly and not causing erosion at the exit point. Adding a small apron of larger riprap stone at the outlet can help dissipate the energy of fast-moving water during severe storms.
By taking the time to properly grade, select the right materials, and integrate water-wise planting, you can turn a frustrating, muddy backyard into a beautiful, functional landscape feature that protects your home and enhances your outdoor living experience.

