
Landscaping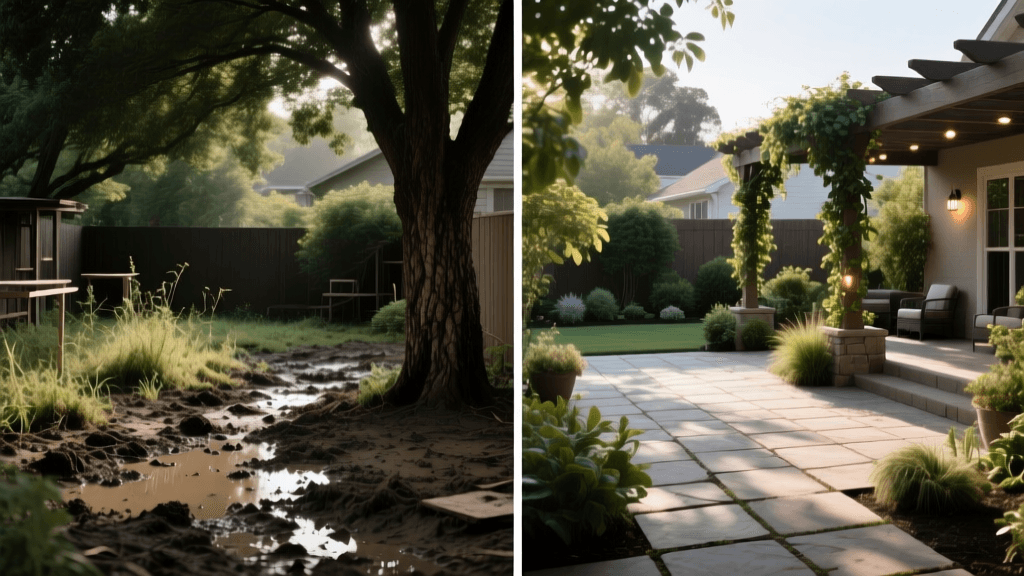
Before and After: Muddy Yard to Shaded Patio Oasis
The 'Before' Nightmare: Failing Grass and Endless Mud
Every homeowner dreams of a lush, green backyard, but the reality of mature landscaping often tells a different story. For one particular 400-square-foot backyard nestled beneath a canopy of three massive, 50-year-old oak trees, the 'before' picture was a landscaping nightmare. The existing tall fescue turf grass had long surrendered to the dense shade, leaving behind patchy, bare dirt. Worse yet, the compacted soil and lack of sunlight created a perpetual mud pit. Every time it rained, the yard held water for days, and the family dogs happily tracked thick, clay-heavy mud straight into the living room.
The homeowners wanted a functional outdoor living space that embraced the shade rather than fighting it. The goal was clear: eliminate the mud, solve the drainage issues, and create a beautiful, low-maintenance patio surrounded by a vibrant shade garden. This before-and-after transformation showcases exactly how to turn a soggy, unusable yard into a stunning outdoor oasis using a combination of smart hardscaping and resilient softscaping.
Site Assessment: Understanding Drainage and Light
Before picking out patio furniture or buying shade plants, a thorough site assessment was critical. The first step was a simple soil percolation test. By digging a 12-inch deep hole and filling it with water, we observed that the water took over 14 hours to drain completely, confirming heavy clay soil with severe compaction. This meant that simply planting new grass or laying down a standard concrete slab would result in pooling water and eventual frost heave.
Next, we mapped the sunlight. Using a sun-tracking app, we confirmed the area received less than three hours of dappled sunlight per day, categorizing it as 'heavy shade.' This data dictated our material choices: we needed permeable hardscaping to handle the water and specialized horticultural selections that thrive in low-light environments.
Pro Tip: Always call 811 before you dig to have underground utilities marked. It is a free service, legally required in most states, and prevents catastrophic damage to gas, water, or fiber-optic lines.
Phase 1: Solving the Water Problem with a French Drain
You cannot build a lasting patio on a swamp. The first phase of the transformation involved installing a French drain to intercept surface runoff and redirect it away from the house and the future patio area.
We trenched a 12-inch wide by 18-inch deep channel along the perimeter of the yard, ensuring a continuous downward slope of 1/8 inch per foot toward the side-yard storm drain. The trench was lined with a heavy-duty, non-woven geotextile fabric to prevent soil from clogging the system. Next, we laid a 4-inch corrugated perforated pipe, holes facing down, and surrounded it with washed river rock. The fabric was then folded over the top of the gravel like a burrito, and the trench was capped with topsoil and shade-tolerant ground cover. This single intervention reduced post-rain standing water by 90%.
Phase 2: Building a Permeable Paver Patio
With the bulk of the water managed, it was time to build the patio. Traditional poured concrete or standard pavers would have sealed the soil, forcing rainwater to pool at the edges. Instead, we opted for Permeable Interlocking Concrete Pavers (PICP). According to the Environmental Protection Agency (EPA), permeable pavements are an excellent green infrastructure solution that allows stormwater to infiltrate through the surface and into the underlying stone reservoir, significantly reducing runoff and filtering pollutants.
The installation required excavating 10 inches of the existing clay soil. We then built a multi-layer base:
- Sub-base: 6 inches of compacted ASTM No. 2 crushed stone (large aggregate for water storage and structural integrity).
- Base layer: 2 inches of ASTM No. 57 crushed stone (smaller aggregate for transition).
- Bedding layer: 1.5 inches of coarse, washed concrete sand (never use fine masonry sand, which clogs permeable joints).
We selected Belgard Urbana permeable pavers in a slate gray color to complement the oak tree trunks. The joints between the pavers were filled with No. 8 or No. 9 crushed stone, allowing water to pass through instantly while locking the pavers firmly in place.
Phase 3: Designing a Resilient Shade Garden
With the hardscape complete, the surrounding 200 square feet of bare mud were ready for a softscape makeover. We amended the top 6 inches of the existing clay soil with 3 inches of premium organic compost and shredded leaf mulch to improve aeration and microbial activity.
When selecting plants, we relied on the guidelines from the Clemson University Home & Garden Information Center, which emphasizes choosing plants adapted to the specific moisture and light levels of a shaded environment. Instead of fighting the shade with sun-loving annuals, we embraced a woodland garden aesthetic.
The Shade Plant Palette
- Hosta 'Patriot': Chosen for its striking variegated green and white leaves, which brighten up dark corners. Planted in sweeping drifts along the patio edge.
- Astilbe 'Fanal': Provides brilliant crimson-red plumes in early summer and features delicate, fern-like foliage that thrives in moist, shaded soil.
- Ostrich Fern (Matteuccia struthiopteris): Used as a tall, architectural backdrop against the back fence. These native ferns elegantly hide the utility boxes and provide a lush, prehistoric texture.
- Heuchera 'Palace Purple': Adds a pop of deep burgundy foliage that contrasts beautifully with the green hostas and the gray permeable pavers.
To finish the beds, we applied a 2-inch layer of double-shredded hardwood mulch, keeping it a few inches away from the base of the oak trees to prevent root rot and trunk decay.
Project Breakdown: Costs, Materials, and Timeline
Transforming a yard requires a realistic understanding of the budget and labor involved. Below is a detailed breakdown of the 400-square-foot project, completed by a mix of professional excavation and DIY finishing work.
| Project Phase | Key Materials | Estimated Cost | Timeline |
|---|---|---|---|
| Site Prep & Excavation | Rental mini-excavator, dump fees | $850 | 1 Day |
| French Drain Installation | Corrugated pipe, geotextile fabric, washed gravel | $400 | 1.5 Days |
| Patio Base & Pavers | Crushed stone, bedding sand, Belgard PICP pavers | $2,600 | 3 Days |
| Soil Amendment & Mulch | Organic compost, hardwood mulch | $350 | 0.5 Days |
| Plants & Installation | 35 perennials, ferns, shrubs | $750 | 1 Day |
| Total | $4,950 | 7 Days |
The 'After' Reveal: A Functional Outdoor Sanctuary
The transformation was nothing short of spectacular. Where a muddy, unusable swamp once sat, there is now a sophisticated, dry, and inviting outdoor living room. The permeable pavers perform flawlessly; even during heavy spring downpours, the patio surface remains completely dry as water vanishes into the sub-base reservoir.
The shade garden has established beautifully. The Hostas and Ferns have filled in, creating a lush, green border that softens the hard edges of the patio. The dogs now have a defined, clean path to the back gate, and the homeowners can enjoy their morning coffee on the patio without worrying about muddy paw prints. By working with the site's natural constraints rather than against them, the yard's biggest liability (shade and water) became its greatest asset.
Maintenance Tips for Your New Oasis
A successful landscape transformation requires ongoing care to ensure longevity. For the hardscape, the primary maintenance task is preventing the permeable joints from clogging. Sweeping the patio regularly and using a leaf blower to remove autumn debris will keep the water infiltration rates high. If the joints do become clogged with fine silt over the years, a specialized vacuum sweeping service can restore them to like-new condition.
For the softscape, managing water and canopy cover is key. As the oak trees grow, their roots will compete with the perennials for moisture. Implementing a smart drip irrigation system on a timer ensures the shade garden gets the deep, infrequent watering it needs without wasting water. Furthermore, managing stormwater effectively through features like French drains and rain gardens is a highly recommended practice for long-term yard health, as noted by Penn State Extension, helping to protect local watersheds while keeping your property dry and beautiful.
By investing in proper drainage, permeable materials, and the right horticultural selections, you can permanently banish the backyard mud and reclaim your outdoor space, no matter how deep the shade.

