
Landscaping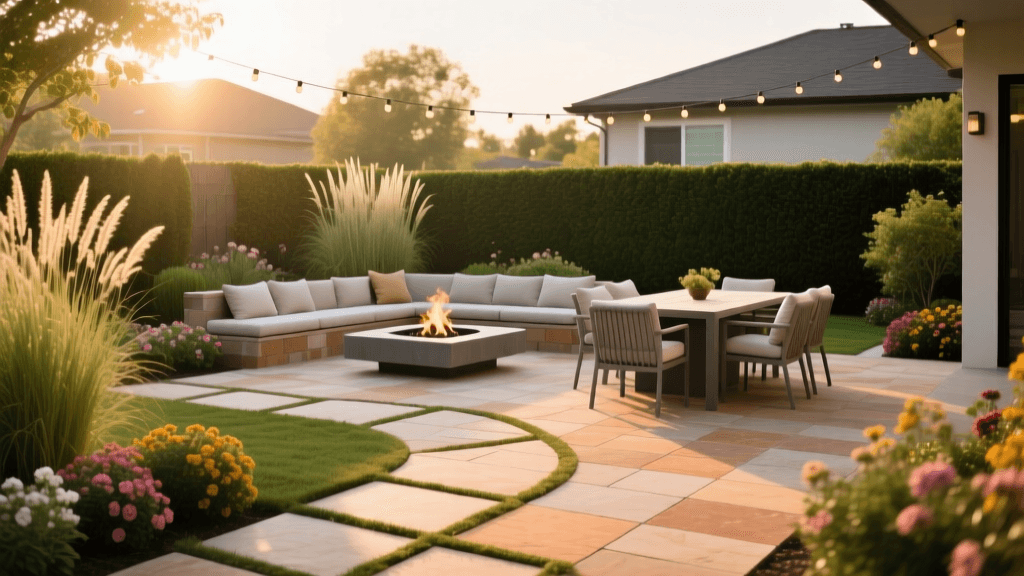
How to Design a Paver Patio for Entertaining and Curb Appeal
The Intersection of Curb Appeal and Outdoor Entertaining
When homeowners think of curb appeal, they often focus on the front yard: a manicured lawn, fresh mulch, and a vibrant front door. However, modern landscape design recognizes that true curb appeal extends to the entire property, including how seamlessly a home transitions into its outdoor living spaces. A well-designed paver patio is no longer just a slab of concrete in the backyard; it is a multi-zone entertaining hub that significantly increases property value while providing a luxurious space for hosting guests.
According to data published by the National Association of Realtors (NAR), outdoor living spaces, including patios and fire pits, consistently rank among the top projects that bring joy to homeowners and offer a strong return on investment at resale. Designing a patio that balances aesthetic elegance with functional entertaining requires careful planning, material selection, and an understanding of hardscaping principles.
Planning Your Multi-Zone Patio Layout
The biggest mistake homeowners make when building a patio is underestimating the square footage required for entertaining. A successful outdoor living space should be divided into distinct 'zones' that cater to different activities, ensuring that the cook, the diners, and the loungers all have adequate space without overlapping traffic patterns.
1. The Culinary Zone (Outdoor Kitchen)
If you plan to install a built-in grill or outdoor kitchen, allocate a minimum of 8x10 feet for this zone. You will need at least 18 inches of landing space on either side of your primary cooking appliance (such as a Weber Summit or Blaze built-in grill) for food prep. Ensure this zone is situated upwind from the primary seating areas to keep smoke away from your guests.
2. The Dining Zone
For a standard six-to-eight-person dining table, you need a clear, level space of at least 10x12 feet. This allows enough room for guests to pull out their chairs and walk behind the seating without stepping off the patio edge into the garden beds.
3. The Lounging Zone
This is the heart of the entertaining space, often anchored by a fire pit or outdoor fireplace. A circular or square lounging area measuring 12x14 feet comfortably accommodates a central gas fire pit and four to six deep-seating Adirondack chairs or a modular outdoor sofa. Maintain a strict safety clearance of at least 10 feet between any wood-burning fire feature and your home's structure or overhead tree branches.
Selecting the Right Paver Materials
The material you choose will dictate both the visual impact of your curb appeal and the longevity of your investment. Interlocking concrete pavers, brick, and natural stone are the premier choices for high-end entertaining spaces.
| Material | Avg Cost (Per Sq Ft) | Durability | Best For |
|---|---|---|---|
| Concrete Pavers | $4 - $10 | High | Versatility, modern designs, budget-friendly luxury |
| Clay Brick | $8 - $15 | Medium-High | Traditional, classic curb appeal, historic homes |
| Natural Stone (Flagstone/Bluestone) | $15 - $30+ | Very High | High-end luxury, organic shapes, premium estates |
Brands like Belgard and Unilock offer concrete pavers with advanced color-mixing technologies that mimic the look of natural stone at a fraction of the cost, making them a favorite among landscape architects for large entertaining spaces.
Incorporating Sustainable Drainage Solutions
A patio that pools water after a rainstorm will quickly become unusable and can damage your home's foundation. Proper grading is essential; your patio should slope away from your home at a minimum grade of 1/8 inch per foot.
For an eco-friendly approach that also manages stormwater runoff, consider using permeable pavers. The Environmental Protection Agency (EPA) highlights permeable pavement as a highly effective green infrastructure tool that allows rainwater to filter through the joints and into the underlying stone base, reducing runoff and filtering pollutants. This is particularly beneficial for large entertaining patios where impervious surface area is a concern for local municipal drainage codes.
Lighting the Entertaining Space
To transition your patio from a daytime barbecue spot to an elegant evening venue, layered lighting is mandatory. Relying on a single floodlight creates harsh shadows and ruins the ambiance. Instead, use a combination of three lighting types:
- Task Lighting: LED under-cabinet lights for the outdoor kitchen and grill area to ensure safe food preparation.
- Ambient Lighting: Commercial-grade LED bistro string lights zig-zagged above the dining and lounging zones. Hang them 8 to 10 feet above the ground using powder-coated steel poles or by anchoring them to nearby trees.
- Accent Lighting: Low-voltage LED uplights placed at the base of perimeter trees or architectural walls to frame the patio and create a sense of privacy and enclosure.
Softscaping to Frame the Patio and Boost Curb Appeal
Hardscaping must be balanced with softscaping to prevent the patio from looking like a sterile, concrete plaza. Strategic planting provides privacy, shade, and a lush backdrop for your entertaining space.
'A well-placed tree can lower surrounding air temperatures by as much as 6 degrees Fahrenheit, making your patio far more comfortable during mid-summer entertaining.' - Arbor Day Foundation
Consider planting fast-growing, non-invasive privacy screens like Green Giant Arborvitae along the property lines to shield your guests from neighbors. For immediate shade over the dining zone, plant a Japanese Maple or a Redbud tree 6 to 8 feet away from the patio edge, allowing the canopy to stretch over the seating area without roots disrupting the paver base.
Step-by-Step Installation Overview
While hiring a certified hardscape professional is recommended for large projects, understanding the installation process ensures you can verify the quality of the work. A proper base is the secret to a patio that won't heave or settle over time.
- Excavation: Dig down 7 to 9 inches below the desired finished grade to accommodate the base, sand, and paver thickness.
- Sub-Base Installation: Lay down a geotextile fabric to prevent weed growth and soil migration. Add 4 to 6 inches of crushed angular gravel (typically 3/4-inch crushed stone) and compact it in 2-inch lifts using a heavy-duty plate compactor.
- Bedding Sand: Spread exactly 1 inch of coarse, concrete-leveling sand over the compacted base. Use aluminum pipes and a 2x4 board to screed the sand perfectly level.
- Laying the Pavers: Begin at a fixed corner (like the house wall) and lay the pavers tightly together according to your chosen pattern (e.g., herringbone for maximum interlock and strength).
- Jointing and Sealing: Sweep polymeric sand (such as Alliance Gator) into the joints. This specialized sand hardens when misted with water, locking the pavers in place and preventing weed growth and ant infestations. Finally, apply a wet-look or matte paver sealer to protect against UV fading and wine or grease stains from entertaining.
Conclusion
Designing a paver patio for outdoor entertaining is a transformative landscaping project that dramatically elevates your home's curb appeal and functionality. By thoughtfully planning multi-zone layouts, selecting durable and aesthetically pleasing materials, integrating sustainable drainage, and framing the space with lush softscaping and layered lighting, you create an outdoor living room that will be the envy of the neighborhood. Whether you are hosting a lively summer barbecue or enjoying a quiet evening by the fire pit, a professionally designed patio is an investment in both your property's value and your lifestyle.

