
Landscaping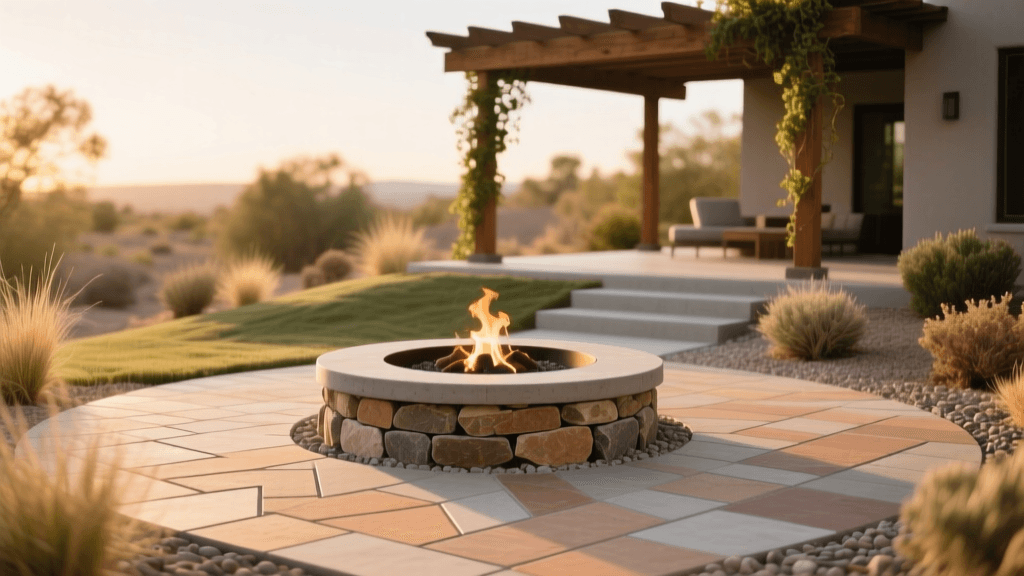
Designing a Paver Patio and Fire Pit for Outdoor Entertaining
Transforming your backyard into a premier outdoor entertaining space is one of the most rewarding landscaping investments you can make. Not only does a well-designed patio extend your living area, but it also significantly boosts your property's curb appeal and overall resale value. When it comes to hardscaping, combining a durable paver patio with a custom fire pit creates a natural focal point that draws people outdoors, encouraging year-round gatherings, conversation, and relaxation.
However, achieving a seamless blend of functionality and aesthetic appeal requires careful planning, proper material selection, and an understanding of landscape design principles. In this comprehensive guide, we will walk you through the essential steps to design and build a paver patio and fire pit that will elevate your outdoor entertaining experience while enhancing the visual flow of your entire property.
Strategic Planning: Sizing and Zoning Your Patio
Before purchasing materials or breaking ground, you must define the purpose and scale of your outdoor living space. A common mistake homeowners make is building a patio that is too small for their entertaining needs. To ensure comfortable flow, landscape architects recommend allocating specific 'zones' for different activities.
- Dining Zone: If you plan to host dinners, allocate a minimum of 10x12 feet for a standard table and chairs, ensuring there is at least 3 feet of clearance on all sides for guests to pull out chairs and walk comfortably.
- Lounging and Fire Pit Zone: A fire pit seating area requires a circular or semi-circular footprint. Plan for a minimum diameter of 15 feet to accommodate the fire pit itself (typically 36 to 44 inches wide) plus seating walls or deep-seated Adirondack chairs, while maintaining safe clearance from the flames.
- Transitional Pathways: Connect your patio to your back door, side yards, and garden beds using 4-foot-wide paver walkways to maintain a cohesive curb appeal throughout the landscape.
Selecting Pavers: Aesthetics, Function, and Climate
The paving material you choose will dictate the maintenance level, durability, and visual tone of your outdoor space. While natural stone offers a premium, rustic look, concrete pavers provide versatility and cost-effectiveness. Furthermore, considering the environmental impact of your hardscape is increasingly important for modern landscape design.
According to the Environmental Protection Agency (EPA), selecting lighter-colored or permeable paving materials can significantly reduce the urban heat island effect, keeping your patio cooler during the sweltering summer months and reducing runoff during heavy rains. The EPA's Green Infrastructure guidelines highlight that permeable pavers allow stormwater to infiltrate the soil beneath, reducing the strain on municipal drainage systems and preventing localized flooding in your yard.
| Paver Material | Avg. Cost (per sq. ft.) | Durability & Maintenance | Best Application |
|---|---|---|---|
| Concrete Pavers | $4 - $10 | High durability; may fade over time. Requires occasional polymeric sand top-ups. | Versatile designs, large entertaining areas, budget-conscious projects. |
| Clay Brick | $8 - $15 | Excellent color retention; can chip if subjected to heavy impact or salt de-icing. | Traditional, colonial, or cottage-style curb appeal designs. |
| Natural Flagstone | $15 - $30+ | Extremely durable and unique; requires professional cutting and fitting. | Premium, rustic, or organic landscape designs. |
| Permeable Pavers | $10 - $20 | High eco-benefit; requires periodic vacuuming of joints to prevent clogging. | Eco-friendly homes, areas with poor drainage or strict runoff codes. |
Designing the Fire Pit: The Heart of the Entertaining Space
A fire pit serves as the anchor of your patio, providing warmth, ambient lighting, and a natural gathering spot. When designing your fire pit, the first decision is choosing between a wood-burning and a gas-burning model.
Wood-Burning Fire Pits
Wood-burning pits offer the authentic crackle, scent, and high heat output of a traditional campfire. They are generally less expensive to install, requiring only a fire-rated brick or steel ring and a bed of gravel or lava rock for drainage. However, they require constant tending, produce smoke that can bother guests, and are subject to local burn bans during dry seasons.
Gas-Burning Fire Pits
Gas fire pits (running on propane or natural gas) offer unparalleled convenience. With the flip of a switch, you have a clean, smokeless flame. Installing a natural gas line requires trenching and a licensed professional, which can add $1,500 to $3,000 to your project cost. For safety and optimal curb appeal, integrate the fire pit into a custom retaining wall or seating wall constructed from matching segmental retaining wall (SRW) blocks. The ideal seating wall height is 18 inches, which doubles as a comfortable bench when topped with capstones.
Safety Note: Always maintain a minimum clearance of 10 to 20 feet between your fire pit and any combustible structures, including your home, fences, and low-hanging tree canopies.
Illuminating the Space: Landscape Lighting for Curb Appeal
To maximize your patio's usability and enhance your home's nighttime curb appeal, a robust low-voltage LED lighting plan is essential. The U.S. Department of Energy recommends using LED fixtures with timers or smart-home integration to minimize energy consumption while ensuring safe navigation and highlighting key landscape features.
- Hardscape Lighting: Install low-profile LED strip lights beneath the capstones of your fire pit seating wall and patio steps. This provides a soft, glare-free glow that defines the edges of the patio and prevents tripping hazards.
- Uplighting: Place 3-watt to 5-watt LED uplights at the base of mature trees or architectural features surrounding the patio. Use a warm color temperature (2700K to 3000K) to create an inviting, moonlight-like ambiance that contrasts beautifully with the flickering fire.
- Path Lighting: Line the walkways leading to your entertainment zone with staggered bollard or stake lights to guide guests safely from the driveway or side yard to the backyard oasis.
Softening the Hardscape: Border Landscaping
A patio composed entirely of stone and concrete can feel harsh and disconnected from the rest of your yard. To integrate your new entertaining space into the broader landscape and boost curb appeal, you must soften the hardscape edges with strategic plantings.
Create layered garden beds along the perimeter of the patio. Start with a backdrop of evergreen shrubs, such as Arborvitae or Boxwood, to provide privacy and block unsightly views. In the middle layer, incorporate flowering perennials like Hydrangeas, Coneflowers, or Black-Eyed Susans to add seasonal color. Finally, use ornamental grasses like Karl Foerster or Muhly Grass near the seating areas; their gentle movement in the evening breeze adds a dynamic, soothing element to the space. Applying a 3-inch layer of premium hardwood mulch to these beds will retain moisture, suppress weeds, and provide a rich, finished contrast against the paver edges.
Step-by-Step Installation Overview
While many homeowners opt to hire certified hardscape professionals, understanding the installation process is crucial for ensuring your project is built to last. A properly installed paver patio requires a meticulous base to prevent settling and frost heave.
- Excavation: Dig down 7 to 9 inches below the desired finished grade, ensuring a slight slope (1/8 inch per foot) away from your home's foundation to promote proper drainage.
- Base Preparation: Install a geotextile fabric to separate the soil from the base material. Add a 4 to 6-inch layer of crushed angular gravel (often called road base or crushed stone) and compact it thoroughly using a plate compactor in 2-inch lifts.
- Bedding Sand: Spread a uniform 1-inch layer of coarse, concrete sand over the compacted base. Use screed rails and a straight edge to create a perfectly level surface.
- Laying the Pavers: Begin laying your chosen pavers from a fixed corner or edge, maintaining tight joints. Use a rubber mallet to tap them into the bedding sand.
- Edge Restraints and Compaction: Install heavy-duty plastic or aluminum edge restraints secured with landscape spikes to prevent the pavers from shifting outward over time. Run the plate compactor over the entire surface to settle the pavers into the sand.
- Jointing Sand: Sweep polymeric sand over the patio, forcing it into all the joints. Lightly mist the area with a garden hose to activate the polymers, which will bind the sand together, locking the pavers in place and preventing weed growth and ant infestations.
Conclusion
Designing a paver patio with a built-in fire pit is a transformative landscaping project that perfectly marries curb appeal with outdoor entertaining functionality. By carefully planning your zones, selecting sustainable and durable materials, incorporating professional-grade lighting, and softening the edges with lush plantings, you will create an inviting, high-value outdoor living space that you, your family, and your guests will enjoy for decades to come.

