
Landscaping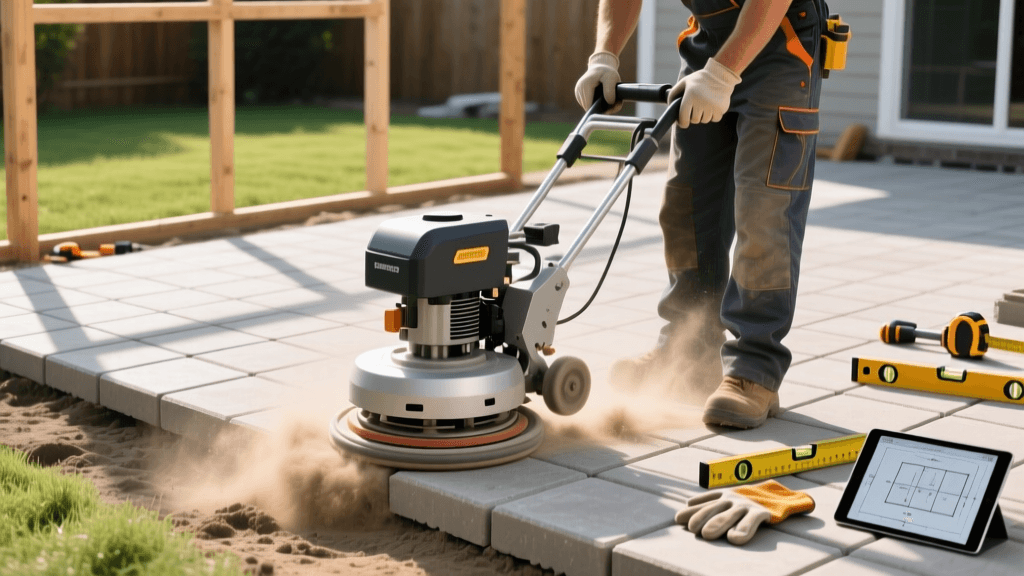
Plate Compactor Guide: Sizing and Renting for Paver Patios
The Unsung Hero of Hardscaping: Why Compaction is Non-Negotiable
When envisioning a beautiful new paver patio, walkway, or retaining wall, most homeowners and novice landscapers focus on the aesthetic choices: the color of the pavers, the laying pattern, and the border details. However, the true longevity and structural integrity of any hardscaping project lie hidden beneath the surface. Proper base preparation and compaction are the most critical steps in the entire installation process. Without the right equipment, even the most expensive concrete pavers will shift, settle, and crack within a single season of freeze-thaw cycles.
While a hand tamper might suffice for setting a single fence post or leveling a small patch of dirt, it is entirely inadequate for hardscaping. The Interlocking Concrete Pavement Institute (ICPI) strictly mandates the use of mechanical plate compactors to achieve the necessary soil and aggregate density. A plate compactor delivers thousands of pounds of dynamic force, locking the aggregate base together and ensuring the bedding sand fully penetrates the joints between the pavers. This guide will walk you through the essential specifications, sizing charts, and operational best practices for renting and using a plate compactor for your next landscaping project.
Understanding Plate Compactor Specifications
Walking into an equipment rental yard can be overwhelming. You will see rows of plate compactors ranging from small, 100-pound models to massive, 500-pound reversible machines. To choose the right tool, you must understand the three primary specifications that dictate a compactor's performance: centrifugal force, plate size, and vibration frequency.
Centrifugal Force (Exciting Force)
Centrifugal force is the most important metric when selecting a compactor. Measured in pounds (lbs) or kilonewtons (kN), this number represents the actual dynamic impact the machine exerts on the ground. Do not confuse centrifugal force with the static weight of the machine. A compactor that weighs 150 lbs might generate 3,000 lbs of centrifugal force. For standard residential paver patios and walkways, you need a machine that generates between 3,000 and 5,000 lbs of centrifugal force. For deeper aggregate bases or commercial driveways, you will need 6,000 to 10,000+ lbs of force.
Plate Size and Static Weight
The physical dimensions of the steel plate determine how the force is distributed. A smaller plate concentrates the force, making it ideal for trench work and deep base compaction. A larger plate distributes the force over a wider area, which is necessary for compacting the final bedding sand layer and seating the pavers without cracking them. Static weight matters for traction and keeping the machine grounded, but dynamic force is what actually does the work.
Vibration Frequency
Frequency is measured in vibrations per minute (vpm). Most standard plate compactors operate between 4,000 and 6,000 vpm. Higher frequency is generally better for granular soils and paving sand, as it helps the particles settle into a dense, interlocking matrix. Lower frequency, high-force machines are better suited for cohesive soils like clay.
Sizing Chart: Matching the Compactor to Your Project
Use the following table to determine the appropriate equipment class for your specific landscaping project. Rental costs are approximate and vary by region and rental provider.
| Project Scope | Base Material | Recommended Centrifugal Force | Plate Size (Approx.) | Typical Daily Rental Cost |
|---|---|---|---|---|
| Small Walkways & Garden Paths | 4-6 inches crushed stone | 2,500 - 3,500 lbs | 15 x 20 inches | $75 - $95 |
| Standard Patios & Pool Decks | 6-8 inches crushed stone | 3,500 - 5,000 lbs | 18 x 24 inches | $95 - $130 |
| Driveways & Heavy Load Areas | 10-12 inches crushed stone | 6,000 - 8,000 lbs | 20 x 26 inches | $130 - $175 |
| Deep Trenches & Retaining Walls | Backfill & deep aggregate | 8,000+ lbs (Reversible) | 20 x 28 inches | $160 - $220 |
Single-Direction vs. Reversible Plate Compactors
When browsing the rental inventory, you will notice two distinct designs: single-direction and reversible plate compactors.
- Single-Direction Compactors: These machines only move forward. They are lighter, easier to maneuver, and are the standard choice for 90% of residential paver patio projects. They are perfect for compacting the subgrade, the aggregate base, and the final paver surface.
- Reversible Compactors: These are heavier, more expensive machines that can move both forward and backward. They feature dual eccentric shafts that allow the operator to stop and reverse direction instantly without turning the machine around. Reversible compactors are essential for compacting deep trenches for retaining walls, working in confined spaces, and handling thick layers of aggregate where a single-direction machine might get bogged down.
The Critical Importance of a Polyurethane Pad
If you are compacting concrete pavers, natural stone, or stamped concrete, you must use a polyurethane (urethane) pad. Attaching a urethane pad to the steel base plate of the compactor acts as a cushion. Without it, the raw steel plate will violently scrape, chip, and permanently scar the surface of your beautiful pavers. Most reputable equipment rental yards will offer urethane pads as an add-on accessory for an extra $15 to $25 per day. Never skip this accessory when working on the final surface layer.
Step-by-Step Guide to Compacting a Paver Patio
To achieve a professional-grade finish that will last for decades, follow this sequential compaction process:
Step 1: Subgrade Compaction
After excavating the area to the proper depth, you must compact the native soil (the subgrade). Make two to three overlapping passes with the plate compactor. If the soil is overly dry, lightly mist it with water; granular materials compact best when slightly damp. If you notice deep ruts forming, the soil is too wet and needs time to dry.
Step 2: Aggregate Base Compaction
Spread your crushed stone base (typically 3/4-inch minus gravel) in layers, or 'lifts', no thicker than 4 inches at a time. Compact each lift thoroughly before adding the next. Attempting to compact an 8-inch layer of gravel all at once will result in a loose, unstable bottom layer that will eventually settle and cause your patio to sink.
Step 3: Bedding Sand and Paver Seating
After laying your screeded bedding sand (usually 1 inch thick) and placing the pavers, it is time for the final compaction. Ensure the urethane pad is attached. Run the compactor over the entire patio surface in two perpendicular directions (e.g., North-South, then East-West). The vibration forces the bedding sand up into the joints between the pavers, creating a rigid, interlocking surface.
Step 4: Joint Sand Consolidation
Sweep polymeric sand or fine jointing sand over the surface of the pavers, filling all the joints. Run the plate compactor over the patio one more time to vibrate the sand deep into the crevices. Sweep on a second layer of sand to fill any remaining voids, and you are ready for final cleanup and sealing.
Safety, Ergonomics, and Equipment Care
Plate compactors are powerful, heavy, and vibrate intensely. Operating one requires strict adherence to safety protocols to prevent short-term injuries and long-term health issues.
Protecting Against Hand-Arm Vibration Syndrome (HAVS)
Prolonged exposure to high-vibration equipment can lead to Hand-Arm Vibration Syndrome (HAVS), a condition that causes nerve damage, reduced grip strength, and vascular issues in the fingers. The National Institute for Occupational Safety and Health (NIOSH) recommends limiting continuous exposure to vibrating tools and utilizing anti-vibration gloves. When operating the compactor, maintain a firm but relaxed grip. Let the machine do the work; do not push down heavily on the handlebars, as this transfers more vibration into your arms and actually reduces the compaction efficiency by lifting the plate slightly off the ground.
Hearing and Respiratory Protection
The small gasoline engines on plate compactors routinely generate noise levels exceeding 90 decibels, which can cause permanent hearing damage over time. According to OSHA guidelines on noise exposure, hearing protection is mandatory when operating equipment at these levels. Always wear over-the-ear muffs or high-NRR foam earplugs. Additionally, the compaction process kicks up fine silica dust from the concrete pavers and sand. A properly fitted N95 respirator is essential to protect your lungs from crystalline silica exposure.
Machine Maintenance and Transport
Before leaving the rental yard, check the engine oil and ensure the exciter box (the sealed unit that generates the vibration) has no visible leaks. When transporting the machine in a truck or trailer, secure it with heavy-duty ratchet straps. Never lift a plate compactor by its handlebars or the engine; always use the dedicated lifting bail or wrap straps around the heavy steel base plate to prevent structural damage to the machine.
Conclusion
Renting a plate compactor is a relatively small expense—often less than $150 for a weekend—that completely transforms the quality and lifespan of your hardscaping project. By understanding the relationship between centrifugal force and plate size, utilizing a urethane pad, and following a strict, layered compaction schedule, you ensure that your paver patio will remain level, stable, and beautiful for decades to come. Respect the power of the equipment, prioritize your safety with proper PPE, and trust the physics of mechanical compaction to build a landscape feature that stands the test of time.

