Tree Care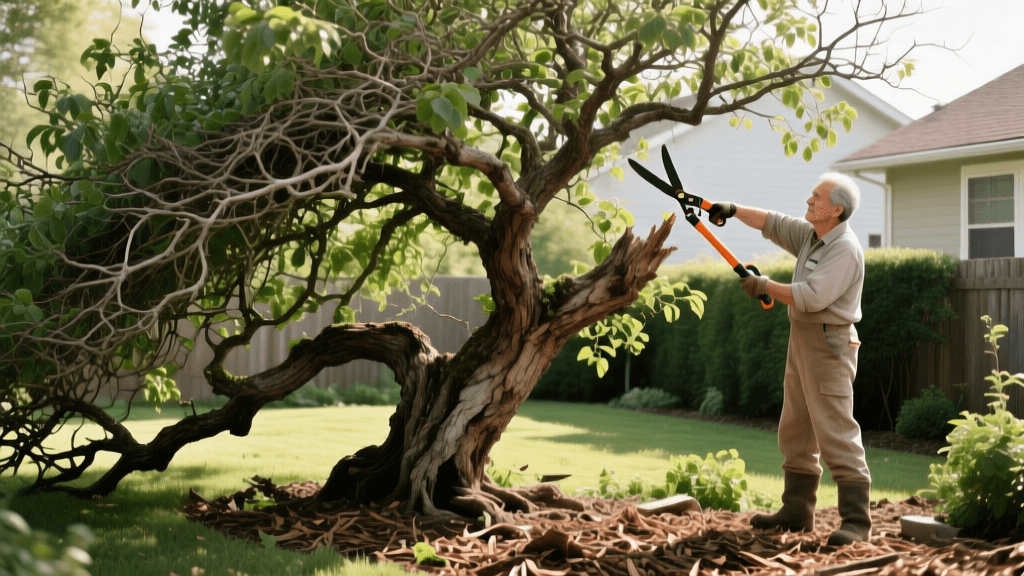
Before and After: Pruning Overgrown Mature Yard Trees
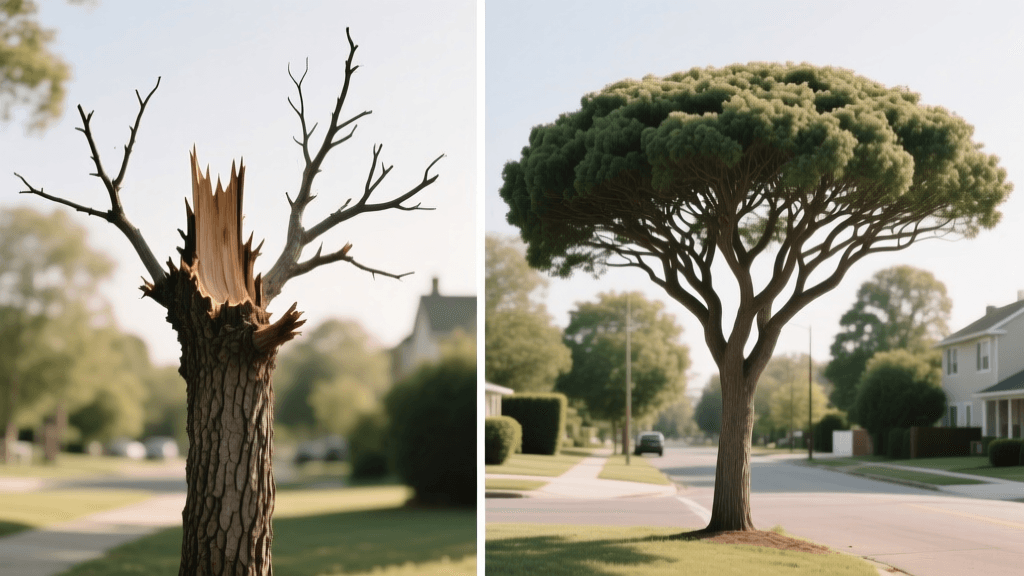
The 'Before' State: Assessing a Neglected Landscape Tree
When we first approached the property, the focal point of the front yard was a 40-foot-tall Red Maple (Acer rubrum) that had been left unpruned for over a decade. While maples are naturally stunning shade trees, this specimen had become a severe landscape liability. The 'before' condition was characterized by a massively overgrown canopy that blocked nearly 90% of sunlight, leaving the lawn beneath it completely barren. Dirt patches, compacted soil, and invasive moss were the only things thriving under the dense, suffocating shade.
Upon closer inspection with binoculars and a visual climb, the tree's structural integrity was heavily compromised. We identified multiple codominant stems—two or more main branches growing from the same junction—creating weak 'V' shaped unions with included bark. This is a massive red flag for storm damage and catastrophic splitting. Additionally, the interior of the canopy was choked with water sprouts (vigorous, upright shoots) and crossing branches that rubbed against each other. This constant friction created open wounds, leaving the tree highly vulnerable to wood-boring pests and fungal pathogens like verticillium wilt and anthracnose.
The Transformation Strategy: Structural Pruning and Crown Thinning
To achieve a dramatic before and after transformation, we needed a meticulous, scientifically backed pruning strategy. According to the University of Minnesota Extension, proper pruning improves tree health, safety, and aesthetics by selectively removing specific branches to guide growth. Our goal was not to 'top' the tree—a harmful, outdated practice that destroys tree health and promotes weak, rapid regrowth—but to perform structural pruning and crown thinning during the late winter dormant season.
Timing is everything in tree care. Pruning in late winter (February to early March) minimizes sap bleeding, which is notoriously common in maples, and allows the tree to rapidly compartmentalize wounds once the spring growth flush begins. We adhered strictly to the golden rule of arboriculture: never remove more than 25% of the tree's live foliage in a single season to avoid shocking the tree's vascular system.
Step 1: Eliminating the '3 Ds' and Water Sprouts
The first phase of the transformation involved removing the '3 Ds': Dead, Diseased, and Damaged wood. Using a sterilized Silky Gomboy folding saw (cleaned with a 10% bleach solution between cuts to prevent disease transmission), we cleared out brittle, lifeless branches that posed a falling hazard. Next, we targeted the water sprouts cluttering the inner canopy. These parasitic shoots drain the tree's energy and block crucial airflow. Removing them immediately opened up the tree's architecture, reducing wind resistance and lowering the risk of branch failure during summer thunderstorms.
Step 2: Correcting Structural Defects
Addressing the codominant stems was the most critical safety intervention. As noted by the Arbor Day Foundation, branches with strong, U-shaped angles are much less likely to split than those with tight, V-shaped angles. We selected the strongest, most central leader and systematically reduced the competing stems using reduction cuts rather than flush removal cuts. This preserved the tree's natural form while drastically reducing the leverage and weight on the weak unions.
Step 3: Crown Thinning for Light Penetration
Finally, we executed a selective crown thinning. This involves removing smaller, lateral branches (typically 1 to 2 inches in diameter) evenly throughout the canopy. The objective was to achieve a uniform density of foliage, allowing dappled sunlight to reach the turf below. We used high-quality Felco F-2 bypass hand pruners for precise, clean cuts just outside the branch collar, ensuring the tree's natural defense mechanisms could quickly seal the wounds without the use of harmful pruning paints or sealants.
Essential Tools for the Transformation
Achieving a professional-grade before and after result requires the right equipment. Here is the toolkit we utilized for this 40-foot maple:
- Silky Gomboy 240 Hand Saw: ($65) Features impulse-hardened teeth that cut through 4-inch limbs like butter without binding.
- Felco F-2 Bypass Pruners: ($60) The industry standard for clean cuts on branches up to 1 inch thick.
- Stihl HT 133 Pole Pruner: ($700) A gas-powered telescoping pole saw that allowed us to safely reach branches 15 feet in the air without using a dangerous ladder.
- Isopropyl Alcohol & Wire Brush: ($15) For sterilizing blades and removing sap buildup to prevent the spread of latent fungal spores.
The 'After' State: A Revived Tree and Landscape
The visual and ecological transformation was immediate and profound. Stepping back to view the 'after' state, the Red Maple looked taller, more elegant, and structurally balanced. The canopy was no longer a solid, impenetrable wall of green; it had a beautiful, lacy texture that allowed the wind to pass through safely, drastically reducing the sail effect during high winds.
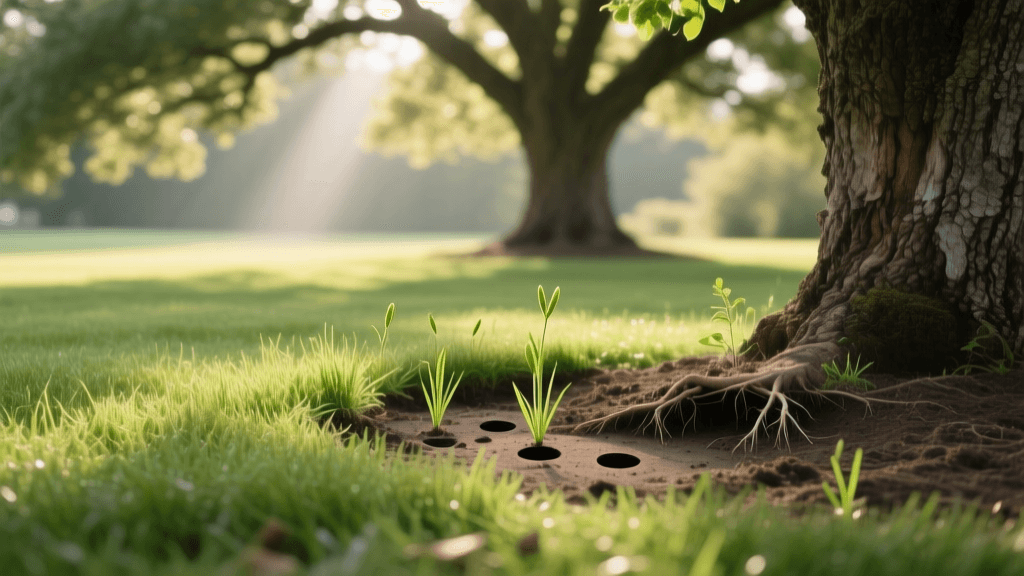
More importantly, the landscape beneath the tree was reborn. With sunlight penetration increased from 10% to roughly 45%, the barren dirt patches were finally ready for rehabilitation. The improved airflow through the canopy also significantly reduced the humidity levels around the leaves, creating an environment far less hospitable to fungal diseases like powdery mildew.
Turf Rehabilitation: Reviving the Understory
The tree transformation was only half the battle; the lawn beneath it needed a complete overhaul. Because the soil was heavily compacted from years of foot traffic and lack of organic matter, we started with a core aeration, pulling 3-inch plugs across the entire drip line. We then top-dressed the area with a quarter-inch layer of screened compost to reintroduce vital soil microbes.
For the seed, we selected a shade-tolerant fine fescue blend (specifically Jonathan Green Black Beauty Ultra), which requires less sunlight than traditional Kentucky Bluegrass. We applied the seed at a rate of 6 pounds per 1,000 square feet and kept the top inch of soil consistently moist for 21 days. Within a month, a lush, dark green carpet of grass had replaced the unsightly dirt patches, completing the landscape's total transformation.
Investment Breakdown: DIY vs. Professional Arborist
Transforming a mature, overgrown tree requires a significant investment of time, labor, and equipment. Below is a comparison chart detailing what homeowners can expect when deciding between a DIY approach and hiring an ISA-Certified Arborist for a tree of this size (40 feet tall, 30-foot canopy spread).
| Factor | DIY Approach | Professional Arborist |
|---|---|---|
| Estimated Cost | $150 - $300 (Tool purchase/rental) | $800 - $1,500 |
| Time Required | 10 - 15 hours over a weekend | 4 - 6 hours (crew of 2-3) |
| Safety Risk | High (ladder work, falling limbs) | Low (insured, specialized rigging) |
| Equipment Used | Hand saws, pole pruners, ladders | Bucket trucks, chipper, climbing gear |
| Wound Healing | Variable (high risk of flush cuts) | Optimal (precise collar cuts) |
| Debris Removal | Manual chopping and municipal yard waste bins | On-site chipping and complete haul-away |
While the DIY route saves money upfront, the risk of personal injury and long-term damage to the tree from improper cuts makes hiring a professional the superior choice for trees over 20 feet tall.
Post-Transformation Care: Setting the Stage for Recovery
A successful before and after transformation does not end when the saws are put away. The tree has just undergone a major stress event and requires proper aftercare to thrive. According to Penn State Extension, proper mulching and watering are critical for post-pruning recovery.
First, we applied a 3-inch layer of premium hardwood mulch in a 'donut' shape around the base of the tree. The mulch ring extended out to the drip line, but we were careful to keep the mulch at least 3 inches away from the trunk flare to prevent rot, girdling roots, and rodent damage. This mimics the natural forest floor, retaining soil moisture and regulating root temperatures during the transition into spring.
Second, we implemented a deep-watering schedule. Newly pruned trees benefit from consistent moisture to support the energy-intensive process of wound compartmentalization and new spring growth. We used a soaker hose coiled around the root zone, running it for two hours once a week during dry spells, delivering roughly 1 inch of water directly to the critical root zone. By combining precise structural pruning with diligent aftercare, this once-neglected maple was transformed into a safe, healthy, and stunning landscape centerpiece that will thrive for decades to come.