
Gardening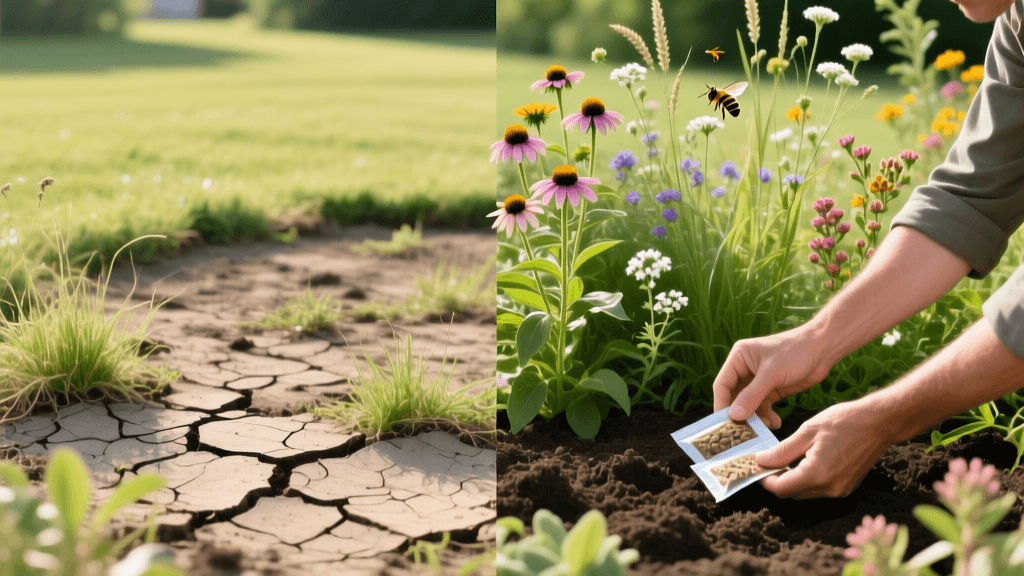
Renovate Dead Lawn Into A Thriving Pollinator Garden
The Challenge of the Dead Lawn
Every homeowner and gardening enthusiast eventually faces the frustration of a failing, dead, or severely compacted lawn. Traditional lawn renovation and recovery methods often rely on aggressive aeration, synthetic fertilizers, and heavy irrigation to force turfgrass back to life. However, when the underlying soil biology is completely depleted and the thatch layer has become hydrophobic, pouring money and water into dead turf is a losing battle. Instead of fighting nature, modern organic gardening offers a transformative solution: renovate the dead space by converting it into a thriving, drought-tolerant pollinator garden. This approach not only recovers the ecological health of your yard but also drastically reduces long-term maintenance, water usage, and chemical dependence.
According to The Xerces Society for Invertebrate Conservation, converting even a small portion of a traditional lawn into a native pollinator habitat can significantly bolster local biodiversity, providing critical forage for bees, butterflies, and beneficial insects. By shifting our perspective on lawn recovery from 'restoring turf' to 'restoring the ecosystem,' we can turn barren, compacted dirt into a vibrant, living garden.
Step 1: Site Preparation and Sheet Mulching
The first step in any major garden renovation is clearing the existing vegetation. While chemical herbicides might seem like a quick fix, they disrupt the fragile soil microbiome necessary for long-term plant health. Instead, we utilize a highly effective organic gardening technique known as sheet mulching, or 'lasagna gardening.' This method smothers the dead grass and weeds while simultaneously building organic matter.
How to Sheet Mulch a Compacted Lawn
- Mow Low: Cut any remaining dead turf or weeds as close to the soil surface as possible. Leave the clippings in place to decompose.
- Moisten the Soil: Deeply water the area. This jumpstarts the microbial activity required to break down the organic layers you are about to add.
- Lay the Cardboard: Cover the entire renovation zone with overlapping layers of plain, uncoated corrugated cardboard. Remove all tape and labels. Overlap the edges by at least six inches to prevent aggressive weeds like bindweed or bermudagrass from finding a gap.
- Wet the Cardboard: Thoroughly soak the cardboard with a hose. This weights it down and accelerates decomposition.
- Add Compost: Apply a generous three to four-inch layer of high-quality organic compost directly over the wet cardboard. This will be your primary planting medium for the first year.
- Top with Mulch: Finish with a two-inch layer of coarse arborist wood chips or shredded leaves to retain moisture and protect the compost from UV degradation.
By following these guidelines, which align with the Environmental Protection Agency's Integrated Pest Management principles, you eliminate weeds without introducing toxic residues into your soil food web.
Step 2: Deep Soil Recovery and Amendment
Lawns often die because the soil beneath them is compacted, lacking in organic matter, and devoid of beneficial mycorrhizal fungi. While sheet mulching provides an excellent medium for shallow-rooted perennials, deep-rooted native plants will eventually penetrate the decomposing cardboard and need a welcoming environment below. Before laying your cardboard, it is highly recommended to perform a broadfork aeration and incorporate specific soil amendments based on a professional soil test.
Below is a comprehensive guide to amending heavily compacted, dead lawn soils to prepare them for a deep-rooted perennial garden.
| Amendment Type | Primary Purpose | Application Rate (per 100 sq ft) | Best Used For |
|---|---|---|---|
| Leaf Mold Compost | Improves soil structure and water retention | 2 to 3 cubic feet | Heavy clay soils typical of dead urban lawns |
| Coarse Builder's Sand | Enhances drainage and prevents waterlogging | 1 to 2 cubic feet (mix with compost) | Poorly draining, compacted turf areas |
| Mycorrhizal Inoculant | Establishes symbiotic root-fungi networks | As directed on package (usually 1-2 oz) | Barren soils lacking biological activity |
| Rock Phosphate | Provides slow-release phosphorus for root growth | 2 to 3 pounds | Soils testing deficient in phosphorus |
When renovating a severely degraded lawn, the introduction of mycorrhizal fungi is a game-changer. These beneficial fungi attach to plant roots, effectively extending the root system by hundreds of times, allowing your new pollinator plants to access water and nutrients deep within the subsoil that was previously locked away from turfgrass roots.
Step 3: Selecting Native Pollinator Plants
Once your sheet mulch has settled and your soil is prepped, it is time to select the right plants. The key to a successful, low-maintenance garden recovery is choosing native perennials that are adapted to your local climate and rainfall patterns. The USDA Natural Resources Conservation Service (NRCS) heavily advocates for the use of native plant materials to support local food webs and reduce irrigation demands.
Top Drought-Tolerant Perennials for Renovated Lawns
- Purple Coneflower (Echinacea purpurea): A staple of the pollinator garden, this deep-rooted perennial thrives in the transition zones between compost and native clay. It provides excellent late-summer nectar for butterflies and seeds for overwintering birds.
- Butterfly Weed (Asclepias tuberosa): Essential for Monarch butterfly caterpillars, this plant features a massive taproot that easily penetrates the decomposing cardboard layer of your sheet mulch, anchoring the plant securely against high winds.
- Wild Bergamot (Monarda fistulosa): A member of the mint family, this plant spreads via underground rhizomes, helping to naturally knit your new garden bed together and suppress any late-emerging weeds.
- New England Aster (Symphyotrichum novae-angliae): Providing critical late-season energy for migrating pollinators, asters are incredibly forgiving of the fluctuating moisture levels often found in newly renovated garden beds.
When planting into a sheet-mulched bed, simply pull back the wood chips, cut an 'X' into the cardboard, and dig a hole just large enough for the plant's root ball. Backfill with a mix of native soil and compost, water deeply, and pull the mulch back around the base of the plant, ensuring it does not touch the stem directly.
Step 4: First-Year Maintenance and Watering
A common misconception is that native pollinator gardens require zero maintenance. While they are vastly superior to traditional turf in terms of long-term care, the first year of lawn renovation and recovery requires attentive management to ensure the new perennials establish their root systems before the first hard freeze.
The First-Year Watering Schedule
Because your new plants are growing in a layer of compost above the original soil line, their roots need encouragement to grow downward. Shallow, frequent watering will keep roots near the surface, making them vulnerable to summer drought. Instead, adopt a deep, infrequent watering strategy.
- Weeks 1-4: Water every other day for the first month to help the plants overcome transplant shock and establish initial root contact with the surrounding medium.
- Months 2-3: Transition to watering twice a week, applying at least one inch of water per session. This encourages roots to push through the cardboard and into the subsoil.
- Months 4-12: Water only during periods of extended drought (more than two weeks without significant rainfall). By this time, the deep taproots of plants like Butterfly Weed will be accessing subterranean moisture.
Weed management in the first year is also crucial. Despite the cardboard barrier, wind-blown weed seeds will land in your compost layer. Hand-pull these weeds while they are small to prevent them from competing with your young perennials for nutrients and sunlight. Avoid using pre-emergent herbicides, as these can inhibit the growth of your desirable native plants and disrupt the soil biology you are working so hard to rebuild.
The Long-Term Benefits of Eco-Lawn Renovation
Transforming a dead, compacted lawn into a pollinator garden is one of the most impactful landscaping decisions a homeowner can make. Not only does it solve the immediate problem of turf failure, but it also creates a dynamic, ever-changing ecosystem that improves year after year. As the cardboard decomposes and the compost integrates with the subsoil, the soil structure regenerates, increasing its capacity to absorb and filter stormwater runoff.
Furthermore, you will reclaim countless hours previously spent mowing, edging, and fertilizing. By embracing organic gardening principles and focusing on soil recovery rather than chemical intervention, you turn a barren patch of dead grass into a vibrant sanctuary for wildlife. The renovation of a failing lawn is not just about covering bare dirt; it is about healing the land, one deep root and one native bloom at a time.

