
Lawn Care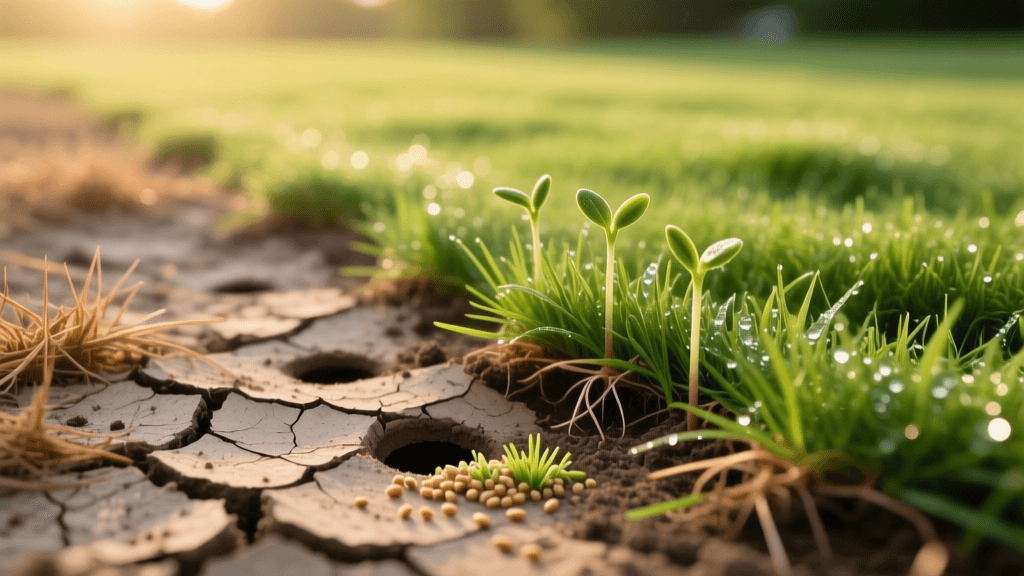
Step-by-Step Guide to Renovating a Drought-Damaged Lawn
Introduction to Lawn Renovation and Drought Recovery
Drought stress is one of the most common and devastating challenges a homeowner can face when maintaining a turfgrass landscape. Prolonged periods of high heat and minimal rainfall can transform a lush, green carpet into a brittle, brown expanse. However, a brown lawn is not necessarily a dead lawn. Turfgrass species possess remarkable survival mechanisms, often entering a state of dormancy to protect their crowns and root systems during extreme environmental stress. When favorable conditions return, or when proactive irrigation is reintroduced, the lawn can recover. But what happens when the drought is too severe, or the soil conditions prevent natural recovery? This is where a comprehensive lawn renovation strategy becomes essential.
Renovating a drought-damaged lawn goes far beyond simply scattering grass seed over brown patches and turning on the sprinklers. True recovery requires a systematic approach that addresses soil compaction, thatch buildup, nutrient deficiencies, and the introduction of modern, drought-tolerant turfgrass cultivars. According to turfgrass experts at the University of Minnesota Extension, successful lawn renovation hinges on proper site preparation and timing. In this comprehensive guide, we will walk you through the exact steps, measurements, and product recommendations needed to bring your drought-stricken lawn back to life and fortify it against future dry spells.
Step 1: Assess the Damage — Dormant vs. Dead Grass
Before purchasing seed or renting equipment, you must determine the actual state of your turf. Cool-season grasses like Kentucky Bluegrass and Tall Fescue can survive up to six weeks of severe drought by entering dormancy. Warm-season grasses like Bermuda and Zoysia are even more resilient. To assess the damage, perform the 'tug test' and the 'crown inspection'.
- The Tug Test: Grab a handful of brown grass and pull gently. If the grass pulls up easily with no resistance and the roots are dry and brittle, the grass is likely dead and the area requires complete renovation or overseeding.
- Crown Inspection: Cut a small cross-section of a brown turf sample down to the soil line. Examine the crown (the base of the plant where the roots meet the shoots). If the crown is firm, white, or pale green, the grass is dormant and will recover with proper hydration. If the crown is brown, mushy, or completely desiccated, the plant is dead.
Map out your lawn, identifying areas that require full renovation (bare soil or dead thatch) versus areas that simply need aggressive watering and nutritional support to break dormancy.
Step 2: Mowing and Dethatching the Lawn
Seed-to-soil contact is the most critical factor in successful overseeding. If your drought-damaged lawn has a thick layer of thatch (the spongy layer of dead and living organic matter between the soil surface and the green blades), new seeds will become trapped in the thatch, germinate, and then die as their roots fail to reach the soil.
Begin by mowing the existing lawn significantly shorter than your normal maintenance height. For cool-season grasses, scalp the lawn down to about 1 to 1.5 inches. For warm-season grasses, lower the deck to 0.5 to 1 inch. Bag the clippings to remove excess debris. Next, assess your thatch layer. If the thatch exceeds 0.5 inches in depth, you must dethatch. For small areas, a manual thatching rake will suffice. For larger lawns, rent a power rake (vertical mower) from a local equipment rental center. Set the blades to cut just into the soil surface to pull up the dead organic matter. Rake up and remove the debris, leaving the soil as exposed as possible.
Step 3: Core Aeration for Compacted Soil
Drought conditions often exacerbate soil compaction, particularly in heavy clay soils. When soil is hard and compacted, water runs off the surface rather than penetrating the root zone, and new grass roots cannot establish themselves. Core aeration is the process of removing small plugs of soil from the lawn to alleviate compaction and create channels for water, oxygen, and nutrients.
Rent a walk-behind core aerator and make two passes over the entire lawn, with the second pass perpendicular to the first to ensure a dense pattern of holes. Aim for holes that are 2 to 3 inches deep and spaced about 2 to 3 inches apart. Leave the extracted soil plugs on the lawn; they will break down naturally over the next few weeks, depositing beneficial soil microbes back into the thatch layer to aid in decomposition. As noted by the NC State University TurfFiles program, core aeration is most effective when the soil is slightly moist, so water the lawn lightly a day before aerating if the ground is too hard.
Step 4: Soil Testing and Targeted Amendment
A drought-damaged lawn is often a symptom of underlying soil imbalances. Before applying fertilizer, conduct a professional soil test. You can obtain a soil test kit from your local cooperative extension office or use a reputable mail-in laboratory like Logan Labs or Ward Laboratories. A standard soil test will reveal your soil's pH, cation exchange capacity (CEC), and exact levels of phosphorus, potassium, and micronutrients.
Turfgrass thrives in a soil pH range of 6.0 to 7.0. If your soil is too acidic (below 6.0), apply pelletized calcitic or dolomitic lime at the rate recommended by your soil test (typically 20 to 50 lbs per 1,000 square feet). If your soil is too alkaline (above 7.5), apply elemental sulfur to gradually lower the pH. Amending the soil based on empirical data ensures that the new grass seed you plant will have the chemical environment necessary to develop deep, drought-resistant root systems.
Step 5: Overseeding with Drought-Tolerant Varieties
When renovating a lawn prone to drought stress, do not simply replace dead grass with the same vulnerable species. Modern turfgrass breeding has produced cultivars that require significantly less water and possess deeper root architectures. For cool-season lawns, Turf-Type Tall Fescue (TTTF) is the undisputed champion of drought tolerance, capable of rooting up to 3 feet deep. For warm-season lawns, Bermuda and Zoysia offer superior heat and drought resistance.
Apply a high-quality starter fertilizer simultaneously with your seed. A starter fertilizer should be high in phosphorus (the middle number in the N-P-K ratio) to stimulate rapid root development. A ratio like 18-24-12 or 10-18-10 is ideal. Apply the seed using a broadcast spreader, followed by a light raking or dragging with a piece of chain-link fence to ensure the seed falls into the aeration holes and makes direct contact with the soil.
Drought-Tolerant Grass Seed Comparison Chart
| Grass Species | Climate Zone | Drought Tolerance | Seeding Rate (lbs/1,000 sq ft) | Germination Time |
|---|---|---|---|---|
| Turf-Type Tall Fescue | Cool-Season / Transition | High | 6.0 - 8.0 | 7 - 14 Days |
| Kentucky Bluegrass | Cool-Season | Moderate (Dormant recovery) | 2.0 - 3.0 | 14 - 28 Days |
| Common Bermuda | Warm-Season | Very High | 1.0 - 2.0 | 10 - 21 Days |
| Buffalograss | Warm-Season / Arid | Extreme | 2.0 - 4.0 | 14 - 28 Days |
Step 6: Strategic Watering and Establishment
The watering schedule during the first 30 days of renovation dictates the success or failure of your project. Newly planted grass seed must remain consistently moist until germination occurs. This typically requires watering the lawn lightly 2 to 3 times per day for 10 to 15 minutes per zone, depending on your soil type and sun exposure. The goal is to keep the top half-inch of soil damp without creating puddles that will wash the seed away or promote fungal diseases like Pythium blight.
Once the seed has germinated and the new grass reaches a height of about 1 inch, begin to taper off the frequency of watering while increasing the duration. Transition to watering deeply once a day, then every other day. This encourages the young roots to chase the moisture deeper into the soil profile. According to the Environmental Protection Agency (EPA) WaterSense program, deep and infrequent watering is the cornerstone of water-efficient landscaping, training the lawn to survive future dry periods by developing extensive root networks.
'The secret to a resilient, drought-proof lawn lies beneath the surface. Healthy soil biology, proper grading, and deep root architecture dictate above-ground recovery far more than the frequency of your sprinkler system.'
Step 7: Long-Term Maintenance for Lawn Recovery
Once the new grass has been mowed three times, the renovation phase is complete, and the lawn transitions into the establishment and maintenance phase. Raise your mowing height to the highest recommended setting for your grass type (typically 3 to 4 inches for Tall Fescue). Taller grass blades shade the soil, reducing surface evaporation and keeping the root zone cooler during summer heat waves.
Continue to fertilize according to a seasonal schedule, avoiding high-nitrogen synthetic fertilizers during the peak heat of summer, which can burn stressed turf and force excessive top-growth at the expense of root development. Instead, focus on soil health by incorporating organic matter, such as compost top-dressing, during your annual fall aeration. By following this meticulous, step-by-step renovation process, you will not only recover your lawn from drought damage but transform it into a resilient, water-efficient landscape capable of withstanding the environmental challenges of tomorrow.

