
Gardening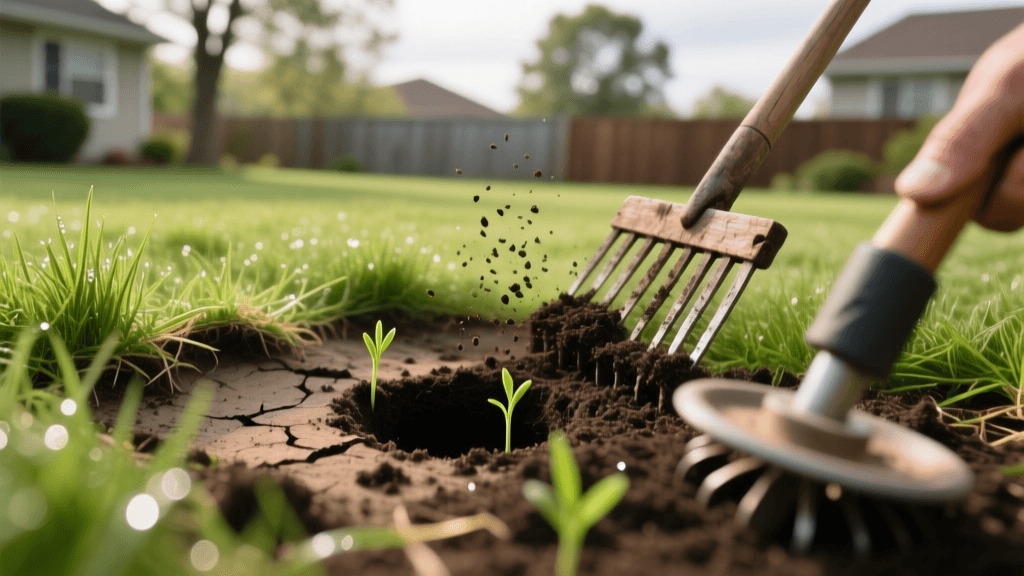
Lawn Renovation: Reviving Damaged Grass With Aeration
Every homeowner dreams of a lush, carpet-like lawn, but environmental stressors, heavy foot traffic, and neglect can quickly turn a vibrant yard into a patchy, compacted eyesore. Lawn renovation is not merely about throwing down a few handfuls of grass seed and hoping for the best. True recovery requires a strategic approach that addresses the underlying soil health, alleviates compaction, and introduces robust new turfgrass varieties. If your lawn is suffering from thinning grass, pooling water, or severe thatch buildup, a comprehensive renovation utilizing core aeration and compost top-dressing is the most effective solution. This guide will walk you through the science and practical steps of reviving your damaged lawn, transforming it back into the pride of your neighborhood.
Assessing Your Lawn's Damage
Before purchasing seed or renting heavy equipment, you must accurately assess the current state of your lawn. Walk your property and identify the specific issues at play. Are there bare patches caused by dog urine or heavy shade? Is the soil so hard that a screwdriver cannot easily penetrate it? Is there a spongy layer of dead organic matter (thatch) thicker than half an inch? Identifying these problems will dictate the intensity of your renovation efforts. If more than 50% of your lawn is dead or overrun with weeds, a complete tear-out and replanting might be necessary. However, if your lawn still has a foundation of living grass that is simply thin, compacted, or stressed, overseeding combined with aeration is the ideal recovery path.
The Science of Soil Compaction and Thatch
Soil compaction is the silent killer of turfgrass. Over time, rain, irrigation, and foot traffic compress the soil particles, squeezing out the vital pore spaces needed for oxygen, water, and nutrients to reach the root zone. When roots cannot breathe or expand, the grass becomes shallow-rooted and highly susceptible to drought and disease. Furthermore, compacted soil exacerbates thatch buildup. Thatch is a tightly woven layer of living and dead stems and roots that accumulates between the soil surface and the green grass blades. While a thin layer of thatch (under 0.5 inches) provides insulation, a thick layer acts as a barrier, preventing water and fertilizer from reaching the soil.
To combat these issues, we must reintroduce organic matter and physical pathways into the soil profile. According to the USDA Natural Resources Conservation Service, healthy soil biology and structure are paramount for sustained plant growth. Incorporating compost during the renovation process feeds the microbial life that naturally breaks down thatch and maintains soil aggregation.
Step-by-Step Lawn Renovation Process
Timing is everything. For cool-season grasses (like Kentucky Bluegrass, Tall Fescue, and Perennial Ryegrass), the absolute best time to renovate is early fall, typically between late August and mid-September. The soil is still warm from summer, which encourages rapid seed germination, while the cooler autumn air reduces heat stress on young seedlings. For warm-season grasses (like Bermuda or Zoysia), late spring to early summer is the optimal window.
Step 1: Mow Low and Dethatch
Begin your renovation by mowing your existing lawn significantly shorter than usual. Drop your mower deck to a height of 1.5 to 2 inches. This severe haircut allows sunlight to reach the soil surface and prevents the existing grass canopy from smothering new seedlings. After mowing, use a sturdy metal thatch rake or a power dethatcher to aggressively pull up dead organic debris. Rake up and remove all the loosened thatch and clippings. Leaving this debris on the lawn will create a physical barrier that prevents seed-to-soil contact, which is the single most critical factor for germination.
Step 2: Core Aeration
Core aeration involves using a machine to pull small plugs of soil (typically 2 to 3 inches deep and 0.5 to 0.75 inches in diameter) out of the ground. This process physically relieves compaction and creates channels for air, water, and nutrients. The Penn State Extension recommends core aeration as a primary cultural practice for maintaining high-traffic turf areas. Rent a walk-behind core aerator from your local equipment rental yard (expect to pay between $80 and $120 for a half-day rental). Make at least two passes over your lawn, with the second pass perpendicular to the first, to ensure maximum hole density. Leave the extracted soil plugs on the lawn; they will break down naturally over the next few weeks and help top-dress the surface.
Step 3: Compost Top-Dressing
Immediately after aerating, apply a layer of high-quality, finely screened compost over the entire lawn. The Environmental Protection Agency (EPA) notes that compost adds essential organic matter, improves soil moisture retention, and introduces beneficial microbes. Spread the compost evenly using a shovel and the back of a heavy garden rake, aiming for a thin layer about 1/4 to 1/2 inch thick. The compost will fall directly into the aeration holes, amending the soil deep within the root zone where it is needed most. Budget approximately $40 to $60 per cubic yard of bulk compost, which is generally enough to cover 1,000 square feet at a 1/4-inch depth.
Step 4: Overseeding
With the soil open and amended, it is time to sow your new grass seed. Use a broadcast spreader or a drop spreader to apply the seed evenly across the lawn. For best results, split your seed application in half and spread it in two perpendicular directions. This cross-hatching technique prevents missed strips and ensures a uniform stand of grass. Ensure the seed makes direct contact with the compost and soil; you can lightly drag a piece of chain-link fence or a landscaping mat over the area to press the seed into the surface.
Step 5: Watering and Germination
Watering is the make-or-break phase of lawn renovation. Newly sown grass seed must remain consistently moist until it germinates and establishes a root system. This typically requires watering the lawn lightly two to three times a day for 10 to 15 minutes per session, depending on your soil type and local temperatures. The goal is to keep the top inch of soil damp without creating puddles that will wash the seed away. Once the seedlings reach about 2 inches in height, you can gradually reduce the frequency of watering while increasing the duration, encouraging the new roots to grow deep into the compost-amended soil.
Seed Selection and Application Rates
Choosing the right seed is critical for long-term lawn recovery. Avoid cheap, generic seed mixes that contain high percentages of annual ryegrass or weed seeds. Invest in premium, certified seed blends tailored to your specific climate and sunlight conditions. Below is a comparison chart to help you select the appropriate grass type and application rate for your renovation project.
| Grass Type | Climate Zone | Sun/Shade Tolerance | Overseeding Rate (per 1,000 sq ft) | Germination Time |
|---|---|---|---|---|
| Tall Fescue (Turf-Type) | Cool-Season / Transition | Excellent Sun, Good Shade | 5 to 8 lbs | 7 to 14 days |
| Kentucky Bluegrass | Cool-Season | Full Sun Required | 2 to 3 lbs | 14 to 21 days |
| Perennial Ryegrass | Cool-Season | Full Sun to Light Shade | 4 to 6 lbs | 5 to 10 days |
| Fine Fescue Blend | Cool-Season | Poor Sun, Excellent Shade | 3 to 5 lbs | 7 to 14 days |
| Bermudagrass | Warm-Season | Full Sun Required | 1 to 2 lbs (hulled) | 10 to 14 days |
Pro Tip: When purchasing seed, always check the label for the 'Test Date' and 'Germination Rate.' Ensure the seed was tested within the last six months and boasts a germination rate of 85% or higher. Avoid any bags where the 'Weed Seed' percentage exceeds 0.1%.
Post-Renovation Maintenance
Once your new grass has germinated and grown to a height of 3.5 to 4 inches, it is time for the first mow. Ensure your mower blades are razor-sharp to prevent tearing the tender young grass blades. Set your mower to a high cutting height (around 3 inches) for the remainder of the fall season. Taller grass shades the soil, retains moisture, and outcompetes emerging winter weeds.
Fertilization should also be timed carefully. Apply a high-quality, slow-release starter fertilizer at the time of seeding to provide the phosphorus necessary for root development. Follow up with a winterizer fertilizer in late October or November to help the new grass store carbohydrates for the winter dormancy period. Avoid using broadleaf weed killers (herbicides) on a newly renovated lawn until the new grass has been mowed at least three to four times, as these chemicals can severely stunt or kill young turfgrass seedlings.
By committing to this intensive renovation process—combining the physical relief of core aeration, the biological boost of compost top-dressing, and the genetic upgrade of premium overseeding—you will fundamentally change the trajectory of your lawn. The result is not just a temporary green-up, but a deeply rooted, resilient turf ecosystem capable of withstanding the stresses of future seasons.

