
Landscaping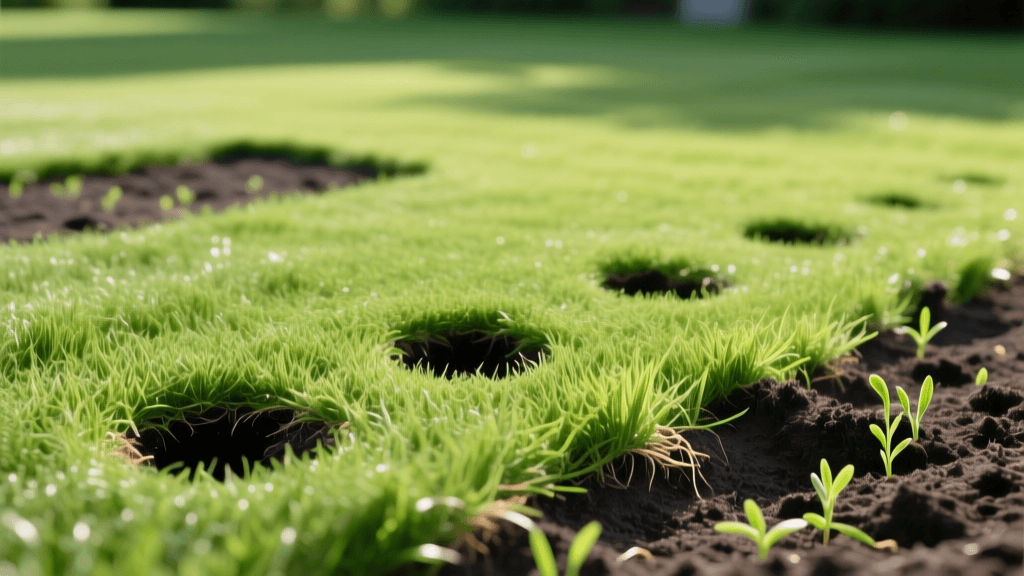
Revive Drought-Damaged Lawns: Aeration and Overseeding
Assessing the Damage: When to Renovate vs. Repair
A lush, vibrant lawn is the cornerstone of any well-designed landscape. However, extreme weather patterns, heavy foot traffic, and poor soil conditions can leave your turf looking sparse, brown, and heavily compacted. When dealing with lawn renovation and recovery, it is crucial to understand the difference between simple repair and full-scale renovation. If your lawn consists of more than 50% bare patches, weeds, or dead thatch, spot-seeding will not suffice. You need a comprehensive renovation strategy that addresses the underlying soil structure and drainage issues.
According to the University of California's Guide to Healthy Lawns, successful turf recovery begins beneath the surface. Compacted soil prevents water, oxygen, and essential nutrients from reaching the root zone, leading to shallow root systems that are highly susceptible to drought stress. By integrating hardscape grading corrections with deep core aeration and strategic overseeding, you can transform a failing landscape into a resilient, drought-tolerant outdoor living space.
Step 1: Hardscape and Grading Corrections
Before introducing new seed, you must address the physical topography of your landscape. Poor grading not only damages turf but can also threaten your home's foundation and hardscaping elements like patios and retaining walls. Water pooling in low spots creates anaerobic soil conditions that drown grass roots and promote fungal diseases.
- Evaluate the Slope: Your lawn should have a minimum 2% slope (a 2-inch drop for every 10 feet) away from your home's foundation and hardscape borders.
- Fill Low Spots: Use a high-quality, screened topsoil to fill depressions. Avoid using heavy clay or pure sand, as these will disrupt the existing soil profile and hinder root penetration.
- Install Drainage Solutions: If grading alone cannot solve standing water issues, consider integrating a French drain or a decorative dry creek bed using river rock to channel excess water away from the turf zone.
Addressing these structural landscape elements first ensures that your newly renovated lawn will not be washed away or drowned during the critical recovery phase.
Step 2: Deep Core Aeration
Core aeration is the most vital step in recovering a compacted, drought-damaged lawn. Unlike spike aeration, which merely pokes holes and can worsen compaction, core aeration physically removes small plugs of soil and thatch from the ground. This process alleviates soil density, stimulates microbial activity, and creates open channels for water and fertilizer to reach the root zone.
For optimal results, rent a walk-behind commercial core aerator from a local equipment rental center (typically costing between $80 and $120 per day). Ensure the machine extracts plugs that are 2 to 3 inches deep and spaced about 3 inches apart. Run the aerator over the lawn in two perpendicular directions (e.g., North-South, then East-West) to maximize soil fracturing. The EPA's WaterSense program notes that properly aerated landscapes significantly improve water infiltration rates, reducing runoff and promoting deeper, more drought-resistant root growth.
Step 3: Soil Amendment and Topdressing
Once the lawn is aerated, the extracted soil cores should be left on the lawn to break down naturally, returning valuable microorganisms to the surface. Next, apply a nutrient-rich topdressing to fill the aeration holes and improve the soil's water-holding capacity.
Apply a 1/4-inch layer of finely screened, aged compost across the entire lawn. For an added nutrient boost, mix in an organic, slow-release fertilizer like Milorganite (apply at a rate of 32 lbs per 2,500 square feet). The organic matter in the compost acts like a sponge, retaining moisture during dry spells and buffering the soil against extreme temperature fluctuations. Use a push broom or a drag mat to work the compost deeply into the aeration holes, ensuring direct contact with the subsoil.
Step 4: Strategic Overseeding
Overseeding introduces modern, drought-tolerant, and disease-resistant turfgrass cultivars into your existing landscape. The success of this step hinges on selecting the right seed for your specific climate zone and micro-environment (sun vs. shade).
Use a broadcast spreader to apply the seed evenly. For best coverage, split your total seed amount in half and apply it in two perpendicular passes. After seeding, lightly rake the area to ensure seed-to-soil contact, which is absolutely critical for germination. Seeds left resting on top of dry thatch will fail to sprout.
Pro Tip: Never use pre-emergent herbicides, such as crabgrass preventers, within 60 days before or after overseeding. These chemicals do not distinguish between weed seeds and your expensive turfgrass seeds, and they will completely inhibit your lawn's recovery.
Turfgrass Seed Comparison Chart
Choosing the right seed is critical for long-term landscape resilience. Below is a comparison of popular turfgrass types used in renovation projects:
| Grass Type | Climate Zone | Germination (Days) | Drought Tolerance | Seed Rate (lbs/1,000 sq ft) | Avg Cost/lb |
|---|---|---|---|---|---|
| Tall Fescue (TTTF) | Transition / Cool | 7-14 | High | 6-8 | $6.00 |
| Kentucky Bluegrass | Cool | 14-30 | Moderate | 2-3 | $9.00 |
| Bermudagrass | Warm | 10-21 | Very High | 2-3 | $12.00 |
| Zoysiagrass | Warm / Transition | 14-21 | High | 2-3 | $15.00 |
| Perennial Ryegrass | Cool / Transition | 5-10 | Low | 4-6 | $5.00 |
Note: Transition Zone lawns benefit greatly from Turf-Type Tall Fescue (TTTF) blends, which offer the deep root systems necessary to survive summer droughts while maintaining a lush, cool-season appearance.
Step 5: The 6-Week Recovery Watering Schedule
Water management is the single most important factor in lawn renovation recovery. New seed requires consistent moisture, but overwatering can lead to seed rot and fungal outbreaks. The University of Minnesota Extension emphasizes that watering frequency and depth must evolve as the root system establishes.
- Weeks 1-2 (Germination Phase): Water lightly 2 to 3 times per day for 5-10 minutes each session. The goal is to keep the top 1 inch of soil constantly moist but never muddy. If the seed dries out even once during germination, it will die.
- Weeks 3-4 (Establishment Phase): Reduce frequency to once per day, but increase the duration to 15-20 minutes. This encourages the young roots to stretch deeper into the compost-amended aeration holes.
- Weeks 5-6 (Maturation Phase): Transition to a standard deep-watering schedule. Apply approximately 1 to 1.5 inches of water per week, divided into two heavy watering sessions. This trains the turf to become drought-tolerant by forcing roots to seek moisture deep in the soil profile.
Long-Term Landscaping Integration
Once your lawn has recovered and you have completed your first mowing (wait until the new grass reaches 3.5 inches and never remove more than 1/3 of the blade height), you can begin integrating the turf back into your broader landscape design. Consider installing deep, curved garden beds to reduce the total square footage of water-demanding turf. Mulching these beds with 3 inches of hardwood bark will further conserve soil moisture and create a striking visual contrast against your newly revived, emerald-green lawn.
By combining structural grading, aggressive core aeration, and precise overseeding techniques, you are not just planting grass; you are rebuilding the ecological foundation of your outdoor living space. A properly renovated lawn serves as a permeable, cooling, and aesthetically pleasing landscape surface that will withstand the rigors of changing seasons and heavy family use for years to come.

