
Landscaping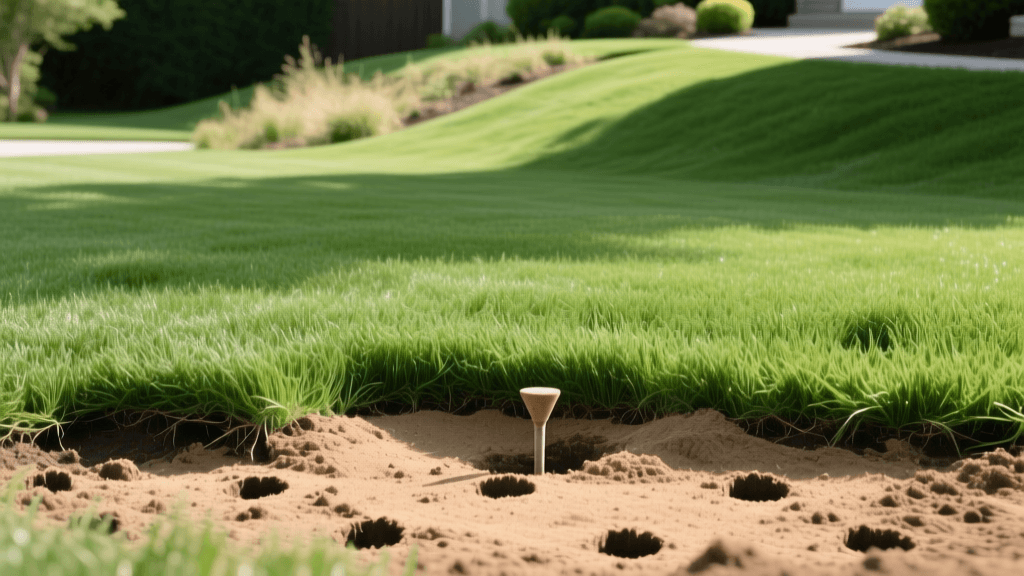
Reviving a Neglected Lawn: Aeration and Overseeding Guide
A beautifully landscaped yard relies on more than just well-placed hardscaping, vibrant garden beds, and pristine mulch rings. The lawn itself serves as the living canvas that ties your entire outdoor living space together. However, years of foot traffic, extreme weather fluctuations, and improper maintenance can leave your turf looking sparse, yellow, and heavily compacted. When a lawn reaches this state of decline, simple fertilization is no longer enough. You must undertake a comprehensive lawn renovation and recovery strategy. In this guide, we will explore the holy trinity of turf recovery: core aeration, compost topdressing, and strategic overseeding. By following these steps, you can transform a neglected, patchy yard into a thick, resilient, and vibrant landscape feature.
Diagnosing the Decline: Why Lawns Fail
Before diving into the physical labor of renovation, it is crucial to understand why lawns deteriorate. In most residential landscapes, the primary culprit is soil compaction. Over time, the weight of foot traffic, lawn mowers, and even heavy rainfall compresses the soil particles, eliminating the microscopic pore spaces that roots need for oxygen, water, and nutrient absorption. According to turfgrass experts at Clemson University Extension, compacted soil severely restricts root growth, making the turf highly susceptible to drought stress, disease, and weed invasion.
Additionally, a thick layer of thatch—a tangled mat of living and dead stems and roots—can form at the soil surface. While a thin layer of thatch (less than half an inch) is beneficial for insulation, excessive thatch acts as a physical barrier, preventing water and fertilizer from reaching the root zone. Renovation begins with breaking these physical barriers.
Step 1: Core Aeration (The Foundation of Recovery)
Core aeration is the mechanical process of removing small plugs of soil and thatch from the lawn. It is vital to distinguish between core aeration and spike aeration. Spike aerators merely punch holes into the ground, which can actually worsen compaction by further compressing the surrounding soil. Core aerators, however, extract actual cores (plugs) of earth, typically 2 to 3 inches deep and 0.5 to 0.75 inches in diameter.
Timing and Execution
The optimal time for core aeration depends on your grass type. Cool-season grasses (like Kentucky Bluegrass and Tall Fescue) should be aerated in early fall, while warm-season grasses (like Bermuda and Zoysia) benefit most from late spring to early summer aeration.
- Prep the Lawn: Mow the grass slightly shorter than usual and water the lawn deeply 24 hours before aerating to soften the soil.
- Mark Utilities: Always mark sprinkler heads and shallow utility lines to avoid costly damage.
- Passes: Run the core aerator over the lawn in two perpendicular directions (e.g., north-south, then east-west) to ensure maximum hole density. Aim for 20 to 40 holes per square foot.
- Leave the Plugs: Allow the extracted soil cores to dry on the surface. They will break apart naturally over the next few weeks, depositing beneficial soil microbes back onto the thatch layer to accelerate decomposition.
Step 2: Topdressing with Organic Matter
Once the aeration holes are open, you have a prime opportunity to amend the soil structure directly at the root zone. Topdressing involves spreading a thin layer of organic matter—specifically screened, high-quality compost—over the lawn. The University of Minnesota Extension highlights that incorporating organic matter improves soil water retention, enhances microbial activity, and provides a slow-release source of essential nutrients.
Application Rates and Techniques
Apply a layer of compost approximately 1/4 to 1/2 inch thick across the entire lawn. Use a landscape rake or a push broom to vigorously work the compost down into the aeration holes. The goal is to fill the voids left by the aerator with rich organic material, creating a hospitable environment for new roots and germinating seeds. If your soil is heavily clay-based, the compost will help break up the dense texture, improving drainage and aeration naturally over time.
Step 3: Selecting the Right Seed and Overseeding
Overseeding is the process of planting new grass seed directly into the existing turf without tearing up the soil. This introduces new, vigorous grass varieties that can outcompete weeds and fill in bare patches. When selecting seed, always invest in premium, weed-free blends suited to your specific microclimate and sun exposure. Avoid cheap contractor mixes, which often contain high percentages of annual ryegrass or agricultural weed seeds.
Seed Application Rates and Timing
Use a broadcast spreader or a drop spreader to apply the seed evenly. For severely damaged lawns, consider renting a slit-seeder (also known as a power overseeder), which cuts shallow grooves into the soil and drops the seed directly into the furrows, ensuring optimal seed-to-soil contact.
| Grass Type | Seed Rate (lbs / 1,000 sq ft) | Germination Time (Days) | Best Renovation Season |
|---|---|---|---|
| Tall Fescue | 6.0 - 8.0 | 7 - 14 | Early Fall |
| Kentucky Bluegrass | 2.0 - 3.0 | 14 - 28 | Early Fall |
| Perennial Ryegrass | 4.0 - 6.0 | 5 - 10 | Early Fall / Spring |
| Bermudagrass | 1.0 - 2.0 (Hulled) | 10 - 14 | Late Spring / Early Summer |
| Zoysiagrass | 2.0 - 3.0 | 14 - 21 | Late Spring / Early Summer |
Step 4: The Germination Watering Protocol
The success of your overseeding effort hinges entirely on your watering protocol. Grass seed must remain consistently moist to germinate; if the seed dries out even once during the initial sprouting phase, the delicate new root will die.
Watering Schedule for the First 21 Days
- Weeks 1 and 2: Water lightly 2 to 4 times per day. The goal is not to soak the soil deeply, but to keep the top inch of soil and the seed constantly damp. Use a fine mist sprinkler setting to avoid washing the seeds away or creating puddles.
- Week 3: As the grass begins to sprout and reach an inch in height, reduce the frequency to once per day, but increase the duration to encourage deeper root growth.
- Week 4 and Beyond: Transition back to your standard landscaping irrigation schedule—typically deep, infrequent watering (about 1 to 1.5 inches per week) to promote drought-tolerant, deep-rooted turf.
Step 5: First Mowing and Fertilization
Patience is required when it comes to the first mow after a renovation. Wait until the new grass reaches a height of 3.5 to 4 inches before mowing. Ensure your mower blades are freshly sharpened; dull blades will tear the delicate new seedlings right out of the ground. Set your mower deck high (around 3 inches) and only remove the top third of the grass blade.
Regarding fertilization, apply a high-phosphorus starter fertilizer at the time of overseeding to promote rapid root development. According to landscape and turf science guidelines from Penn State Extension, a starter fertilizer with an N-P-K ratio similar to 10-18-10 provides the necessary phosphorus to establish strong root systems in newly germinated seeds. Wait to apply broadleaf weed control or pre-emergent herbicides until you have mowed the new grass at least three times, as these chemicals can severely stunt or kill young grass seedlings.
Integrating Recovery into Your Broader Landscape
Lawn renovation does not happen in a vacuum. As your turf recovers, take the opportunity to evaluate the surrounding landscape beds and hardscaping. Ensure that sprinkler heads are properly adjusted so they are not wasting water on patios or driveways, and that garden bed edging is deep enough to prevent aggressive turfgrass from invading your mulch and ornamental plants. A thick, healthy lawn acts as a natural filter for runoff, protecting local waterways and reducing the heat-island effect around your home. By investing the time and labor into core aeration, topdressing, and overseeding, you are not just fixing a patchy yard—you are restoring a vital, functional component of your home's exterior landscaping ecosystem.

