
Lawn Care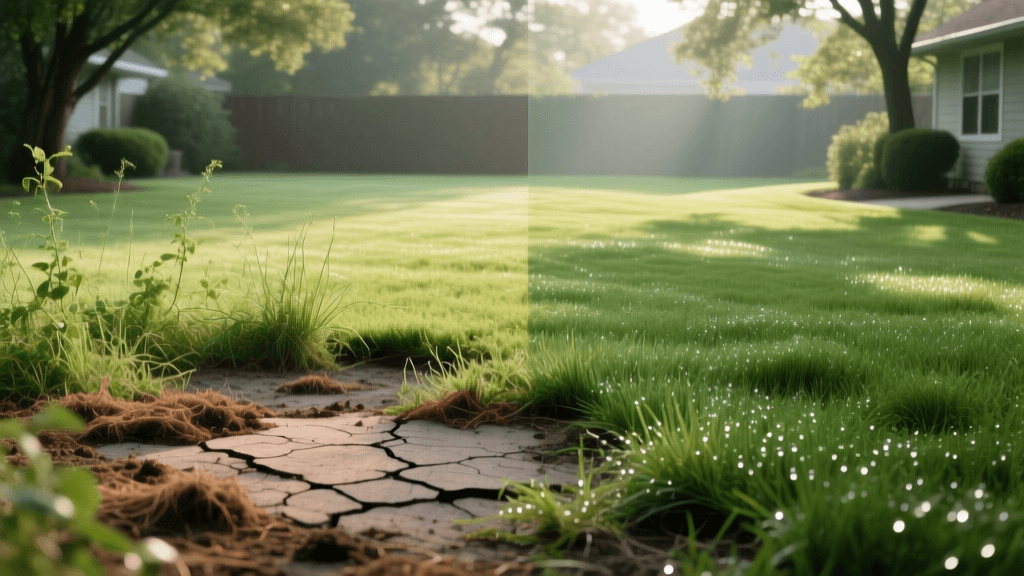
Reviving a Neglected Lawn: A 90-Day Before and After Guide
The 'Before' State: Assessing a Neglected Lawn
Every dramatic lawn transformation begins with an honest assessment of the 'before' state. If you are reading this, your yard likely suffers from a combination of severe compaction, aggressive broadleaf weeds, invasive grassy weeds like crabgrass, and large bare patches where soil erosion has taken hold. A neglected lawn is not just an eyesore; it is a symptom of underlying soil distress and poor cultural practices. The soil is often so hard that a standard screwdriver cannot penetrate more than an inch, preventing water and nutrients from reaching the root zone.
Transforming this barren, weedy landscape into a lush, carpet-like oasis is entirely possible, but it requires patience, strategic planning, and a commitment to a structured timeline. This 90-day before and after renovation guide will walk you through the exact steps, products, and schedules needed to completely overhaul your turf. According to turfgrass experts at the University of Minnesota Extension, a complete lawn renovation is often more cost-effective and yields better long-term results than continually trying to patch a lawn that is beyond saving.
Phase 1: Eradication and Soil Testing (Days 1–14)
You cannot build a healthy new lawn on top of a foundation of weeds and diseased turf. The first two weeks are dedicated to clearing the slate and understanding your soil's chemical makeup.
Step 1: Comprehensive Soil Testing
Before applying any chemicals or seeds, you must know what your soil lacks. Purchase a mail-in soil test kit from your local university extension office or a reputable private lab like Logan Labs. You are testing for pH, phosphorus, potassium, and organic matter content. Ideal turfgrass thrives in a pH range of 6.0 to 7.0. If your pH is below 6.0, you will need to plan for pelletized lime applications; if it is above 7.5, elemental sulfur may be required.
Step 2: Total Vegetation Eradication
To achieve a true 'after' transformation, the existing weedy grass must be eliminated. You have two primary options:
- Chemical Eradication: Apply a non-selective systemic herbicide containing glyphosate. This will kill all existing vegetation, roots included, within 7 to 14 days. Ensure you apply on a calm, dry day to prevent drift to desirable garden beds.
- Solarization: For an organic approach, mow the existing lawn as short as possible, water it deeply, and cover the entire area with clear, UV-stabilized plastic sheeting for 4 to 6 weeks during the hottest months. This uses the sun's heat to cook weeds and weed seeds in the top layer of soil.
Once the existing lawn is completely brown and dead, use a heavy-duty rake to remove the thick layer of dead thatch and debris, exposing the bare soil beneath.
Phase 2: Soil Preparation and Amendment (Days 15–30)
The secret to a stunning 'after' photo lies entirely in the soil preparation. Grass roots need oxygen, water, and loose soil to expand.
Core Aeration vs. Rototilling
If your soil is heavily compacted clay, renting a walk-behind core aerator is essential. Core aeration pulls 2-to-3-inch plugs of soil out of the ground, relieving compaction and creating channels for amendments. For a complete tear-down renovation, however, rototilling the top 4 to 6 inches of soil is superior. Tilling breaks up hardpan layers and allows you to incorporate organic matter deeply into the soil profile.
Topdressing with Organic Matter
Once tilled or aerated, spread a 1/2-inch layer of high-quality, screened compost or peat moss over the entire area. Use a landscaping rake to level the ground, ensuring you create a slight slope away from your home's foundation to promote proper drainage. This organic matter will act as a sponge, retaining moisture and feeding the beneficial microbes necessary for a thriving lawn ecosystem.
Phase 3: Seeding and Germination (Days 31–45)
With a clean, level, and nutrient-rich seedbed prepared, it is time to introduce your new turf. Timing is critical: cool-season grasses (Tall Fescue, Kentucky Bluegrass) should be seeded in early fall, while warm-season grasses (Bermuda, Zoysia) are best seeded in late spring or early summer.
Selecting the Right Seed and Fertilizer
Invest in premium, weed-free seed. For high-traffic, drought-prone areas, a Turf-Type Tall Fescue blend (such as Jonathan Green Black Beauty Ultra) offers deep roots and excellent disease resistance. Apply the seed using a broadcast spreader at the exact rate recommended on the bag—typically 6 to 8 pounds per 1,000 square feet for new Tall Fescue lawns.
Immediately after seeding, apply a high-quality starter fertilizer. Starter fertilizers are rich in phosphorus, which is vital for rapid root development. A product like Scotts Turf Builder Starter Food for New Grass (24-25-4) provides the immediate nutrients germinating seeds require.
According to the NC State TurfFiles database, proper seed-to-soil contact is the single most critical factor in successful lawn renovation, increasing germination rates by up to 40%. Always drag a piece of chain-link fence or a lawn roller over the seeded area to press the seed firmly into the soil.
Phase 4: Establishment and the First Mow (Days 46–90)
The transition from bare dirt to a lush carpet requires meticulous moisture management and patience.
The Watering Schedule
For the first 21 days, the seedbed must never dry out. Water the lawn lightly 3 to 4 times a day for 10 to 15 minutes per zone. Once the grass reaches 1.5 inches in height and you notice the roots anchoring into the soil, transition to watering once a day for 20 minutes. By Day 60, you should be watering deeply just twice a week, applying about 1 inch of water per session to encourage deep, drought-resistant root growth. Proper irrigation is vital; the EPA WaterSense program recommends watering deeply and infrequently once the lawn is established to encourage deep root growth and drought tolerance.
The First Mow and Weed Prevention
Wait until the new grass reaches roughly 4 inches tall before executing the first mow. Ensure your mower blades are freshly sharpened to prevent tearing the tender young grass. Follow the '1/3 Rule': never remove more than one-third of the grass blade in a single mowing. For Tall Fescue, set your mower deck to 3.5 inches. Leaving the grass tall shades the soil, naturally suppressing new weed seeds from germinating.
90-Day Lawn Renovation Cost and Timeline Breakdown
Budgeting for a lawn transformation requires understanding the costs associated with each phase. Below is a detailed breakdown of the 90-day renovation process, including estimated costs per 1,000 square feet. Prices will vary based on your region and whether you choose to rent equipment or hire professionals.
| Phase | Timeframe | Key Actions | Est. Cost (per 1,000 sq ft) |
|---|---|---|---|
| Assessment & Eradication | Days 1–14 | Soil testing, non-selective herbicide application, debris removal | $15 – $30 |
| Soil Prep & Aeration | Days 15–30 | Core aeration or rototilling, compost topdressing, grading | $50 – $120 |
| Seeding & Fertilizing | Days 31–45 | Premium seed application, starter fertilizer, seed-to-soil contact | $40 – $90 |
| Establishment & Mowing | Days 46–90 | Transitioning to deep watering, first mow, spot-treating weeds | $20 – $50 (Water/Blades) |
Total Estimated DIY Cost: $125 to $290 per 1,000 square feet. For an average 5,000 square foot lawn, a complete DIY renovation will cost between $625 and $1,450, a fraction of the cost of hiring a professional landscaping crew to install sod.
The 'After' Reveal: Maintaining Your New Oasis
By Day 90, the transformation is complete. The 'before' image of cracked dirt, dandelions, and thin, yellowing grass has been replaced by a dense, vibrant, and resilient carpet of green. The deep root system you cultivated through proper soil amendment and deep watering practices means your new lawn will require less water and naturally outcompete most weeds.
To maintain this stunning 'after' state, commit to an ongoing seasonal maintenance routine. This includes annual fall aeration, regular soil testing every two to three years, and applying a pre-emergent herbicide in early spring to stop crabgrass before it starts. Your 90-day investment of sweat equity has not only increased your home's curb appeal but has created a healthy, living ecosystem right in your backyard.

