
Landscaping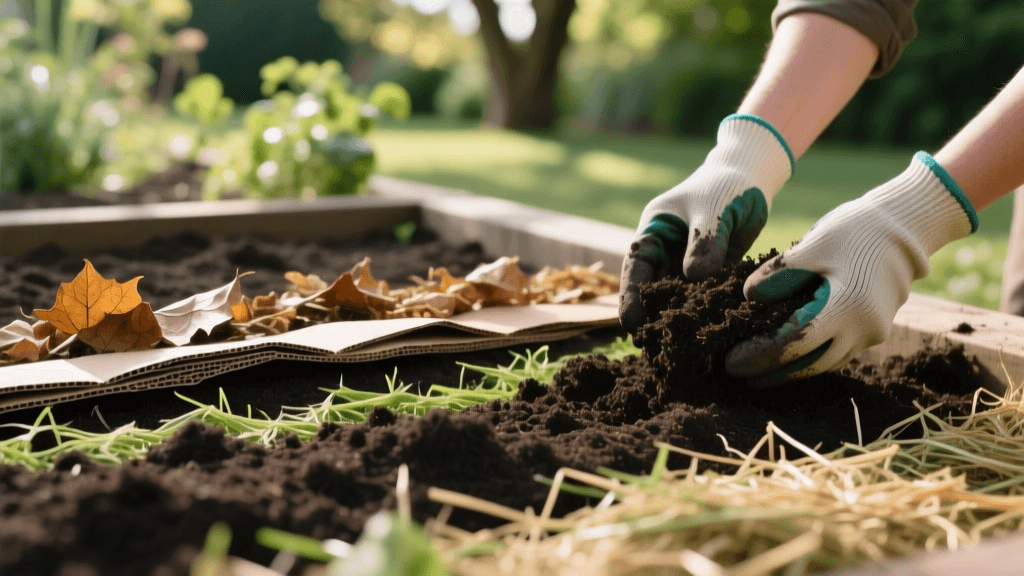
Sheet Mulching: Transform Landscape Beds With Compost
The Hidden Cost of Traditional Landscape Bed Preparation
When homeowners and landscape contractors set out to build new garden beds or renovate existing yard spaces, the default instinct is often to fire up a rototiller. Tilling the soil and mixing in a few bags of store-bought topsoil feels like productive work. However, from a soil health and sustainable landscaping perspective, aggressive tilling can actually cause long-term damage to your landscape's foundation. Tilling destroys the delicate soil food web, severs beneficial mycorrhizal fungal networks, and brings dormant weed seeds to the surface where they are exposed to sunlight and germinate.
Furthermore, tilling compacted clay or poor subsoil without addressing the underlying organic matter deficit often results in a hardpan layer just below the tilled depth. This restricts drainage, limits root growth for your new shrubs and perennials, and creates a landscape bed that requires constant chemical intervention and supplemental watering. Fortunately, there is a highly effective, ecologically sound alternative that builds soil health while suppressing weeds: sheet mulching with compost.
What is Sheet Mulching?
Sheet mulching, often referred to as 'lasagna gardening' or 'lasagna composting,' is a no-till landscaping technique that mimics the natural process of leaf litter decomposition found in forest ecosystems. Instead of removing existing sod or weeds and turning the soil, you smother the existing vegetation with a biodegradable barrier (usually corrugated cardboard) and layer it with thick applications of compost and organic mulch.
Over time, earthworms, beneficial nematodes, and soil microbes break down the cardboard and pull the organic matter from the compost and mulch layers down into the native soil. The result is a deeply aerated, nutrient-rich, and moisture-retentive landscape bed that requires minimal weeding and virtually no synthetic fertilizers.
Materials and Cost Breakdown for Sheet Mulching
One of the greatest advantages of sheet mulching for landscape renovations is its cost-effectiveness. Because you are not paying for heavy machinery to remove sod or haul away dirt, the primary costs are limited to organic amendments. Below is a breakdown of the materials needed for a standard 100-square-foot landscape bed renovation.
| Material | Estimated Cost | Primary Purpose | Application Depth |
|---|---|---|---|
| Corrugated Cardboard | Free (sourced locally) | Weed suppression, initial carbon source | 1-2 layers (overlapped by 6 inches) |
| Bulk Organic Compost | $30 - $45 per cubic yard | Nutrient density, microbial inoculation | 2 to 4 inches |
| Arborist Wood Chips | Free to $25 per yard | Moisture retention, long-term carbon | 3 to 4 inches |
| Landscape Edging | $2 - $5 per linear foot | Containment, preventing mulch spread | N/A |
| Soaker Hose / Drip Line | $30 - $50 | Deep watering to initiate decomposition | N/A |
Step-by-Step Guide to Sheet Mulching Your Landscape
Step 1: Site Preparation and Edging
Begin by mowing the existing grass or weeds in the designated landscape bed area as low as your mower will allow. Do not bag the clippings; leave them on the soil surface to act as an initial nitrogen-rich green compost layer. Next, install your physical landscape edging (such as steel, aluminum, or deep plastic bender board). This step is crucial because it creates a clean boundary between your new mulched bed and the surrounding lawn or hardscaping, preventing the wood chips from migrating into your turfgrass.
Step 2: Laying the Biodegradable Weed Barrier
Collect plain, uncoated corrugated cardboard. Remove all plastic tape, staples, and glossy labels, as these will not decompose and can introduce microplastics into your soil. Wet the cardboard thoroughly with a garden hose before or immediately after laying it down. Overlap the edges of the cardboard pieces by at least 6 to 8 inches to prevent aggressive weeds like bindweed or bermudagrass from finding a gap and pushing through. The wet cardboard will immediately begin to conform to the soil contours and attract earthworms.
Step 3: Applying the Compost Layer
This is the engine of your new landscape bed. Apply a 2 to 4-inch layer of high-quality, screened organic compost directly over the wet cardboard. When sourcing compost, look for products that are OMRI-listed (Organic Materials Review Institute) or locally produced from composted leaf litter and yard waste. Avoid composts heavily reliant on biosolids or untested municipal waste if you are integrating edible landscaping elements into your design. The compost layer provides the immediate nitrogen source required to fuel the microbial breakdown of the carbon-heavy cardboard below.
Step 4: Topping with Wood Chip Mulch
Finish the bed by applying a 3 to 4-inch layer of coarse arborist wood chips over the compost. Arborist chips are superior to dyed, bagged bark mulches because they contain a diverse mix of wood, bark, and green leaves, providing a broader spectrum of nutrients and fostering a more robust fungal network. Keep the wood chips a few inches away from the base of any existing tree trunks or structural foundations to prevent rot and pest harborage.
The Science of Soil Health and Composting
The sheet mulching method is deeply rooted in modern soil science. According to the Environmental Protection Agency (EPA), composting enriches soil, helping retain moisture and reducing the need for chemical fertilizers, while also promoting a healthier soil microbiome. By keeping the soil covered and undisturbed, you create an ideal environment for mycorrhizal fungi to establish symbiotic relationships with the roots of your landscape plants.
The USDA Natural Resources Conservation Service (NRCS) emphasizes that minimizing soil disturbance (no-till) and keeping the soil covered are fundamental principles of soil health. When you till, you introduce excess oxygen that causes a rapid burn-off of existing soil organic matter. Sheet mulching preserves the native soil structure while slowly feeding it from the top down, exactly as nature intended. As noted by the United States Department of Agriculture (USDA), healthy soils are critical for sustaining plant life, filtering water, and supporting the broader ecosystem, making this technique a cornerstone of sustainable landscape architecture.
How to Plant in a Sheet Mulched Bed
A common misconception is that you must wait six to twelve months for the cardboard to decompose before planting. While waiting a season allows the bed to settle and the compost to fully integrate, you can plant immediately if necessary. To plant trees, shrubs, or large perennials, simply use a utility knife to cut an 'X' through the wet cardboard. Dig your planting hole into the native soil, place the plant, and backfill with a mix of native soil and compost. Pull the cardboard flaps back around the base of the plant, and cover the root ball with your compost and wood chip layers. This method allows you to install a full landscape design on day one while the surrounding soil continues to regenerate.
Long-Term Maintenance and Top-Dressing
Once your sheet mulched landscape bed is established, maintenance is remarkably low. The thick layer of wood chips and compost will suppress the vast majority of weed seeds, reducing your weeding time by up to 80 percent. Every spring or fall, simply 'top-dress' the bed by adding an additional 1 to 2 inches of fresh compost and a light layer of new wood chips to replace what the soil biology has consumed. Over the course of three to five years, the heavy clay or poor subsoil beneath the bed will be entirely transformed into dark, friable, loamy topsoil teeming with life, ensuring your landscape thrives for decades to come.

