
Landscaping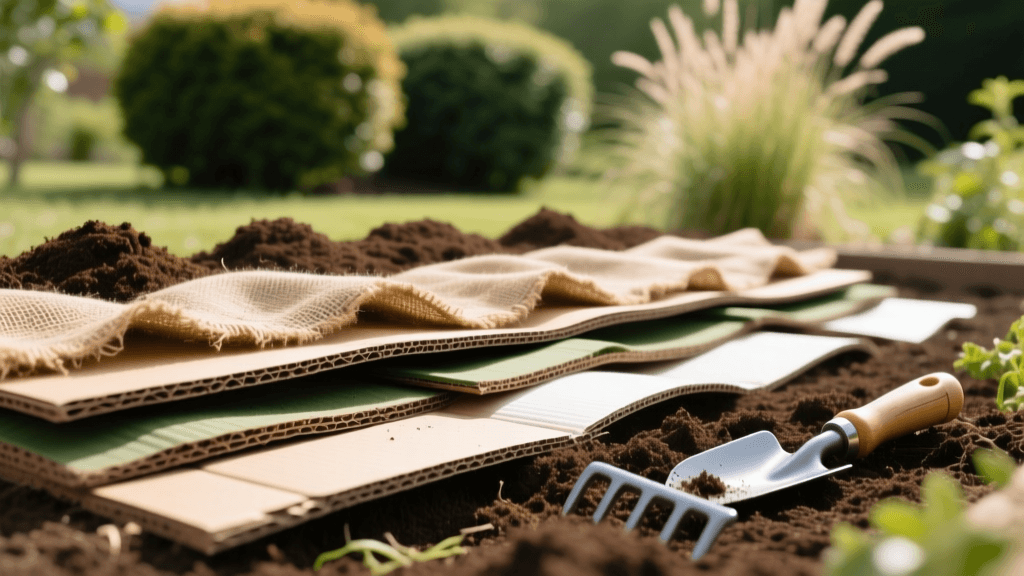
Sheet Mulching Guide: Build Rich Soil for Garden Beds
The Intersection of Landscaping and Soil Health
Landscaping is frequently treated as a purely visual endeavor, with homeowners and designers focusing heavily on hardscaping, plant aesthetics, and curb appeal. However, the true foundation of any thriving outdoor living space or garden bed lies hidden beneath the surface. Soil health is the critical, often overlooked component that dictates plant vitality, drainage efficiency, and long-term landscape sustainability. When establishing new landscape beds, traditional methods often involve aggressive rototilling, which destroys the delicate soil food web, brings dormant weed seeds to the surface, and accelerates the oxidation of organic matter.
Enter sheet mulching, a sustainable landscaping technique often referred to as 'lasagna composting.' This no-till method mimics the natural decomposition processes found in forest ecosystems, allowing you to build rich, biologically active soil directly in place. By layering carbon-rich and nitrogen-rich organic materials over existing turf or compacted soil, you can simultaneously suppress weeds, improve drainage, and create a highly fertile planting medium without ever turning a shovel of dirt.
The Science of In-Situ Composting and Soil Biology
Sheet mulching relies on the same biological principles as traditional composting, but it occurs in-situ (directly on the landscape bed). The process leverages the activity of earthworms, fungi, and bacteria to break down organic layers, pulling nutrients deep into the subsoil while exuding beneficial microbial compounds that improve soil structure. According to the Environmental Protection Agency's composting guidelines, maintaining a proper balance of carbon (browns) and nitrogen (greens) is essential for efficient decomposition and odor prevention. In a landscape setting, this means carefully alternating layers of dry leaves, straw, or wood chips with fresh grass clippings, vegetable scraps, or manure.
The benefits of this approach extend far beyond simple weed control. Sheet mulching increases the soil's water-holding capacity, reduces erosion on sloped landscape berms, and sequesters carbon. Furthermore, the USDA Soil Health portal outlines four core principles of soil health: keep the soil covered, minimize soil disturbance, maximize biodiversity, and maintain living roots. Sheet mulching perfectly satisfies the first two principles during the bed preparation phase, setting the stage for a resilient, low-maintenance landscape.
Essential Materials and Cost Breakdown
One of the most significant advantages of sheet mulching is its cost-effectiveness. Many of the required materials can be sourced for free from local municipal waste centers, coffee shops, or your own yard waste. Below is a detailed breakdown of the materials needed to build a 100-square-foot landscape bed, including estimated costs if you need to purchase supplemental amendments.
| Material | Purpose in Soil Health | Volume (per 100 sq ft) | Estimated Cost |
|---|---|---|---|
| Corrugated Cardboard | Weed suppression, initial carbon base | 120 sq ft (includes overlap) | $0 (Recycled) |
| Green Organic Matter | Nitrogen source, microbial food | 3-4 cubic feet | $0 - $15 |
| Brown Organic Matter | Carbon source, aeration, structure | 10-12 cubic feet | $0 - $30 |
| Finished Compost | Planting layer, immediate nutrients | 3 cubic feet | $15 - $25 |
| Arborist Wood Chips | Top mulch, moisture retention | 4 cubic feet | $0 - $20 |
Step-by-Step Implementation Guide
Building a sheet mulched landscape bed requires careful layering and adequate moisture. Follow these precise steps to ensure rapid decomposition and a plant-ready bed.
Step 1: Site Preparation and Mowing
Do not till or dig up the existing grass or weeds. Instead, mow the area as short as your mower will allow. This flattens the vegetation, making it easier to lay down the cardboard barrier and accelerating the breakdown process by reducing the volume of tough, woody stems. If the soil is severely compacted, use a broadfork to gently aerate the subsoil without turning it, which preserves the existing fungal networks.
Step 2: The Nitrogen Kickstart
Before laying the cardboard, scatter a nitrogen-rich amendment over the mowed grass to speed up the decomposition of the carbon-heavy layers above it. Apply approximately 2 pounds of blood meal, alfalfa meal, or fresh grass clippings per 100 square feet. Water the area thoroughly with about 10 gallons of water to activate the soil microbes.
Step 3: The Cardboard Barrier
Lay down plain, uncoated corrugated cardboard. Remove all plastic tape and staples. Overlap the edges of the cardboard by at least 6 inches to prevent aggressive weeds like bindweed or bermudagrass from finding a seam and pushing through. Once the cardboard is in place, wet it down heavily until it is completely saturated and conforms to the shape of the ground.
Step 4: Layering the Lasagna
Now, begin alternating your brown (carbon) and green (nitrogen) layers. Start with a 4-inch layer of brown material (shredded fall leaves, straw, or pine needles), followed by a 1-inch layer of green material (composted manure, coffee grounds, or fresh yard waste). Repeat this process until your pile is 18 to 24 inches high. While this may seem excessively tall, the organic matter will compress and decompose, shrinking down to a rich 6 to 8-inch layer of topsoil over the next six months.
Step 5: The Planting Cap and Mulch
Finish the bed with a 2 to 3-inch layer of high-quality, finished compost or topsoil. This provides an immediate, stable medium for shallow-rooted annuals or cover crops. Finally, cap the entire bed with 2 to 3 inches of coarse arborist wood chips to protect the compost from UV degradation and retain moisture.
Timing: The Importance of Seasonal Cycles
The timing of your sheet mulching project is critical to its success. The absolute best time to build a lasagna compost bed is in the autumn. By constructing the bed in October or November, you allow the winter rains, snowmelt, and freeze-thaw cycles to naturally compress the layers and encourage deep earthworm activity. By the time spring planting arrives, the cardboard will have completely decomposed, and the layers will have integrated into a dark, friable loam.
If you must build a bed in the spring, you will need to rely more heavily on finished compost for your top planting layer, as the underlying lasagna layers will still be in the active, heat-generating stages of decomposition. Planting deep-rooted perennials or trees directly into actively composting layers can lead to root burn or nitrogen tie-up, where soil microbes consume all available nitrogen to break down the carbon, starving your new plants.
Common Landscaping Mistakes to Avoid
- Using Glossy or Waxed Cardboard: Never use cardboard with heavy color printing, glossy finishes, or wax coatings. These materials contain heavy metals, microplastics, and petrochemicals that will leach into your soil and harm the soil food web.
- Skipping the Watering Step: Microbes and earthworms require moisture to travel and break down organic matter. If you build a dry sheet mulch bed, the decomposition process will stall, and the cardboard may act as a hydrophobic barrier, preventing rain from reaching the subsoil.
- Ignoring the Carbon-to-Nitrogen Ratio: Piling on too much green material (like fresh manure or thick layers of grass clippings) without adequate brown material will result in an anaerobic, foul-smelling sludge rather than rich soil. Always maintain a ratio of roughly 3 parts brown to 1 part green by volume.
Long-Term Soil Health and Maintenance
Once your sheet mulched bed is established and planted, the focus shifts to long-term soil maintenance. The Food and Agriculture Organization (FAO) soils portal highlights the importance of maintaining continuous soil cover and promoting biological diversity to prevent degradation. In a landscape setting, this means adopting a 'chop and drop' mulching technique, where spent plant material and pruned branches are cut into small pieces and left on the soil surface to decompose naturally.
Avoid the temptation to use synthetic, water-soluble fertilizers, which can disrupt the symbiotic relationships between plant roots and mycorrhizal fungi. Instead, top-dress your landscape beds annually with a half-inch layer of finished compost and replenish the wood chip mulch as it breaks down. By treating your landscape beds as living, breathing ecosystems rather than static decorative elements, you will cultivate a resilient outdoor space that requires less water, fewer amendments, and minimal weeding year after year.

