
Landscaping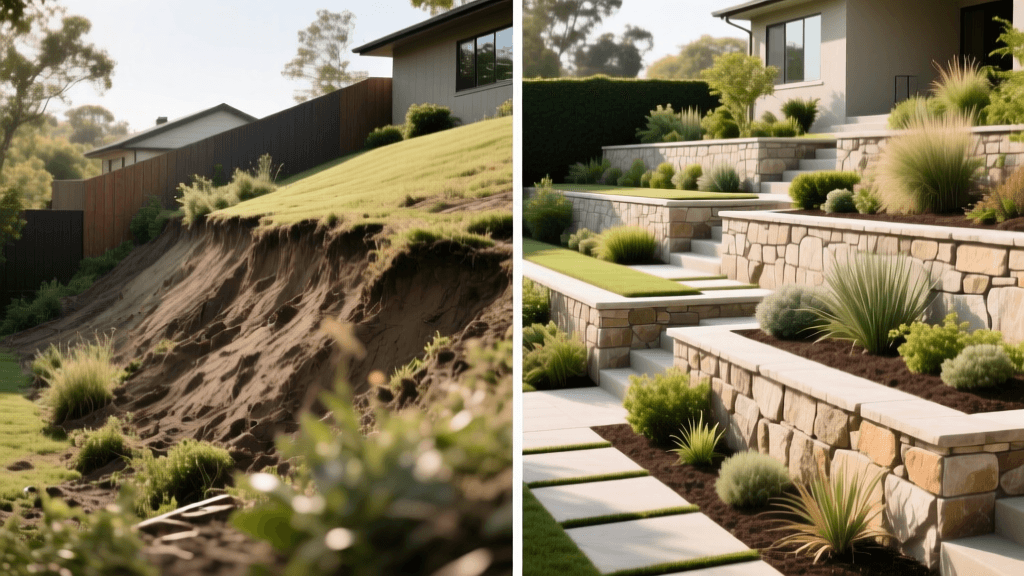
Before & After: Sloped Yard Retaining Wall Transformation
The Challenge: Assessing the 'Before' State of a Steep Slope
Landscape transformations are rarely as dramatic, functional, or structurally necessary as conquering a steep, erosion-prone backyard. When we first evaluated the property in question, the homeowners were dealing with a 40-foot wide, 12-foot high slope that was essentially a muddy slip-and-fall hazard. The 'before' state of this yard was a textbook example of poor grading and unchecked water runoff. Every heavy rainstorm washed valuable topsoil toward the home's foundation, creating a perpetual muddy mess at the base of the slope and threatening the structural integrity of the house.
The existing grass was patchy and failing to establish a deep root system, largely due to the heavy clay soil composition and the sheer angle of the incline. Mowing was dangerous, and the space was entirely unusable for outdoor recreation or entertainment. The homeowners wanted a flat, functional backyard, but a single 12-foot retaining wall would have been an engineering nightmare, requiring massive concrete footings, extensive permits, and resulting in an imposing, unnatural barrier. The solution? A three-tiered segmental retaining wall (SRW) system that would break up the elevation change, manage hydrostatic pressure, and create beautiful, usable terraced garden beds.
The Master Plan: Designing a Tiered Retaining Wall System
The design phase focused on dividing the 12-foot vertical drop into three separate 4-foot high retaining walls, spaced approximately 5 feet apart horizontally. This terraced approach not only distributes the lateral earth pressure more safely but also creates three distinct planting zones. By stepping the walls back, we effectively turned a hazardous slope into a cascading garden that invites the eye upward while providing flat surfaces for both plant roots and human foot traffic.
Material Selection: Comparing Hardscape Options
Choosing the right material was critical for the longevity and aesthetic of the transformation. We evaluated three primary options before settling on concrete segmental retaining wall blocks.
| Material | Estimated Lifespan | Cost per Sq. Ft. | Pros | Cons |
|---|---|---|---|---|
| Pressure-Treated Timber | 15-20 Years | $15 - $25 | Lower upfront cost, natural look. | Prone to rot, warping, and termite damage over time. |
| Natural Stone (Mortared) | 50+ Years | $30 - $50+ | Timeless aesthetic, extremely durable. | Requires specialized masonry skills, expensive, poor drainage if not engineered perfectly. |
| Concrete SRW Blocks | 50+ Years | $20 - $35 | Interlocking design, built-in drainage, DIY-friendly, uniform. | Heavier to transport, manufactured look (though modern textures mimic stone well). |
We selected a high-density concrete SRW block with a split-face stone texture in a slate gray color. According to the National Concrete Masonry Association (NCMA), SRW systems are the industry standard for residential retaining walls because their flexibility, permeability, and interlocking pin systems accommodate minor soil shifts without cracking.
The Execution: Step-by-Step Transformation
Step 1: Excavation and Base Preparation
The success of any retaining wall lies entirely beneath the surface. We began by excavating a trench for the base course of the lowest wall. The trench was dug 8 inches deep and 24 inches wide to accommodate the block depth plus working space. Because the native soil was heavy clay, we removed an additional 4 inches of clay and replaced it with a geotextile fabric to prevent the clay from migrating into our drainage gravel.
We then filled the trench with 6 inches of 3/4-inch crushed angular gravel. Angular gravel is non-negotiable here; unlike smooth river rock, the sharp edges of crushed stone lock together when compacted with a mechanical plate compactor, creating a rigid, frost-resistant foundation that will not shift or wash away.
Step 2: Block Installation and Geogrid Reinforcement
The first course of blocks was laid directly onto the compacted gravel base. Using a 4-foot carpenter's level and a rubber mallet, we ensured every single block was perfectly level both front-to-back and side-to-side. A flawed first course guarantees a flawed wall. Subsequent courses were stacked using the manufacturer's fiberglass connecting pins, stepping back slightly with each layer to create a 'batter' angle that leans into the retained soil.
For the second and third tiers, we incorporated layers of biaxial geogrid. This synthetic mesh material is laid between the block courses and extended 4 feet back into the soil bank. When the backfill soil is compacted over the geogrid, it essentially ties the wall to the earth behind it, turning the soil mass and the wall into a single, cohesive, gravity-defying structure.
Step 3: Implementing Crucial Drainage Solutions
Water is the number one enemy of retaining walls. Hydrostatic pressure—the force exerted by water trapped in the soil behind the wall—can easily push a poorly drained wall outward, causing it to bulge or collapse. To combat this, we installed a 4-inch perforated PVC drainage pipe wrapped in a protective landscape fabric sock at the base of the wall, directly behind the blocks. This pipe was sloped at a 1/8-inch per foot grade to daylight at the edge of the yard, safely carrying water away from the home's foundation.
Managing stormwater runoff at the source is critical for overall property health. As noted by the Environmental Protection Agency (EPA), integrating green infrastructure and proper drainage solutions prevents localized flooding and protects municipal water systems from being overwhelmed by residential runoff. Behind the wall, we backfilled with 12 inches of clean, washed 57-stone gravel to ensure water could rapidly percolate down to the drain pipe rather than saturating the retained clay soil.
The 'After' Reveal: Planting and Final Hardscaping
The transformation from a muddy hazard to a lush, terraced oasis was finalized with strategic soil amendment and planting. The 5-foot wide terraces between the walls were filled with a blend of high-quality topsoil and organic compost, creating deep, nutrient-rich beds. To further stabilize the soil and enhance the landscape's ecology, we selected deep-rooted native plants.
The American Society of Landscape Architects (ASLA) strongly emphasizes the use of native, deep-rooted plants in sustainable site design. Native species like Switchgrass (Panicum virgatum), Purple Coneflower (Echinacea purpurea), and Black-Eyed Susans (Rudbeckia hirta) were planted densely across the terraces. Their extensive root systems act as a secondary, biological retaining net, holding the topsoil in place while requiring a fraction of the water and maintenance of traditional turfgrass. We also integrated low-voltage LED uplighting at the base of the walls to highlight the stone textures and improve nighttime safety along the new terraced pathways.
Project Breakdown: Costs, Timeline, and ROI
A project of this scale requires a realistic budget and timeline. The entire transformation took a professional crew of three landscapers approximately eight full days to complete, from initial excavation to final mulching. Below is a detailed breakdown of the costs associated with this 40-foot wide, three-tiered transformation.
| Project Phase / Material | Estimated Cost | Notes |
|---|---|---|
| Excavation & Soil Removal | $1,800 | Includes skid-steer rental and dump fees for clay removal. |
| Base & Drainage Gravel | $1,200 | Approx. 15 tons of 3/4-inch crushed stone and washed 57-stone. |
| SRW Blocks & Pins | $3,500 | High-density concrete blocks with split-face texture. |
| Geogrid & Drain Pipe | $650 | Biaxial geogrid rolls and 4-inch perforated PVC. |
| Topsoil, Compost & Mulch | $900 | Premium blended garden soil and hardwood mulch. |
| Native Plants & Lighting | $1,400 | Flats of native perennials and LED hardscape lighting kit. |
| Professional Labor | $6,500 | 8 days for a 3-person certified hardscape crew. |
| Total Project Cost | $15,950 | Yields approx. 600 sq. ft. of newly usable, stabilized outdoor space. |
'The difference is night and day. We went from dreading the rain to looking forward to it, knowing our terraced garden is handling the water beautifully while giving us the flat, usable yard we always dreamed of.' — Homeowner, Post-Project Review.
Final Thoughts on Sloped Landscaping
Transforming a steep, unusable slope into a tiered retaining wall garden is one of the most rewarding investments a homeowner can make. It solves critical drainage and erosion issues, protects the home's foundation, and drastically increases both the curb appeal and the functional square footage of the property. By prioritizing a compacted gravel base, rigorous drainage planning, and sustainable native planting, your 'before and after' transformation will not only look spectacular but will stand the test of time against the elements.

