
Smart Composting: Using Wireless Soil Sensors to Perfect Your Pile
The Intersection of Smart Home Tech and Soil Health
Composting is often viewed as a passive backyard chore, a simple matter of tossing kitchen scraps and yard waste into a corner bin and waiting for nature to take its course. However, as homeowners increasingly bridge the gap between indoor smart home ecosystems and outdoor garden management, the concept of 'smart composting' has emerged. By integrating wireless soil sensors into your compost bin, you can monitor the internal temperature and moisture levels of your pile in real-time. This data-driven approach not only accelerates the decomposition process but also ensures that the finished compost is teeming with the beneficial microbes your garden soil needs.
According to the Environmental Protection Agency (EPA), composting enriches soil, helps retain moisture, and suppresses plant diseases and pests. But achieving these benefits requires maintaining a delicate biological balance. In this comprehensive guide, we will explore how to use affordable, Wi-Fi-enabled soil sensors to take the guesswork out of composting, troubleshoot issues before they arise, and ultimately produce premium 'black gold' for your garden beds.
The Biology of the Perfect Compost Pile
Before installing sensors, it is crucial to understand the biological targets you are aiming for. Composting is driven by microorganisms that require three main elements to thrive: carbon (browns), nitrogen (greens), and oxygen, all suspended in an optimal moisture environment.
Temperature Phases
A healthy compost pile goes through distinct temperature phases. The mesophilic phase (70°F to 100°F) is dominated by moderate-temperature bacteria that break down easily degradable compounds. As they work, they generate heat, pushing the pile into the thermophilic phase (110°F to 160°F). This high-temperature stage is critical; it is where thermophilic bacteria break down complex proteins and fats, and where weed seeds and harmful pathogens are destroyed. The Cornell Waste Management Institute emphasizes that maintaining temperatures between 130°F and 150°F for at least three consecutive days is essential for pathogen reduction and optimal breakdown rates.
Moisture and Oxygen
Microbes need water to transport nutrients and facilitate enzymatic reactions. The ideal moisture content for a compost pile is between 40% and 60%. If the pile is too dry, microbial activity halts. If it is too wet, water fills the pore spaces, displacing oxygen and creating anaerobic conditions that lead to foul odors and slow decomposition.
Choosing the Right Wireless Sensors for Composting
To monitor your pile remotely, you need sensors that can transmit data through the thick, dense mass of a compost bin to your home Wi-Fi or Bluetooth network. Here are the top categories of sensors to consider for your smart composting setup:
- Wi-Fi Thermometer/Hygrometer Probes (e.g., Govee or SwitchBot): These devices feature a main display unit that sits outside the bin and a long, waterproof stainless-steel probe that inserts into the compost. They cost between $25 and $45 and connect directly to your home Wi-Fi, allowing you to set push notifications if the temperature drops below your target threshold.
- Wireless Soil Moisture Sensors (e.g., Ecowitt): While standard temperature probes measure heat, dedicated soil moisture sensors measure volumetric water content (VWC). A Wi-Fi-enabled soil moisture sensor gateway with a probe (approx. $35 to $50) can be buried in the outer layers of the compost to ensure the pile isn't drying out.
- Multi-Parameter Smart Soil Probes (e.g., Xiaomi Mi Flora or advanced Ecowitt models): These measure temperature, moisture, light, and soil fertility (EC). While light and fertility are less relevant inside a dark compost bin, the temperature and moisture readings are highly accurate and integrate well with broader smart home hubs like Home Assistant.
Step-by-Step Guide to Building a Smart Compost Bin
Follow these actionable steps to integrate technology into your composting routine.
Step 1: Bin Preparation and Sensor Installation
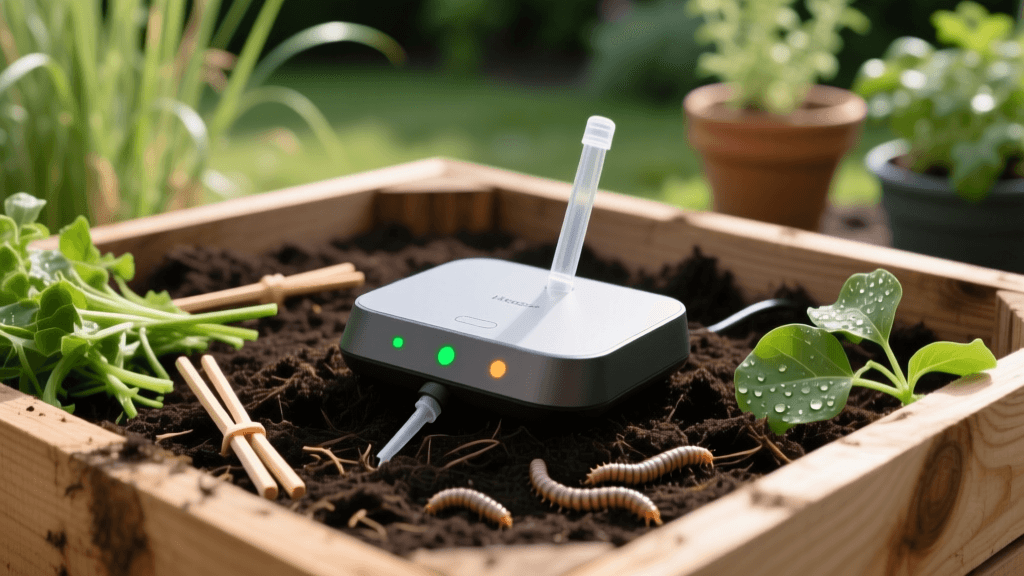
If you are using a solid plastic tumbler or a wooden pallet bin, you will need to create a small access point for your sensor cables. Drill a 1/2-inch hole near the top third of the bin. Feed the stainless-steel temperature probe through the hole, ensuring the tip reaches the exact center of the pile (the thermal core). Seal the gap around the wire with outdoor-grade silicone caulk to prevent pests and excess rain from entering. Mount the main Wi-Fi transmitter unit on the outside of the bin or a nearby fence post, ensuring it is within range of your home Wi-Fi network.
Step 2: Layering for Optimal C:N Ratios
Begin your pile by alternating layers of 'browns' (carbon-rich materials like dried leaves, shredded cardboard, and straw) and 'greens' (nitrogen-rich materials like vegetable scraps, coffee grounds, and fresh grass clippings). Aim for a volume ratio of 3 parts browns to 1 part greens. This roughly achieves the ideal 30:1 Carbon-to-Nitrogen ratio required by microbes.
Step 3: Hydration and App Calibration
As you build the layers, water them lightly. The material should feel like a wrung-out sponge. Open your sensor's companion app on your smartphone and calibrate your alerts. Set a high-temperature alert for 165°F (to remind you to turn the pile and cool it down) and a low-temperature alert for 110°F (indicating the thermophilic phase has ended and it may be time to turn the pile or add more nitrogen).
Smart Compost Monitoring Schedule and Data Table
Tracking your sensor data over time helps you understand the rhythm of your specific compost ecosystem. Below is a reference table for interpreting your smart sensor readings and taking immediate action.
| Sensor Reading | Pile Status | Required Action |
|---|---|---|
| Temp: 70°F - 100°F Moisture: 50% | Mesophilic Phase (Starting up or cooling down) | Wait 48 hours. If it stalls here, add more 'greens' (nitrogen) and water. |
| Temp: 130°F - 155°F Moisture: 45% | Thermophilic Phase (Peak decomposition) | Monitor daily. Do not turn the pile yet; let the heat kill pathogens and weed seeds. |
| Temp: > 165°F Moisture: 35% | Overheating / Drying Out | Turn the pile immediately to introduce oxygen and cool the core. Add water if dry. |
| Temp: < 110°F Moisture: > 70% | Anaerobic / Waterlogged | Turn the pile and mix in dry 'browns' (shredded paper, dry leaves) to absorb excess moisture. |
Troubleshooting Based on App Alerts
One of the greatest advantages of smart composting is receiving push notifications before a problem becomes unmanageable. Here is how to troubleshoot common alerts:
- Alert: Temperature Dropping Prematurely: If your app notifies you that the pile has dropped below 110°F after only a few days, the microbes have likely exhausted the available nitrogen. Top-dress the pile with a nitrogen booster like blood meal, alfalfa meal, or fresh coffee grounds, mix it in, and monitor the app to watch the temperature spike back up within 48 hours.
- Alert: Moisture Levels Below 30%: In arid climates or during summer heatwaves, the outer edges of the pile will dry out, causing the microbial workforce to go dormant. Use a garden hose with a shower nozzle to deeply water the pile while turning it, ensuring the moisture reaches the core. Check your app's moisture sensor readings the next morning to confirm levels have returned to the 45-55% sweet spot.
- Alert: Sustained High Heat (>160°F for 5+ days): While heat is good, excessive heat for prolonged periods can kill off beneficial thermophilic bacteria and lead to the spontaneous combustion of extremely dry, carbon-heavy piles (though rare in small home bins). Turn the pile to release trapped heat and introduce fresh oxygen.
Integrating Smart Compost Data with Smart Irrigation
The benefits of your sensor-optimized compost extend far beyond the bin. When you harvest your finished compost and integrate it into your garden beds, you fundamentally alter the soil's physical properties. According to the University of California Agriculture and Natural Resources, adding high-quality compost to heavy clay or sandy soils significantly increases the soil's water-holding capacity and improves drainage.
This is where your smart home ecosystem truly shines. If you use a smart irrigation controller (like Rachio or B-hyve) connected to your home Wi-Fi, you must adjust your watering schedules after amending your garden beds with fresh compost. Because compost acts like a sponge, retaining up to 20% more water in the root zone, your plants will require less frequent irrigation. Reduce your smart controller's baseline watering times by 15% to 20% in compost-amended zones to prevent overwatering, conserve municipal water, and reduce your utility bills. You can even place your wireless soil moisture sensors directly into the newly amended garden beds to let the smart irrigation system water only when the soil VWC drops below your target threshold.
Harvesting Your Tech-Optimized Black Gold
How do you know when the compost is truly finished? Your smart sensors will tell you. A finished compost pile will no longer generate heat, regardless of how much you turn it or add water. The temperature probe will consistently read within 5 to 10 degrees of the ambient outdoor air temperature. At this point, the material should be dark, crumbly, and smell like rich forest earth.
Sift the finished compost through a 1/4-inch hardware cloth screen to remove any large, undecomposed twigs or avocado pits, and return those chunks to your new compost pile to act as a microbial starter. Apply the finished compost as a 1-inch top dressing on your lawn, or mix it into the top 6 inches of your vegetable garden beds before spring planting. By leveraging wireless soil sensors, you have transformed a traditional, guesswork-heavy chore into a precise, data-driven science, ensuring your garden receives the highest quality soil amendments possible.

